
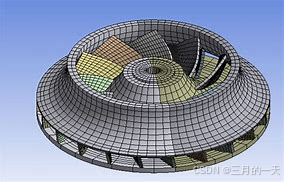
背景:项目里需要对有限元输出的3d模型进行网格绘制。已知有限元输出的单元面索引信息:三个顶点组成的三角形为一个单元面,索引数组中相邻的三个节点为一个单元面。已知顶点信息、顶点坐标信息;项目的其中一个需求是根据以上信息绘制单元面。也即绘制几何表面的网格。这里的网格并不是几何的框线显示,还是显示所有的三角形面。所以仅用three的BufferGeometry创建几何显示为线框是不行的。因此项目的难点:
1.如何绘制三角形
2.绘制三角形需要哪些数据
针对第一个问题:因为有的坐标信息,绘制三角形需要三个边,有了单元面顶点[顶点1,顶点2,顶点3],那么可以得到顶点对应的坐标[坐标1,坐标2,坐标3]。有了坐标,就可以在3D 空间中绘制线段了,依次串联两个顶点,得到三个线段。因此,自然而然,用的是THREE.LineSegments创建线段。
对于第二个问题:问题一中需要单元面的坐标,而项目给的是顶点坐标。因此需要将单元面的顶点-》映射到节点对应的坐标。这里需要对threejs的数据格式有一定了解。threejs里的一个顶点对应三个坐标,也就是[x轴坐标,y轴坐标,z轴坐标]。在后续的代码示例中可以更清晰的看到。

安装插件react-three/fiber、react-three/drei、three
react-three/fiber
react-three/drei
three
react
要安装 react-three/fiber、react-three/drei 和 three 这些库,你可以按照以下步骤进行操作:
-
创建一个新的 React 项目(如果还没有的话):
如果你还没有一个 React 项目,可以通过
create-react-app快速创建一个:
npx create-react-app my-react-app
cd my-react-app
安装必要的依赖:
接下来,在项目目录中运行以下命令来安装 react-three/fiber、react-three/drei 和 three:
npm install @react-three/fiber @react-three/drei three或者如果你使用的是 Yarn:
yarn add @react-three/fiber @react-three/drei three在react中使用示例:
import { Canvas, useThree } from '@react-three/fiber'
import { Suspense } from 'react'
import { OrbitControls } from '@react-three/drei'
import * as THREE from 'three'export const ModelViewer = () => {return (<Suspense fallback={<span>Loading...</span>}><Canvas>{/* 添加环境光,照亮整个场景 */}<ambientLight intensity={1} />{/* 添加平行光 */}<directionalLight position={[-100, 100, -100]} intensity={5} /></Canvas></Suspense>)
}
示例:剖分一个立方体网格
首先 在3d空间中绘制一个立方体,然后根据将立方体面划分为两个三角形,形成网格的最小单元是三角形。绘制立方体需要8个顶点,6个面,12个三角形。这里仅剖分外表面。三角形使用threejs的LineSegments线段进行绘制,三角形需要三个顶点,并且根据顶点得到三角形的坐标。通过LineSegments材质绘制三角形。
假设立方体一个顶点在原点,起始位置对齐xyz轴的正方向,边长为1。我们可以手动推算顶点和坐标信息。这里我们不需要顶点的编号,因为默认以坐标数组的索引进行顶点的编号。
生成顶点坐标和单元面索引数组
// 每个顶点由 [x, y, z] 三个值表示
const vertexCoordinates = [// 第一个小立方体(原数据)[0, 0, 0],[1, 0, 0],[0, 1, 0],[1, 1, 0],[0, 0, 1],[1, 0, 1],[0, 1, 1],[1, 1, 1],
]// 假设这是有限元输出的单元面索引信息
// 相邻的三个索引代表一个三角形面的三个顶点
const faceIndices = [// 第一个小立方体的面索引(原数据)0,1,2,1,3,2,4,5,6,5,7,6,0,4,2,4,6,2,1,5,3,5,7,3,0,4,1,5,4,1,2,6,3,7,6,3,
]
绘制几何对象
在react-three/fiber框架中,可以通过引入Canvas组件,避免编写繁琐的canvas初始化节点挂载相机和场景初始化工作。默认引入了Canvas组件这些都自动完成了。并且在react-three/fiber框架中,我们可以以组件的形式使用材质,无需引入,react-three/fiber自动识别。

使用mesh组件,添加几何对象和材质。首先找到单元面顶点坐标。然后给geometry设置positon属性即可。无需手动设置index属性。BufferGeometry会自动根据相邻的三个顶点组成一个单元。
const MeshRenderer = () => {const geometry = new THREE.BufferGeometry()const positionData = []// 遍历单元面索引,生成三角形面的顶点坐标for (let i = 0; i < faceIndices.length; i += 3) {const index1 = faceIndices[i]const index2 = faceIndices[i + 1]const index3 = faceIndices[i + 2]const vertex1 = vertexCoordinates[index1]const vertex2 = vertexCoordinates[index2]const vertex3 = vertexCoordinates[index3]positionData.push(...vertex1, ...vertex2, ...vertex3)}console.log(faceIndices.length, positionData.length)const positionAttribute = new THREE.Float32BufferAttribute(positionData, 3)geometry.setAttribute('position', positionAttribute)return (<meshgeometry={geometry}material={new THREE.MeshBasicMaterial({color: '#a2a2aa',side: THREE.DoubleSide,})}/>)
}
显示坐标系
写一个坐标系组件插入到canvas组件中。使用useThree可以拿到当前的场景scene。之后的逻辑和原生threejs一样的
const CoordinateAxes = () => {const { scene } = useThree()const axesHelper = new THREE.AxesHelper(15) // 15 是坐标轴的长度scene.add(axesHelper)return null
}
使用lineSegments线段材质绘制网格
比如通过lineSegments就可以得到线段对象。
<lineSegmentsgeometry={geometry}material={new THREE.LineBasicMaterial({ color: '#74747e' })}/>
完整代码
import { Canvas, useThree } from '@react-three/fiber'
import { Suspense } from 'react'
import { OrbitControls } from '@react-three/drei'
import * as THREE from 'three'// 假设这是有限元输出的顶点坐标信息
// 每个顶点由 [x, y, z] 三个值表示
const vertexCoordinates = [// 第一个小立方体(原数据)[0, 0, 0],[1, 0, 0],[0, 1, 0],[1, 1, 0],[0, 0, 1],[1, 0, 1],[0, 1, 1],[1, 1, 1],
]// 假设这是有限元输出的单元面索引信息
// 相邻的三个索引代表一个三角形面的三个顶点
const faceIndices = [// 第一个小立方体的面索引(原数据)0,1,2,1,3,2,4,5,6,5,7,6,0,4,2,4,6,2,1,5,3,5,7,3,0,4,1,5,4,1,2,6,3,7,6,3,
]const MeshEdgesRenderer = () => {const geometry = new THREE.BufferGeometry()const positionData = []// 遍历单元面索引,生成线段的顶点坐标for (let i = 0; i < faceIndices.length; i += 3) {const index1 = faceIndices[i]const index2 = faceIndices[i + 1]const index3 = faceIndices[i + 2]const vertex1 = vertexCoordinates[index1]const vertex2 = vertexCoordinates[index2]const vertex3 = vertexCoordinates[index3]// 生成三条线段的顶点坐标positionData.push(...vertex1, ...vertex2)positionData.push(...vertex2, ...vertex3)positionData.push(...vertex3, ...vertex1)}const positionAttribute = new THREE.Float32BufferAttribute(positionData, 3)geometry.setAttribute('position', positionAttribute)return (<lineSegmentsgeometry={geometry}material={new THREE.LineBasicMaterial({ color: '#74747e' })}/>)
}
const MeshRenderer = () => {const geometry = new THREE.BufferGeometry()const positionData = []// 遍历单元面索引,生成三角形面的顶点坐标for (let i = 0; i < faceIndices.length; i += 3) {const index1 = faceIndices[i]const index2 = faceIndices[i + 1]const index3 = faceIndices[i + 2]const vertex1 = vertexCoordinates[index1]const vertex2 = vertexCoordinates[index2]const vertex3 = vertexCoordinates[index3]positionData.push(...vertex1, ...vertex2, ...vertex3)}console.log(faceIndices.length, positionData.length)const positionAttribute = new THREE.Float32BufferAttribute(positionData, 3)geometry.setAttribute('position', positionAttribute)return (<meshgeometry={geometry}material={new THREE.MeshBasicMaterial({color: '#a2a2aa',side: THREE.DoubleSide,})}/>)
}
const CoordinateAxes = () => {const { scene } = useThree()const axesHelper = new THREE.AxesHelper(15) // 15 是坐标轴的长度scene.add(axesHelper)return null
}
// 定义 ModelViewer 组件,用于封装 Model 组件并提供加载提示
export const ModelViewer = () => {return (<Suspense fallback={<span>Loading...</span>}><Canvas>{/* 添加环境光,照亮整个场景 */}<ambientLight intensity={1} />{/* 添加平行光 */}<directionalLight position={[-100, 100, -100]} intensity={5} /><MeshEdgesRenderer /><MeshRenderer /><CoordinateAxes />{/* 添加轨道控制器,允许用户通过鼠标交互控制相机 */}<OrbitControls /></Canvas></Suspense>)
}
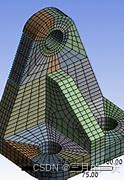
剖分复杂几何网格
代码拿去不谢
import { Canvas, useThree } from '@react-three/fiber'
import { Suspense } from 'react'
import { OrbitControls } from '@react-three/drei'
import * as THREE from 'three'// 假设这是有限元输出的顶点坐标信息
// 每个顶点由 [x, y, z] 三个值表示
const vertexCoordinates = [// 第一个小立方体(原数据)[0, 0, 0],[1, 0, 0],[0, 1, 0],[1, 1, 0],[0, 0, 1],[1, 0, 1],[0, 1, 1],[1, 1, 1],
]// 假设这是有限元输出的单元面索引信息
// 相邻的三个索引代表一个三角形面的三个顶点
const faceIndices = [// 第一个小立方体的面索引(原数据)0,1,2,1,3,2,4,5,6,5,7,6,0,4,2,4,6,2,1,5,3,5,7,3,0,4,1,5,4,1,2,6,3,7,6,3,
]
// 顶点:在立方体1的基础上,所有顶点X+1
vertexCoordinates.push([1, 0, 0], [2, 0, 0], [1, 1, 0], [2, 1, 0], // 新底面[1, 0, 1], [2, 0, 1], [1, 1, 1], [2, 1, 1]  // 新顶面
);// 面索引:原索引+8(立方体1有8个顶点)
faceIndices.push(8,9,10, 9,11,10,  // 前面12,13,14, 13,15,14,  // 后面8,12,10, 12,14,10,  // 左面(注意:左面实际是与立方体1的右面相邻,可选择是否保留)9,13,11, 13,15,11,  // 右面8,12,9, 12,13,9,  // 底面10,14,11, 14,15,11  // 顶面
);
// 顶点:在立方体1的基础上,所有顶点Y+1
vertexCoordinates.push([0, 1, 0], [1, 1, 0], [0, 2, 0], [1, 2, 0], // 新底面[0, 1, 1], [1, 1, 1], [0, 2, 1], [1, 2, 1]  // 新顶面
);// 面索引:原索引+16(前两个立方体共16个顶点)
faceIndices.push(16,17,18, 17,19,18,  // 前面20,21,22, 21,23,22,  // 后面16,20,18, 20,22,18,  // 左面17,21,19, 21,23,19,  // 右面16,20,17, 20,21,17,  // 底面(注意:底面Y=1,与立方体1的顶面相邻)18,22,19, 22,23,19  // 顶面
);
// 顶点:在立方体1的基础上,所有顶点Z+1
vertexCoordinates.push([0, 0, 1], [1, 0, 1], [0, 1, 1], [1, 1, 1], // 新底面(与立方体1顶面重合,可优化)[0, 0, 2], [1, 0, 2], [0, 1, 2], [1, 1, 2]  // 新顶面
);// 面索引:原索引+24(前三个立方体共24个顶点)
faceIndices.push(24,25,26, 25,27,26,  // 前面(底面Z=1,与立方体1顶面重合)28,29,30, 29,31,30,  // 后面24,28,26, 28,30,26,  // 左面25,29,27, 29,31,27,  // 右面24,28,25, 28,29,25,  // 底面(Z=1,与立方体1共享)26,30,27, 30,31,27  // 顶面(Z=2)
);
const MeshEdgesRenderer = () => {const geometry = new THREE.BufferGeometry()const positionData = []// 遍历单元面索引,生成线段的顶点坐标for (let i = 0; i < faceIndices.length; i += 3) {const index1 = faceIndices[i]const index2 = faceIndices[i + 1]const index3 = faceIndices[i + 2]const vertex1 = vertexCoordinates[index1]const vertex2 = vertexCoordinates[index2]const vertex3 = vertexCoordinates[index3]// 生成三条线段的顶点坐标positionData.push(...vertex1, ...vertex2)positionData.push(...vertex2, ...vertex3)positionData.push(...vertex3, ...vertex1)}const positionAttribute = new THREE.Float32BufferAttribute(positionData, 3)geometry.setAttribute('position', positionAttribute)return (<lineSegmentsgeometry={geometry}material={new THREE.LineBasicMaterial({ color: '#74747e' })}/>)
}
const MeshRenderer = () => {const geometry = new THREE.BufferGeometry()const positionData = []// 遍历单元面索引,生成三角形面的顶点坐标for (let i = 0; i < faceIndices.length; i += 3) {const index1 = faceIndices[i]const index2 = faceIndices[i + 1]const index3 = faceIndices[i + 2]const vertex1 = vertexCoordinates[index1]const vertex2 = vertexCoordinates[index2]const vertex3 = vertexCoordinates[index3]positionData.push(...vertex1, ...vertex2, ...vertex3)}console.log(faceIndices.length, positionData.length)const positionAttribute = new THREE.Float32BufferAttribute(positionData, 3)geometry.setAttribute('position', positionAttribute)return (<meshgeometry={geometry}material={new THREE.MeshBasicMaterial({color: '#a2a2aa',side: THREE.DoubleSide,})}/>)
}
const CoordinateAxes = () => {const { scene } = useThree()const axesHelper = new THREE.AxesHelper(15) // 15 是坐标轴的长度scene.add(axesHelper)return null
}
// 定义 ModelViewer 组件,用于封装 Model 组件并提供加载提示
export const ModelViewer = () => {return (<Suspense fallback={<span>Loading...</span>}><Canvas>{/* 添加环境光,照亮整个场景 */}<ambientLight intensity={1} />{/* 添加平行光 */}<directionalLight position={[-100, 100, -100]} intensity={5} /><MeshEdgesRenderer /><MeshRenderer /><CoordinateAxes />{/* 添加轨道控制器,允许用户通过鼠标交互控制相机 */}<OrbitControls /></Canvas></Suspense>)
}
关注我一起交流学习吧


