
Harmonyos-Navigation路由跳转
- 概述
- Navigation路由跳转
- 模块内页面路由
- 系统路由表
- 测试页代码
- 创建并配置路由表文件
- 配置创建好的路由表文件
- 跳转页面
- 自定义路由表
- 跨模块路由
- 封装库模块路由跳转工具类
概述
Navigation是路由容器组件,一般作为首页的根容器,适用于模块内和跨模块的路由切换。Navigation子页是NavDestination包含的子组件,使用NavPathStack实现页面路由。
Navigation路由跳转
模块内页面路由
Index.ets跟页面代码:
@Entry@Componentstruct Index {/*** 创建一个页面栈对象*/pathStack: NavPathStack = new NavPathStack()build() {Navigation(this.pathStack) {Column() {Text("这是一个test Navigation Page的例子")Button("点击跳转").onClick((event: ClickEvent) => {})}.height('100%').width('100%')}.title('Navigation Main Page')}}
系统路由表
系统路由表的方式,不需要引入子页面的ets文件,解除了各个页面之间的耦合;此外路由跳转通过配置文件配置方式实现,降低了代码的复杂度。建议使用系统路由表的方式实现页面的跳转。
测试页代码
PageOne.ets测试页的代码:
@Builder
export function PageOneBuilder() {PageOne()
}
@Component
struct PageOne {pathStack: NavPathStack = new NavPathStack();build() {NavDestination() {Column() {Text("PageOne Test")}}.title("PageOne").onReady((context: NavDestinationContext) => {this.pathStack = context.pathStack;})}
}
创建并配置路由表文件
我们需要配置系统路由表, 在resource/base/profile目录下创建一个路由的配置文件:
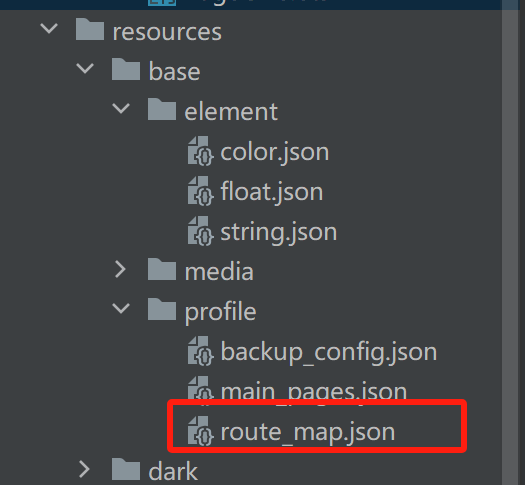
其内容如下:
{"routerMap": [{"name": "PageOne","pageSourceFile": "src/main/ets/pages/PageOne.ets","buildFunction": "PageOneBuilder","data": {"des": "传递的参数"}}]
}
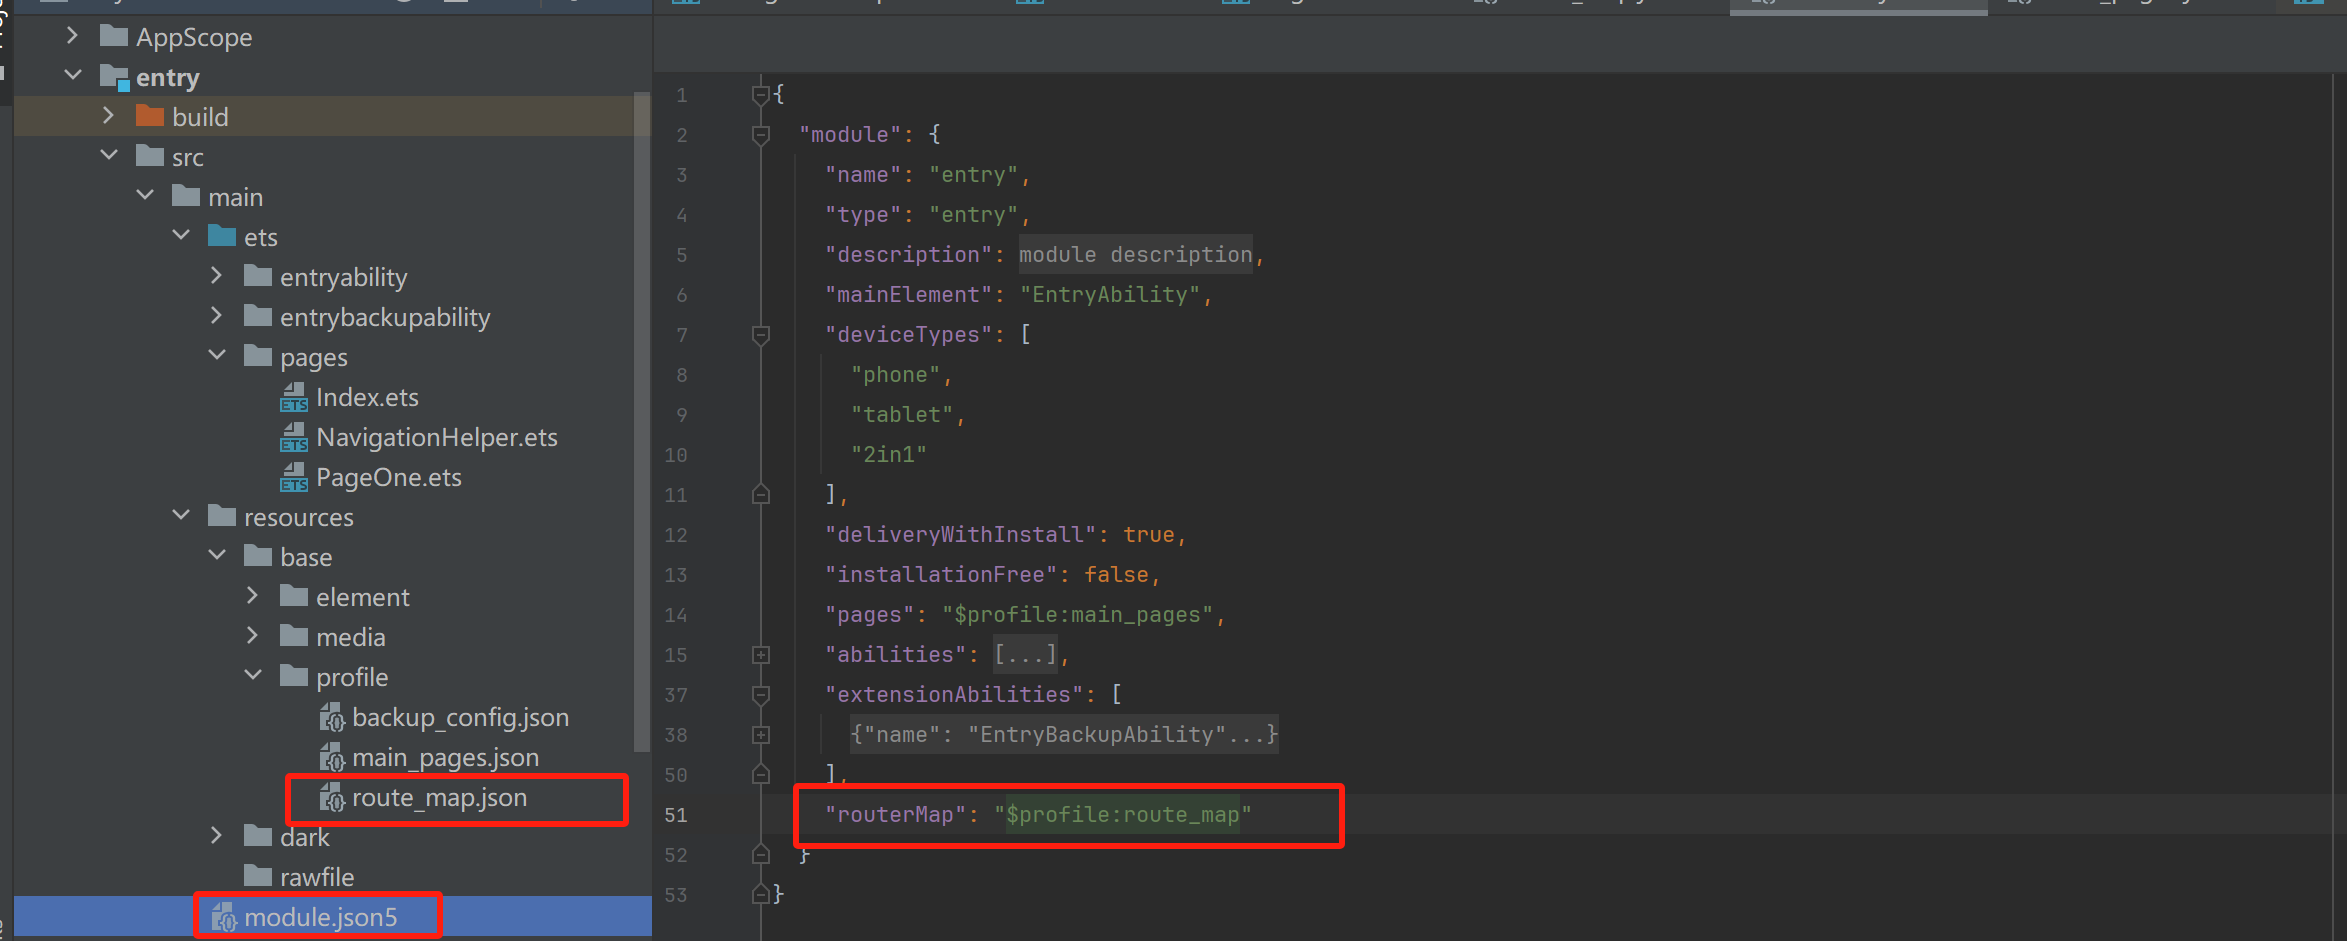
配置创建好的路由表文件
然后需要再module.json5的配置文件中的module标签中定义routeMap字段, 指向定义好的路由表配置文件route_map.json
跳转页面
Button("点击跳转").onClick((event: ClickEvent) => {// 名称是路由表注册的名称 this.pathStack.pushPathByName("PageOne", null, false)})
自定义路由表
我们需要修改Index.ets文件内容如下:
import { PageTwo } from './PageTwo'@Entry
@Component
struct Index {/*** 创建一个页面栈对象*/pathStack: NavPathStack = new NavPathStack()@BuilderpageMap(pageName: string, param: ESObject) {if (pageName === "PageTwo") {PageTwo()}} build() {Navigation(this.pathStack) {Column() {Text("这是一个test Navigation Page的例子")Button("点击跳转").onClick((event: ClickEvent) => {this.pathStack.pushPathByName("PageTwo", null, false)})}.height('100%').width('100%')}.title('Navigation Main Page').navDestination(this.pageMap)}
}
这种路由方式,不需要配置什么文件。
更多路由页面的其他操作参考链接:https://developer.huawei.com/consumer/cn/doc/harmonyos-references-V14/ts-basic-components-navigation-V14
跨模块路由
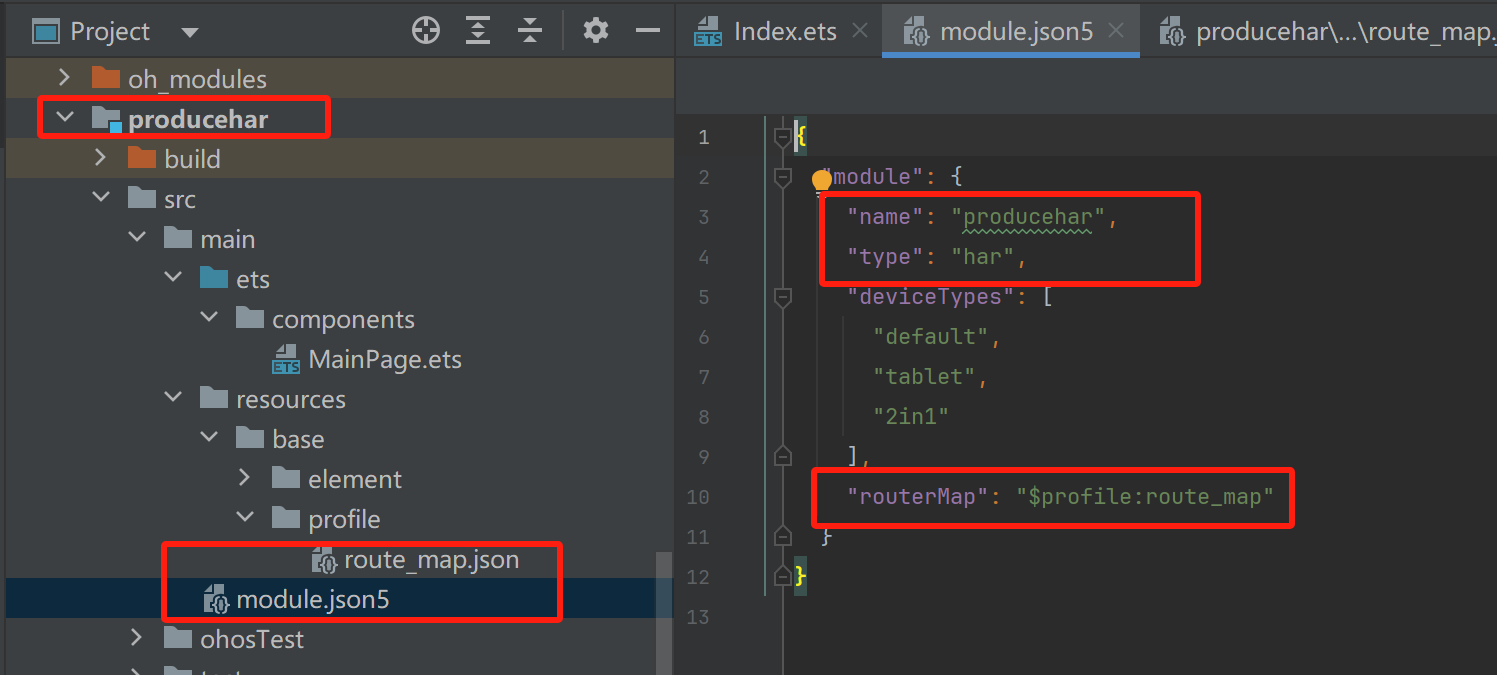
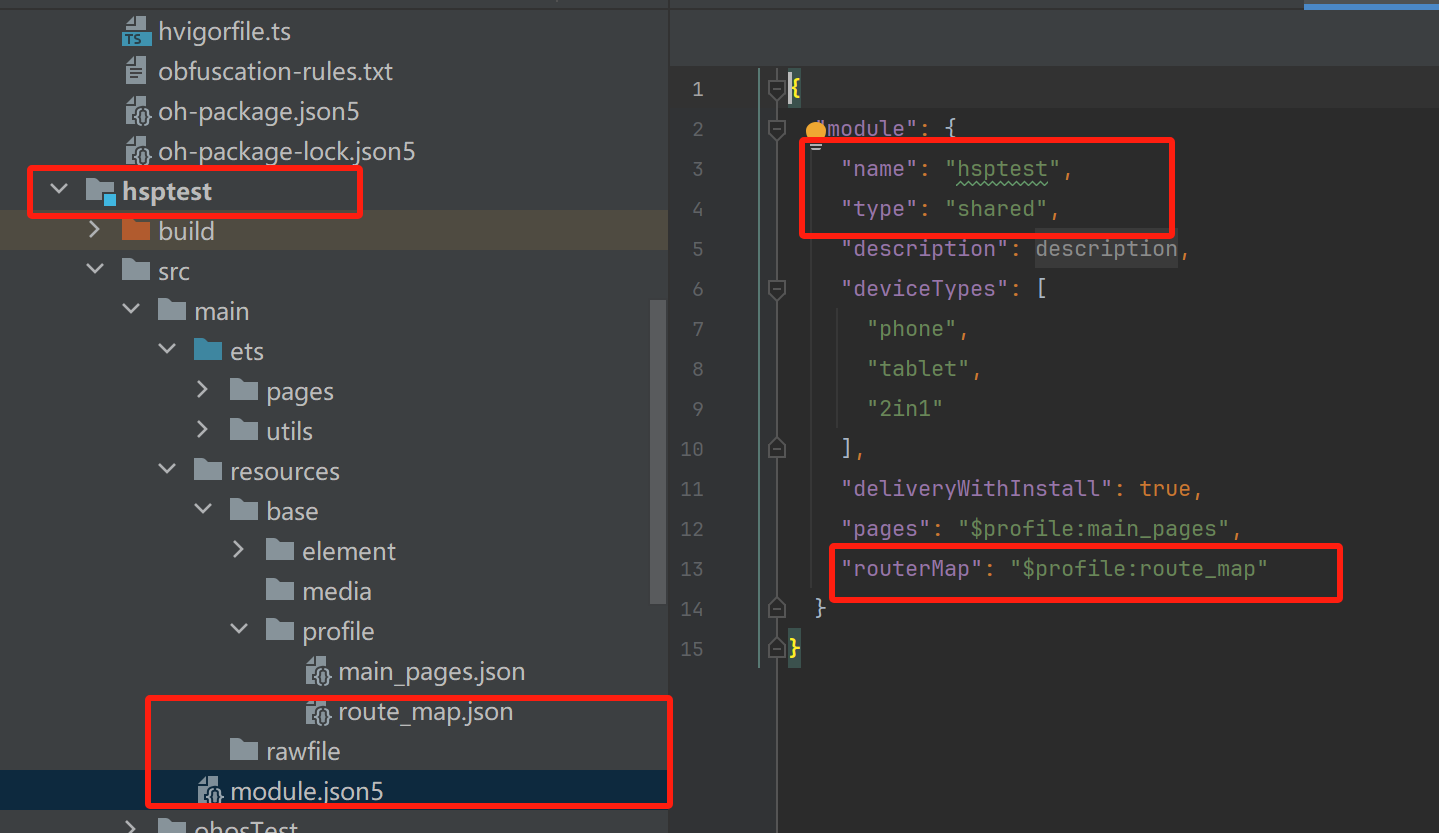
对于其他模块的页面,如果需要跨模块进行路由跳转, 首先我们对于该模块的页面进行系统路由的配置操作。配置步骤和上面是一样的。
NavPushPathHelper对Navigation路由栈NavPathStack的所有路由跳转接口进行了封装,在NavPushPathHelper中持有一个NavPathStack对象,在封装的跳转接口中去判断子包是否存在,如果不存在则进行动态下载子包,等结果返回后调用NavPathStack的相应的接口将指定的NavDestination页面信息入栈。
如:
配置好路由表之后, 我们在需要跳转的地方, 实现如下逻辑:
/*** 创建一个页面栈对象*/pathStack: NavPathStack = new NavPathStack()helper: NavPushPathHelper = new NavPushPathHelper(this.pathStack)Button("点击跳转另外一个har的页面").onClick((event: ClickEvent) => {// NavigationHelper.pushPathByName({ name: "PageOne"})this.helper.pushPath("producehar", { name: 'MainPage' }, false).then(() => {console.info('pushPath success')}).catch((error: BusinessError) => {console.error('pushPath error: ' + JSON.stringify(error))})})Button("点击跳转另外一个hsp的页面").onClick((event: ClickEvent) => {this.helper.pushPath("hsptest", { name: 'Index' }, false).then(() => {console.info('pushPath success')}).catch((error: BusinessError) => {console.error('pushPath error: ' + JSON.stringify(error))})})封装库模块路由跳转工具类
工具类代码如下:
import { bundleManager } from '@kit.AbilityKit';
import { NavPushPathHelper } from '@kit.ArkUI';
import { BusinessError } from '@kit.BasicServicesKit';
import { JSON } from '@kit.ArkTS';/*** @Author: You name* @CreateDate: 2025/4/9 18:24* @Description: 类功能描述说明*/
class NavigationUtils {public navPathStack: NavPathStack;private navModuleNameMap: Map<string, string>;private helper: NavPushPathHelper;constructor() {const bundleInfo = this.getBundleInfo();this.navModuleNameMap = this.getNavModuleNameMap(bundleInfo);this.navPathStack = new NavPathStack();this.helper = new NavPushPathHelper(this.navPathStack);}/** 获取包信息* */private getBundleInfo() {// 实现获取包信息的逻辑const bundleFlags =bundleManager.BundleFlag.GET_BUNDLE_INFO_DEFAULT |bundleManager.BundleFlag.GET_BUNDLE_INFO_WITH_APPLICATION |bundleManager.BundleFlag.GET_BUNDLE_INFO_WITH_HAP_MODULE |bundleManager.BundleFlag.GET_BUNDLE_INFO_WITH_ABILITY |bundleManager.BundleFlag.GET_BUNDLE_INFO_WITH_EXTENSION_ABILITY |bundleManager.BundleFlag.GET_BUNDLE_INFO_WITH_REQUESTED_PERMISSION |bundleManager.BundleFlag.GET_BUNDLE_INFO_WITH_METADATA |bundleManager.BundleFlag.GET_BUNDLE_INFO_WITH_DISABLE |bundleManager.BundleFlag.GET_BUNDLE_INFO_WITH_SIGNATURE_INFO |bundleManager.BundleFlag.GET_BUNDLE_INFO_WITH_MENU |bundleManager.BundleFlag.GET_BUNDLE_INFO_WITH_ROUTER_MAP |bundleManager.BundleFlag.GET_BUNDLE_INFO_WITH_SKILLreturn bundleManager.getBundleInfoForSelfSync(bundleFlags);}/*** 获取导航模块名称映射* */private getNavModuleNameMap(bundleInfo: bundleManager.BundleInfo) {// 实现获取导航模块名称映射的逻辑const moduleNameMap = new Map<string, string>();bundleInfo.hapModulesInfo.forEach((moduleInfo) => {moduleInfo.routerMap.forEach((router) => {moduleNameMap.set(router.name, moduleInfo.name);});});return moduleNameMap;}/*** 跳转到指定页面*/public pushPathByName(info: NavPathInfo, animation?: boolean) {// 获取需要跳转的模块名称const moduleName = this.navModuleNameMap.get(info.name);if (moduleName) {// 实现跳转逻辑this.helper.pushPath(moduleName, info, animation).then(() => {// 跳转成功后的回调逻辑console.log('Push path success=============');}).catch((error: BusinessError) => {// 跳转失败后的回调逻辑console.error('Error: ===================' + error.message);})} else {console.error('Module name not found======================');}}/*** 根据Navigation路由名称, 查找携带参数* @param name 导航路由名称*/public getPathByName<NaDestinationParam>(name: string): NaDestinationParam[] | undefined {// 实现查找逻辑if (!this.navPathStack) {console.error('NavPathStack is null');return undefined;}return this.navPathStack.getParamByName(name) as NaDestinationParam[];}/*** 路由后退* @param name* @param result* @param animation*/public pop<T = null>(name?: string, result?: T, animation?: boolean) {if (!this.navPathStack) {console.error('NavPathStack is null');return;}if (name) {this.navPathStack.popToName(name, result, animation)} else {this.navPathStack.pop()}}/*** 获取父级页面信息*/public gteParent() {const allPathName = this.navPathStack.getAllPathName();if (allPathName.length === 0) {return undefined;}console.log("allPathName==============" + JSON.stringify(allPathName));return allPathName[allPathName.length - 1];}/*** 路由清除 回到根页面*/public clear(animation?: boolean) {if (!this.navPathStack) {console.error('NavPathStack is null');return;}this.navPathStack.clear(animation);}public gteLastPathName(): string | undefined {if (!this.navPathStack) {console.error('NavPathStack is null');return undefined;}const allPathName = this.navPathStack.getAllPathName();if (allPathName.length === 0) {return undefined;}console.log("allPathName==============" + JSON.stringify(allPathName));return allPathName[allPathName.length - 1];}
}const NavigationHelper = new NavigationUtils();export { NavigationHelper };
使用方式:
build() {// 把工具类中的navPathStack传递进去Navigation(NavigationHelper.navPathStack) {Column() {Text("这是一个test Navigation Page的例子")Button("跳转本模块的页面").onClick((event: ClickEvent) => {NavigationHelper.pushPathByName({ name: "PageOne"})})Button("点击跳转另外一个har的页面").onClick((event: ClickEvent) => {NavigationHelper.pushPathByName({ name: "MainPage" })})Button("点击跳转另外一个hsp的页面").onClick((event: ClickEvent) => {NavigationHelper.pushPathByName({ name: "Index" })})}.height('100%').width('100%')}


