
文章目录
- Spring Security
- 核心功能
- 架构设计
- 配置方式
- 与其他框架集成
- 社区支持和资源
- SpringSecurity请求流转的本质
- 1. SpringSecurity核心源码分析
- 1.1 系统启动
- 1.2 第一次请求

个人主页:道友老李
欢迎加入社区:道友老李的学习社区
Spring Security
Spring Security 是一个功能强大且高度可配置的安全框架,用于为 Java 应用程序提供身份验证和授权功能。以下是对它的详细介绍:
核心功能
- 身份验证:支持多种身份验证方式,如用户名 / 密码、OAuth、LDAP 等。可以方便地与各种身份验证源集成,如数据库、LDAP 目录、OAuth 提供商等。例如,在一个 Web 应用中,用户可以通过输入用户名和密码进行登录,Spring Security 会验证用户提供的凭据是否有效。
- 授权:提供了细粒度的授权控制,可以基于角色、权限或自定义的访问规则来限制对资源的访问。比如,只有具有特定角色(如管理员)的用户才能访问某些敏感的 API 端点或页面。
- 防止常见攻击:自动防范常见的安全漏洞,如跨站请求伪造(CSRF)、会话固定攻击、点击劫持等。
架构设计
- 过滤器链:Spring Security 基于 Servlet 过滤器链实现,通过一系列的过滤器来处理安全相关的任务,如身份验证、授权、安全上下文管理等。每个过滤器都有特定的职责,它们协同工作以确保应用程序的安全性。
- 安全上下文:安全上下文(Security Context)用于存储当前用户的安全信息,如用户身份、角色和权限等。在整个应用程序的执行过程中,不同的组件可以通过安全上下文来获取当前用户的相关信息,以便进行授权决策和其他安全相关的操作。
配置方式
- Java 配置:通过 Java 代码进行配置,提供了一种类型安全、可维护的方式来定义安全规则和配置。例如,可以使用
@Configuration和@EnableWebSecurity注解来创建一个 Spring Security 配置类,然后在类中定义各种安全配置方法。 - XML 配置:使用 XML 文件来配置 Spring Security,这种方式在一些传统的企业级应用中较为常见。通过在 XML 文件中定义 Bean 和配置元素,可以指定身份验证提供者、授权规则、过滤器等安全相关的配置。
与其他框架集成
- Spring Boot:Spring Security 与 Spring Boot 无缝集成,通过自动配置和起步依赖,可以快速搭建安全的 Spring Boot 应用。在 Spring Boot 应用中,只需添加相关的依赖,然后进行简单的配置,就可以启用 Spring Security 的功能。
- Spring MVC:与 Spring MVC 紧密集成,能够方便地对 Web 应用的控制器方法进行安全控制。可以在控制器方法上使用
@PreAuthorize、@PostAuthorize等注解来定义访问权限,确保只有授权的用户才能访问相应的方法。
社区支持和资源
- 活跃的社区:Spring Security 拥有庞大且活跃的社区,这意味着在使用过程中遇到问题时,很容易在社区论坛、Stack Overflow 等平台上找到解决方案。同时,社区也会不断地为框架的发展做出贡献,推动其功能的不断完善和更新。
- 丰富的文档:官方提供了详细的文档,包括用户指南、API 文档等,有助于开发者快速上手和深入了解框架的各种功能。此外,还有许多第三方的书籍、博客和教程可供参考,进一步帮助开发者掌握 Spring Security 的使用。

SpringSecurity请求流转的本质
1. SpringSecurity核心源码分析
分析SpringSecurity的核心原理,那么我们从哪开始分析?以及我们要分析哪些内容?
- 系统启动的时候SpringSecurity做了哪些事情?
- 第一次请求执行的流程是什么?
- SpringSecurity中的认证流程是怎么样的?
1.1 系统启动
当我们的Web服务启动的时候,SpringSecurity做了哪些事情?当系统启动的时候,肯定会加载我们配置的web.xml文件
<!DOCTYPE web-app PUBLIC"-//Sun Microsystems, Inc.//DTD Web Application 2.3//EN""http://java.sun.com/dtd/web-app_2_3.dtd" ><web-app version="2.5" id="WebApp_ID" xmlns="http://java.sun.com/xml/ns/javaee"xmlns:xsi="http://www.w3.org/2001/XMLSchema-instance"xsi:schemaLocation="http://java.sun.com/xml/ns/javaeehttp://java.sun.com/xml/ns/javaee/web-app_2_5.xsd"><display-name>Archetype Created Web Application</display-name><!-- 初始化spring容器 --><context-param><param-name>contextConfigLocation</param-name><param-value>classpath:applicationContext.xml</param-value></context-param><listener><listener-class>org.springframework.web.context.ContextLoaderListener</listener-class></listener><!-- post乱码过滤器 --><filter><filter-name>CharacterEncodingFilter</filter-name><filter-class>org.springframework.web.filter.CharacterEncodingFilter</filter-class><init-param><param-name>encoding</param-name><param-value>utf-8</param-value></init-param></filter><filter-mapping><filter-name>CharacterEncodingFilter</filter-name><url-pattern>/*</url-pattern></filter-mapping><!-- 前端控制器 --><servlet><servlet-name>dispatcherServletb</servlet-name><servlet-class>org.springframework.web.servlet.DispatcherServlet</servlet-class><!-- contextConfigLocation不是必须的, 如果不配置contextConfigLocation, springmvc的配置文件默认在:WEB-INF/servlet的name+"-servlet.xml" --><init-param><param-name>contextConfigLocation</param-name><param-value>classpath:spring-mvc.xml</param-value></init-param><load-on-startup>1</load-on-startup></servlet><servlet-mapping><servlet-name>dispatcherServletb</servlet-name><!-- 拦截所有请求jsp除外 --><url-pattern>/</url-pattern></servlet-mapping><!-- 配置过滤器链 springSecurityFilterChain 名称固定 --><filter><filter-name>springSecurityFilterChain</filter-name><filter-class>org.springframework.web.filter.DelegatingFilterProxy</filter-class></filter><filter-mapping><filter-name>springSecurityFilterChain</filter-name><url-pattern>/*</url-pattern></filter-mapping></web-app>web.xml中配置的信息:
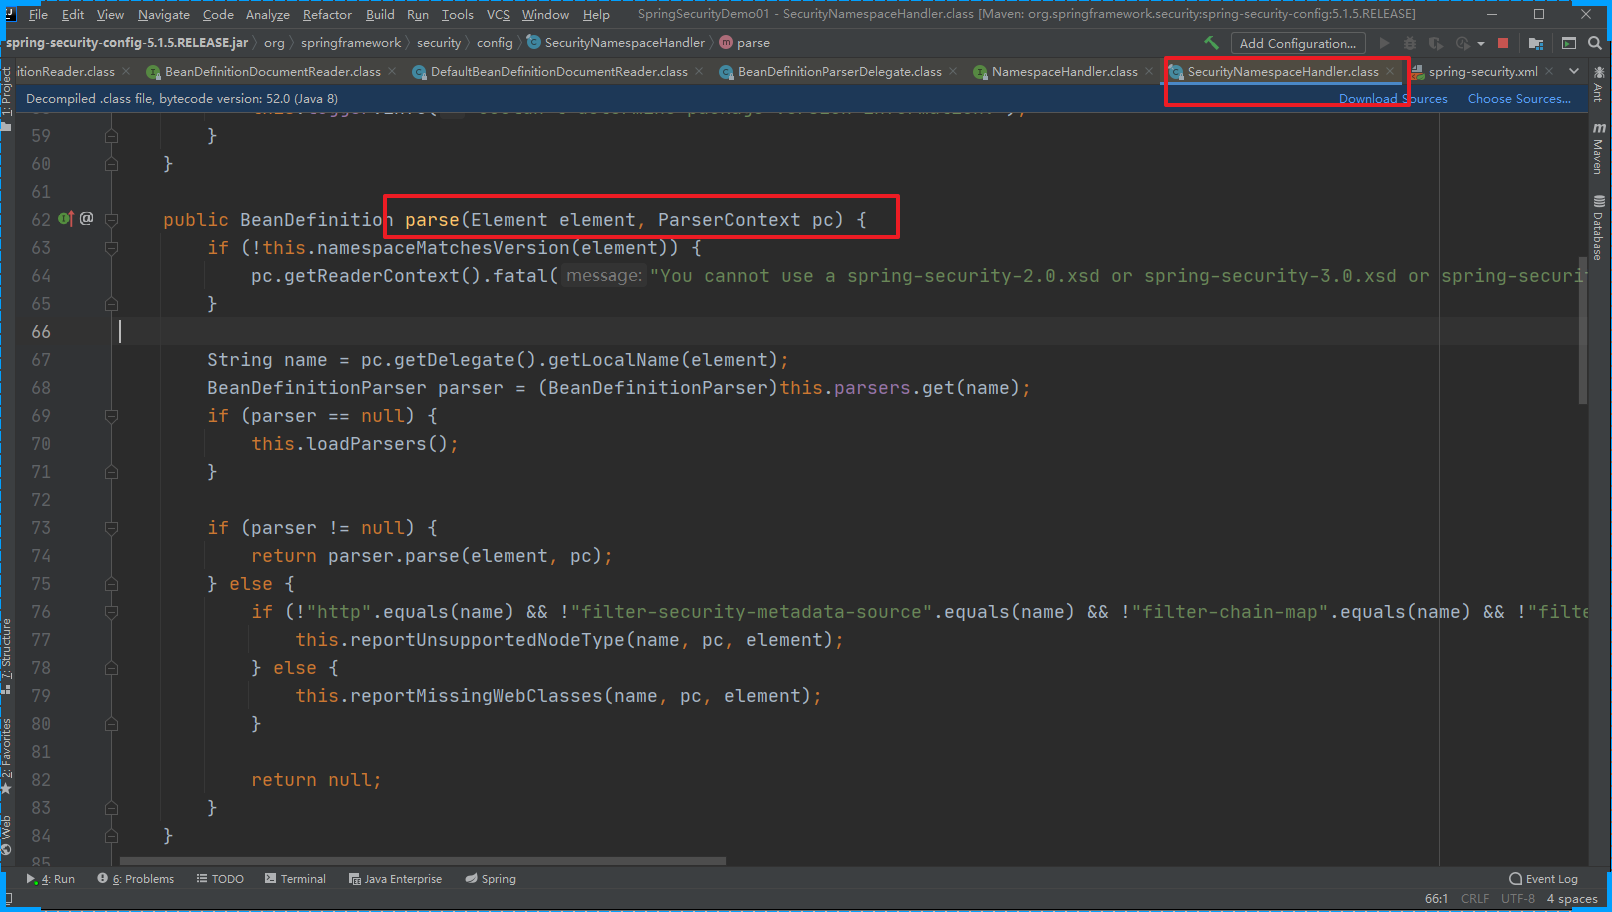
- Spring的初始化(会加载解析SpringSecurity的配置文件)
- SpringMVC的前端控制器初始化
- 加载DelegatingFilterProxy过滤器
Spring的初始化操作和SpringSecurity有关系的操作是,会加载介绍SpringSecurity的配置文件,将相关的数据添加到Spring容器中
SpringMVC的初始化和SpringSecurity其实是没有多大关系的
DelegatingFilterProxy过滤器:拦截所有的请求。而且这个过滤器本身是和SpringSecurity没有关系的!!!在之前介绍Shiro的时候,和Spring整合的时候我们也是使用的这个过滤器。 其实就是完成从IoC容器中获取DelegatingFilterProxy这个过滤器配置的 FileterName 的对象。
系统启动的时候会执行DelegatingFilterProxy的init方法
protected void initFilterBean() throws ServletException {synchronized(this.delegateMonitor) {// 如果委托对象为null 进入if (this.delegate == null) {// 如果targetBeanName==nullif (this.targetBeanName == null) {// targetBeanName = 'springSecurityFilterChain'this.targetBeanName = this.getFilterName();}
// 获取Spring的容器对象WebApplicationContext wac = this.findWebApplicationContext();if (wac != null) {// 初始化代理对象this.delegate = this.initDelegate(wac);}}}
}
protected Filter initDelegate(WebApplicationContext wac) throws ServletException {// springSecurityFilterChainString targetBeanName = this.getTargetBeanName();Assert.state(targetBeanName != null, "No target bean name set");// 从IoC容器中获取 springSecurityFilterChain的类型为Filter的对象Filter delegate = (Filter)wac.getBean(targetBeanName, Filter.class);if (this.isTargetFilterLifecycle()) {delegate.init(this.getFilterConfig());}return delegate;
}
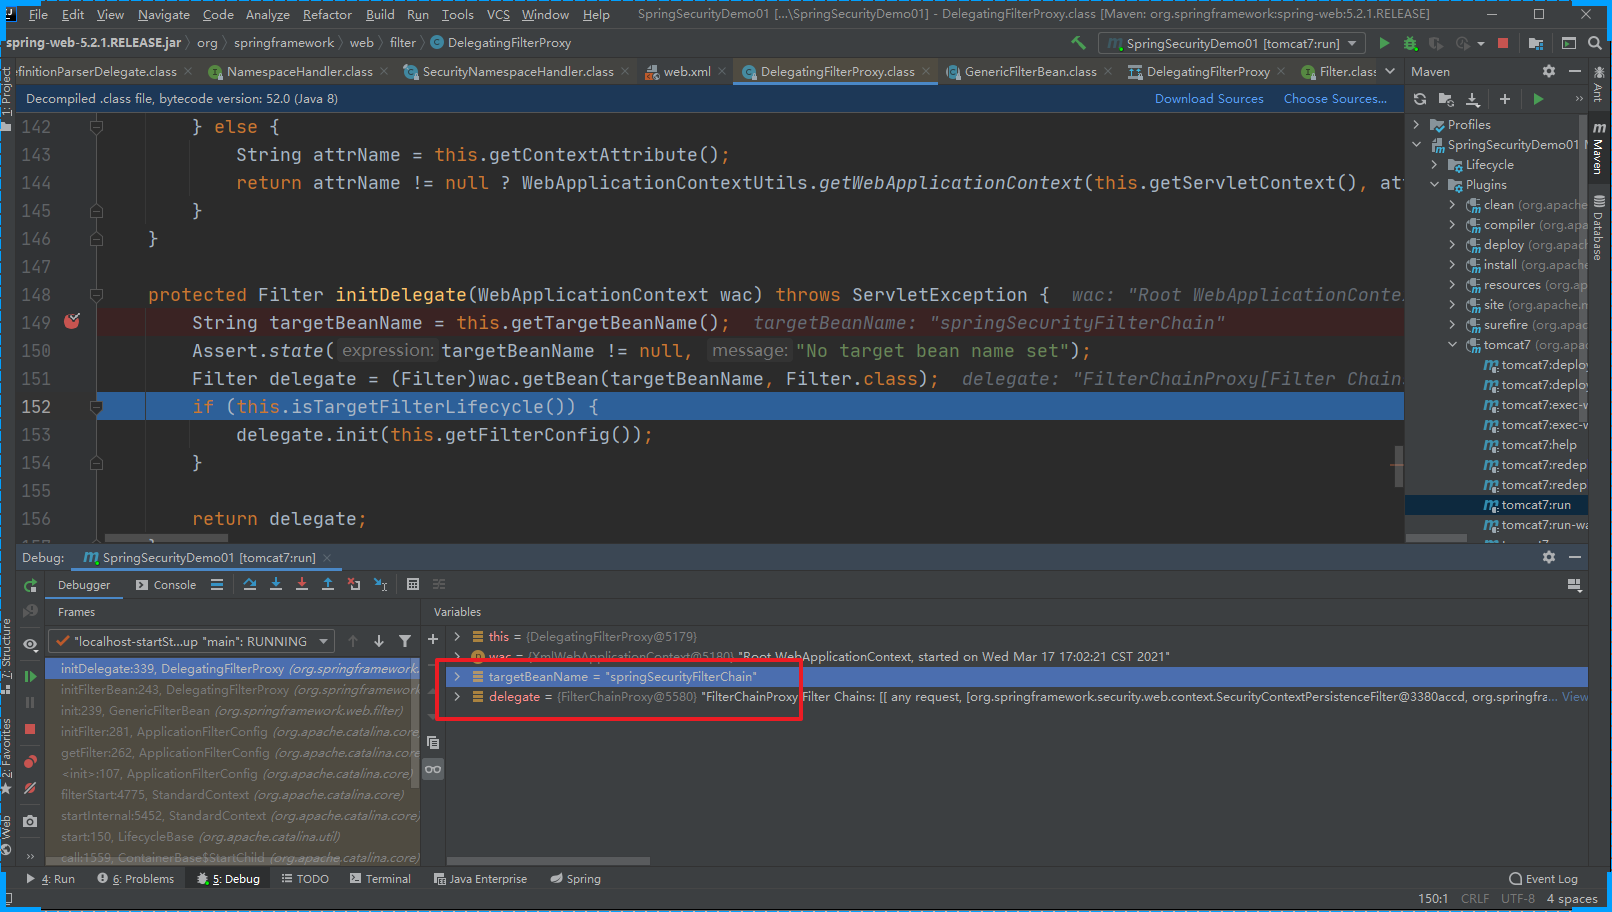
init方法的作用是:从IoC容器中获取 FilterChainProxy的实例对象,并赋值给 DelegatingFilterProxy的delegate属性
1.2 第一次请求
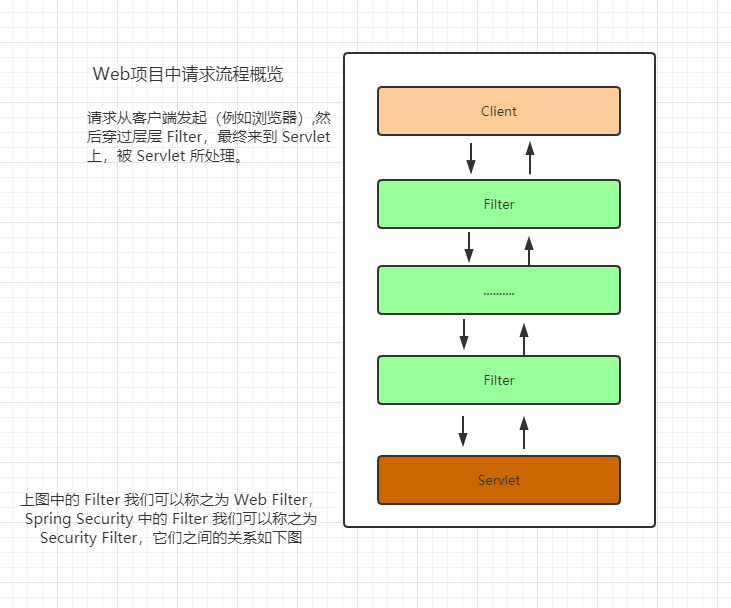
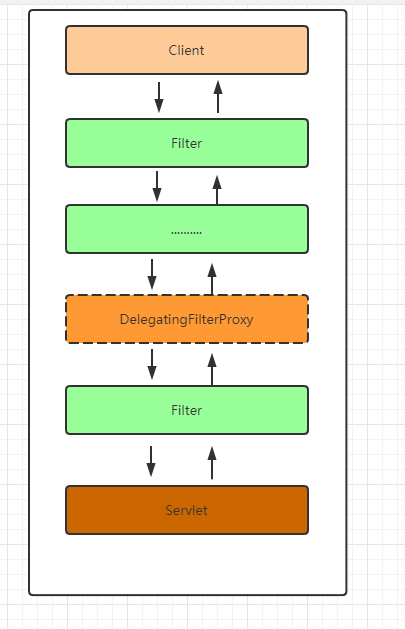
客户发送请求会经过很多歌Web Filter拦截。
然后经过系统启动的分析,我们知道有一个我们定义的过滤器会拦截客户端的所有的请求。DelegatingFilterProxy
当用户请求进来的时候会被doFilter方法拦截
public void doFilter(ServletRequest request, ServletResponse response, FilterChain filterChain) throws ServletException, IOException {Filter delegateToUse = this.delegate;if (delegateToUse == null) {// 如果 delegateToUse 为空 那么完成init中的初始化操作synchronized(this.delegateMonitor) {delegateToUse = this.delegate;if (delegateToUse == null) {WebApplicationContext wac = this.findWebApplicationContext();if (wac == null) {throw new IllegalStateException("No WebApplicationContext found: no ContextLoaderListener or DispatcherServlet registered?");}delegateToUse = this.initDelegate(wac);}this.delegate = delegateToUse;}}this.invokeDelegate(delegateToUse, request, response, filterChain);
}
invokeDelegate
protected void invokeDelegate(Filter delegate, ServletRequest request, ServletResponse response, FilterChain filterChain) throws ServletException, IOException {// delegate.doFilter() FilterChainProxydelegate.doFilter(request, response, filterChain);
}
所以在此处我们发现DelegatingFilterProxy最终是调用的委托代理对象的doFilter方法
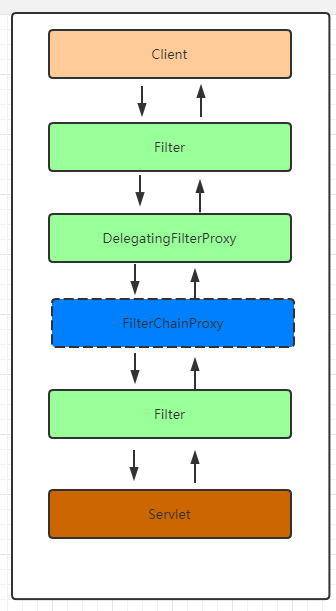
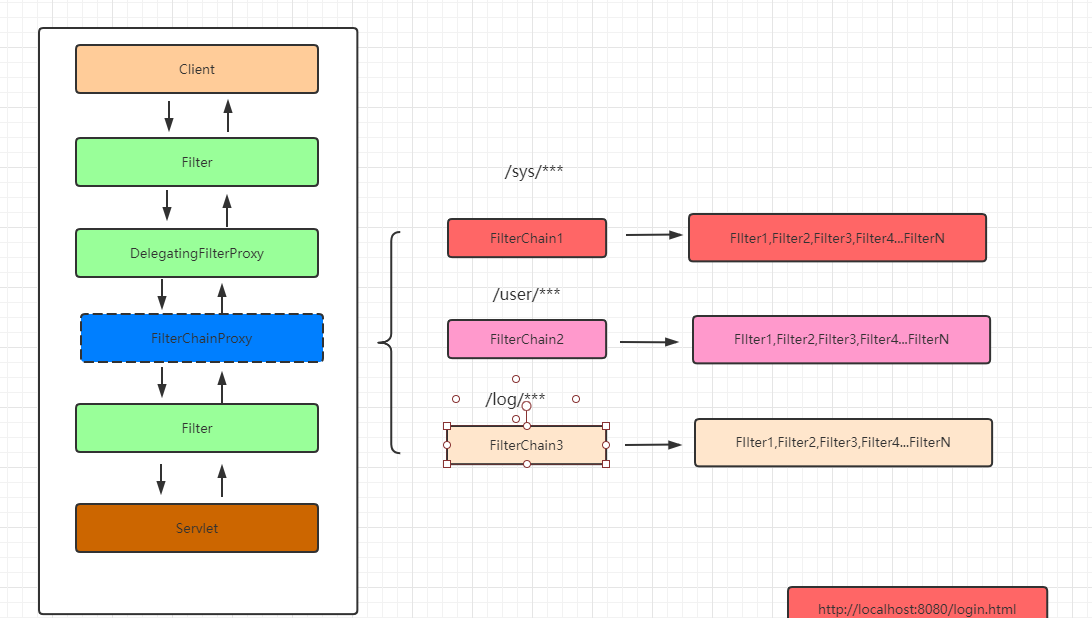
FilterChainProxy
过滤器链的代理对象:增强过滤器链(具体处理请求的过滤器还不是FilterChainProxy ) 根据客户端的请求匹配合适的过滤器链链来处理请求
public class FilterChainProxy extends GenericFilterBean {private static final Log logger = LogFactory.getLog(FilterChainProxy.class);private static final String FILTER_APPLIED = FilterChainProxy.class.getName().concat(".APPLIED");// 过滤器链的集合  保存的有很多个过滤器链  一个过滤器链中包含的有多个过滤器private List<SecurityFilterChain> filterChains;private FilterChainProxy.FilterChainValidator filterChainValidator;private HttpFirewall firewall;
// .....
}
// 处理用户请求
public void doFilter(ServletRequest request, ServletResponse response, FilterChain chain) throws IOException, ServletException {boolean clearContext = request.getAttribute(FILTER_APPLIED) == null;if (clearContext) {try {request.setAttribute(FILTER_APPLIED, Boolean.TRUE);this.doFilterInternal(request, response, chain);} finally {SecurityContextHolder.clearContext();request.removeAttribute(FILTER_APPLIED);}} else {this.doFilterInternal(request, response, chain);}}
doFilterInternal
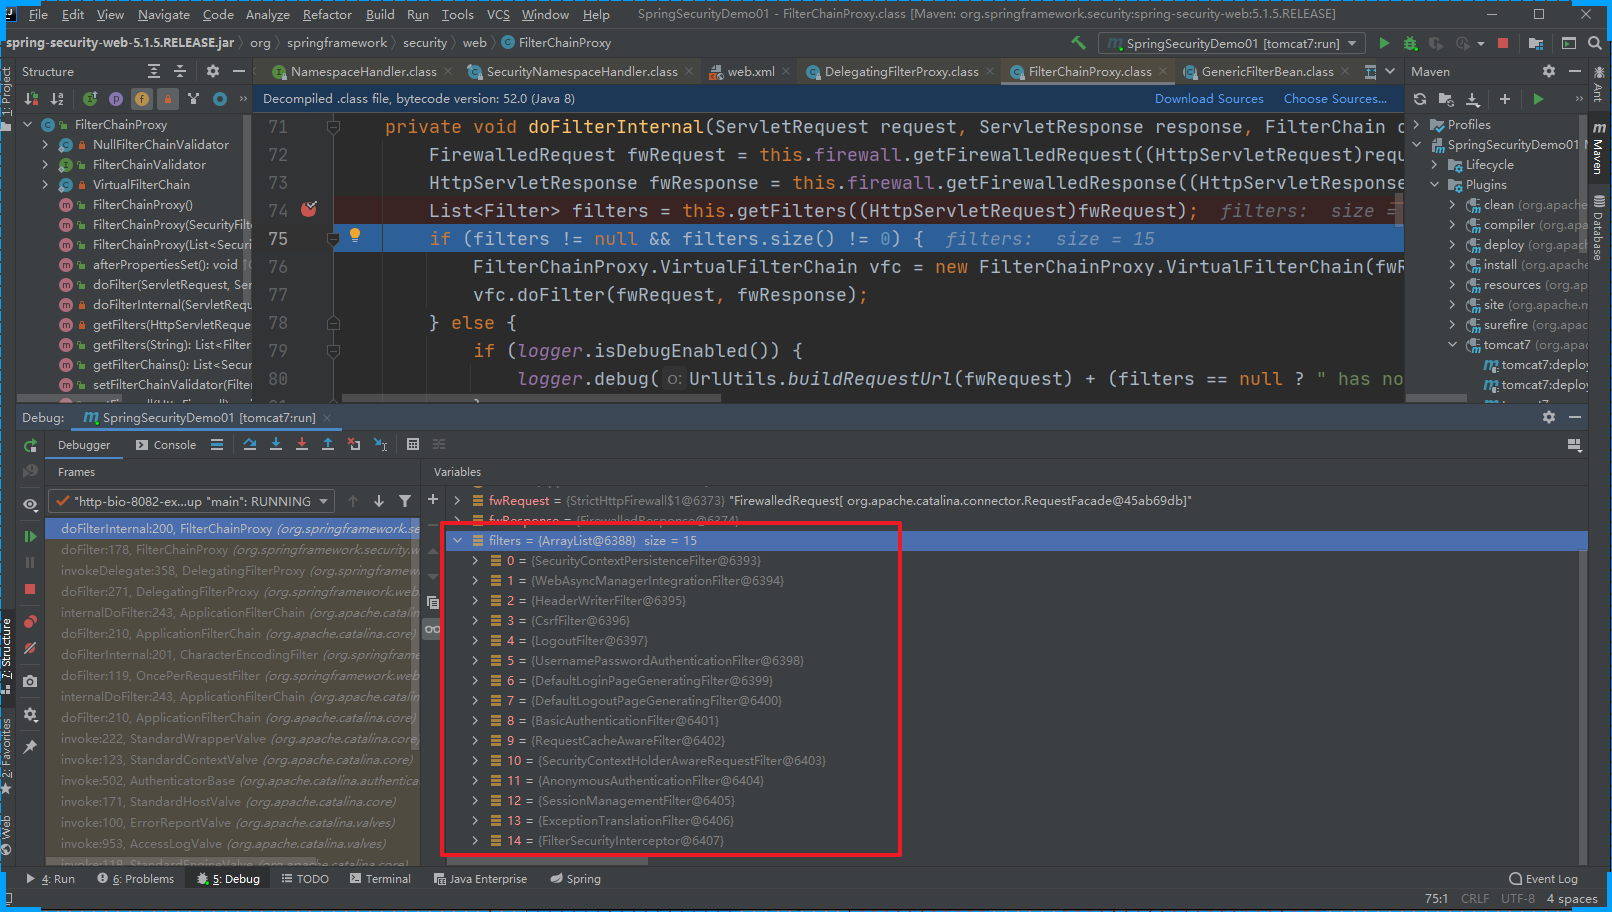
private void doFilterInternal(ServletRequest request, ServletResponse response, FilterChain chain) throws IOException, ServletException {FirewalledRequest fwRequest = this.firewall.getFirewalledRequest((HttpServletRequest)request);HttpServletResponse fwResponse = this.firewall.getFirewalledResponse((HttpServletResponse)response);// 根据当前的请求获取对应的过滤器链List<Filter> filters = this.getFilters((HttpServletRequest)fwRequest);if (filters != null && filters.size() != 0) {FilterChainProxy.VirtualFilterChain vfc = new FilterChainProxy.VirtualFilterChain(fwRequest, chain, filters);vfc.doFilter(fwRequest, fwResponse);} else {if (logger.isDebugEnabled()) {logger.debug(UrlUtils.buildRequestUrl(fwRequest) + (filters == null ? " has no matching filters" : " has an empty filter list"));}fwRequest.reset();chain.doFilter(fwRequest, fwResponse);}
}
获取到了对应处理请求的过滤器链
SpringSecurity中处理请求的过滤器中具体处理请求的方法
public void doFilter(ServletRequest request, ServletResponse response) throws IOException, ServletException {if (this.currentPosition == this.size) {if (FilterChainProxy.logger.isDebugEnabled()) {FilterChainProxy.logger.debug(UrlUtils.buildRequestUrl(this.firewalledRequest) + " reached end of additional filter chain; proceeding with original chain");}this.firewalledRequest.reset();this.originalChain.doFilter(request, response);} else {++this.currentPosition;Filter nextFilter = (Filter)this.additionalFilters.get(this.currentPosition - 1);if (FilterChainProxy.logger.isDebugEnabled()) {FilterChainProxy.logger.debug(UrlUtils.buildRequestUrl(this.firewalledRequest) + " at position " + this.currentPosition + " of " + this.size + " in additional filter chain; firing Filter: '" + nextFilter.getClass().getSimpleName() + "'");}nextFilter.doFilter(request, response, this);}}

主要过滤器的介绍
https://www.processon.com/view/link/5f7b197ee0b34d0711f3e955
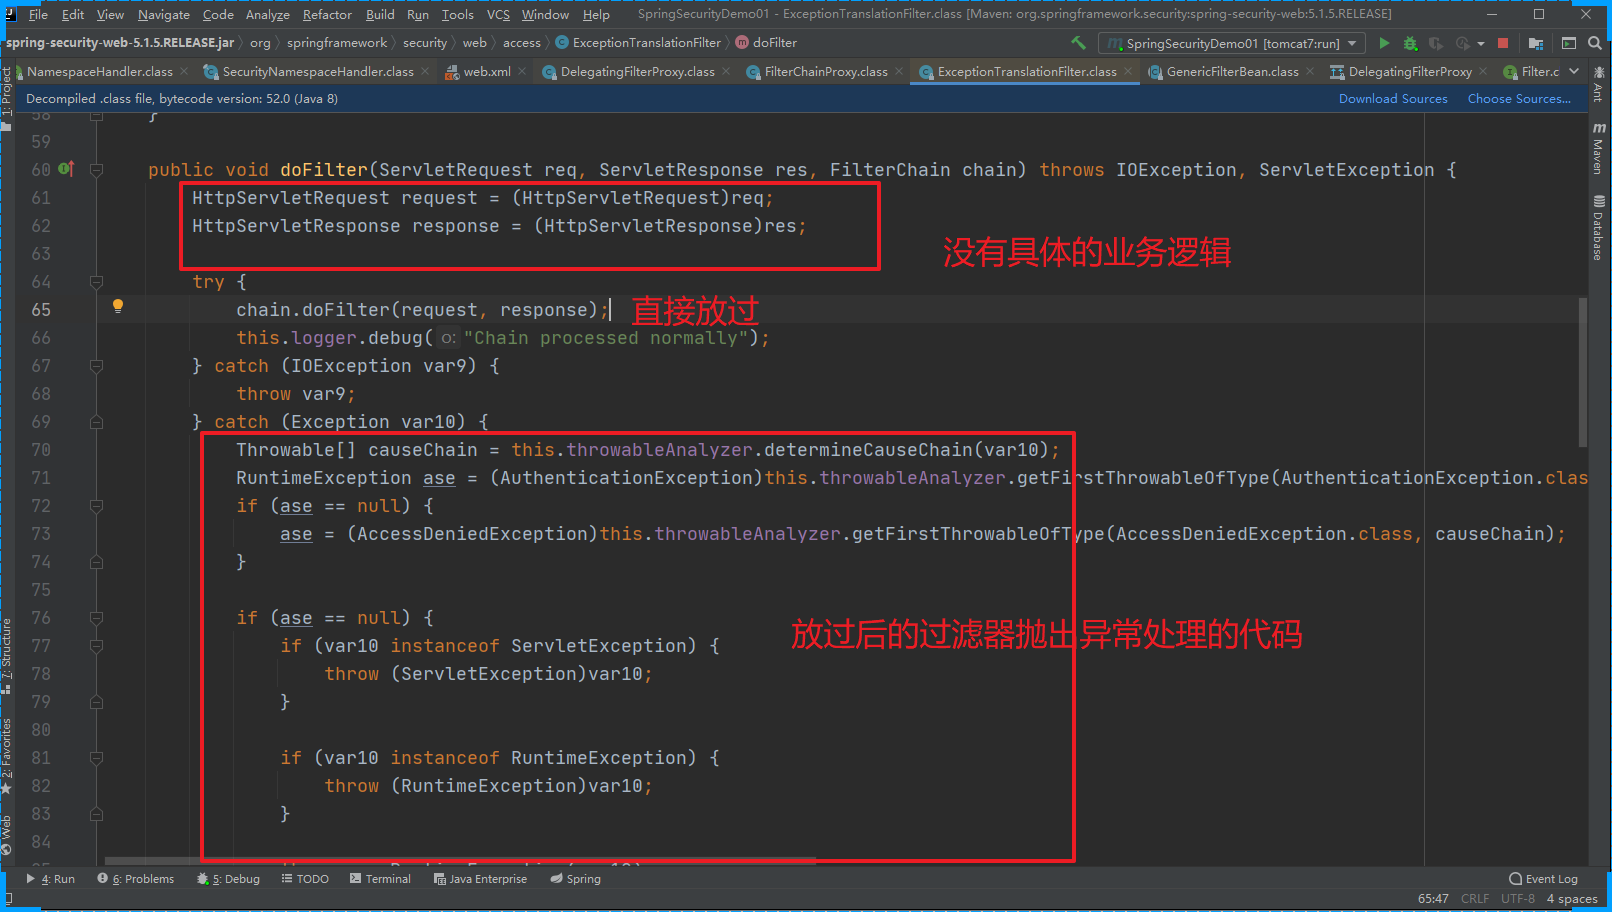
ExceptionTranslationFilter
ExceptionTranslationFilter是我们看的过滤器链中的倒数第二个,作用是捕获倒数第一个过滤器抛出来的异常信息。
FilterSecurityInterceptor
做权限相关的内容
    public void invoke(FilterInvocation fi) throws IOException, ServletException {if (fi.getRequest() != null && fi.getRequest().getAttribute("__spring_security_filterSecurityInterceptor_filterApplied") != null && this.observeOncePerRequest) {fi.getChain().doFilter(fi.getRequest(), fi.getResponse());} else {if (fi.getRequest() != null && this.observeOncePerRequest) {fi.getRequest().setAttribute("__spring_security_filterSecurityInterceptor_filterApplied", Boolean.TRUE);}
// 抛出异常 ExceptionTranslationFilter就会捕获异常InterceptorStatusToken token = super.beforeInvocation(fi);try {fi.getChain().doFilter(fi.getRequest(), fi.getResponse());} finally {super.finallyInvocation(token);}super.afterInvocation(token, (Object)null);}}
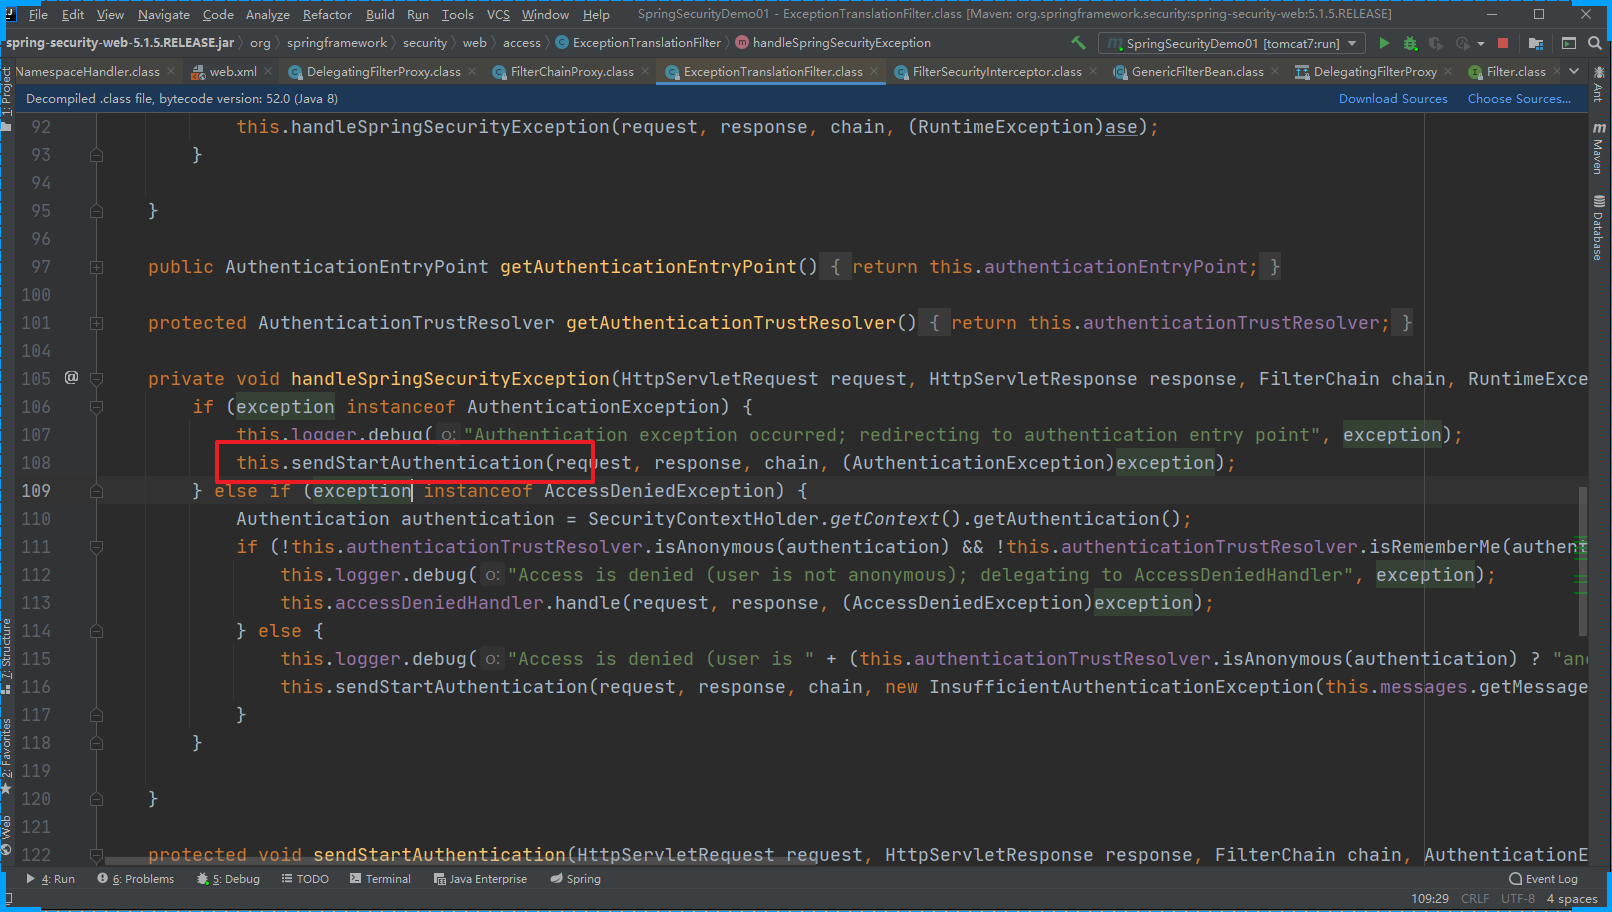
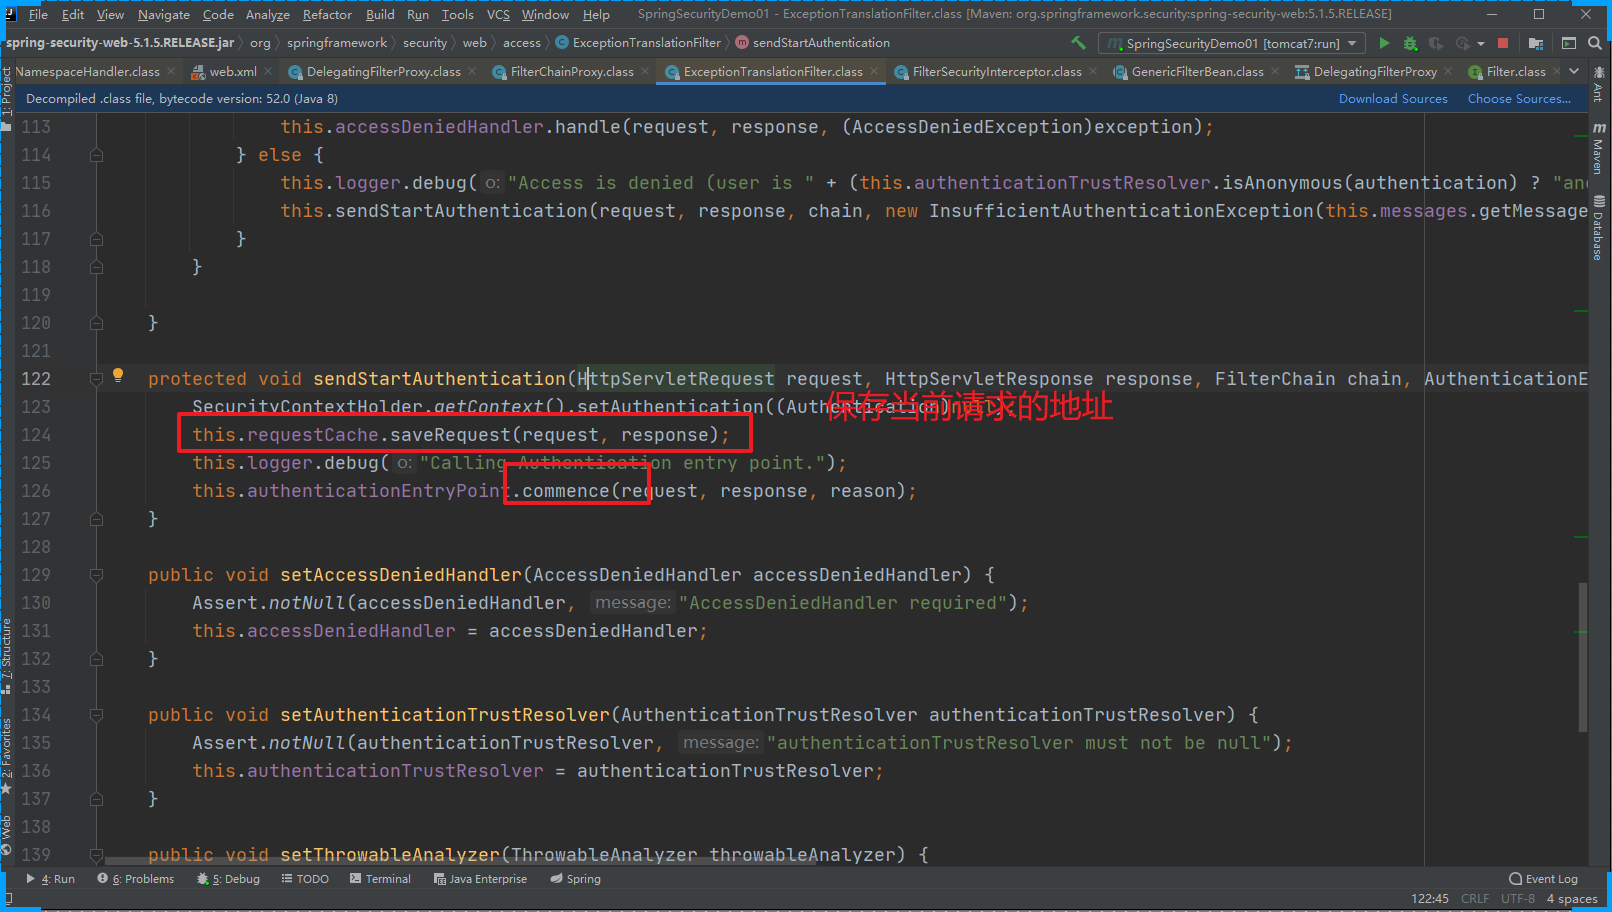
ExceptionTranslationFilter 处理异常的代码
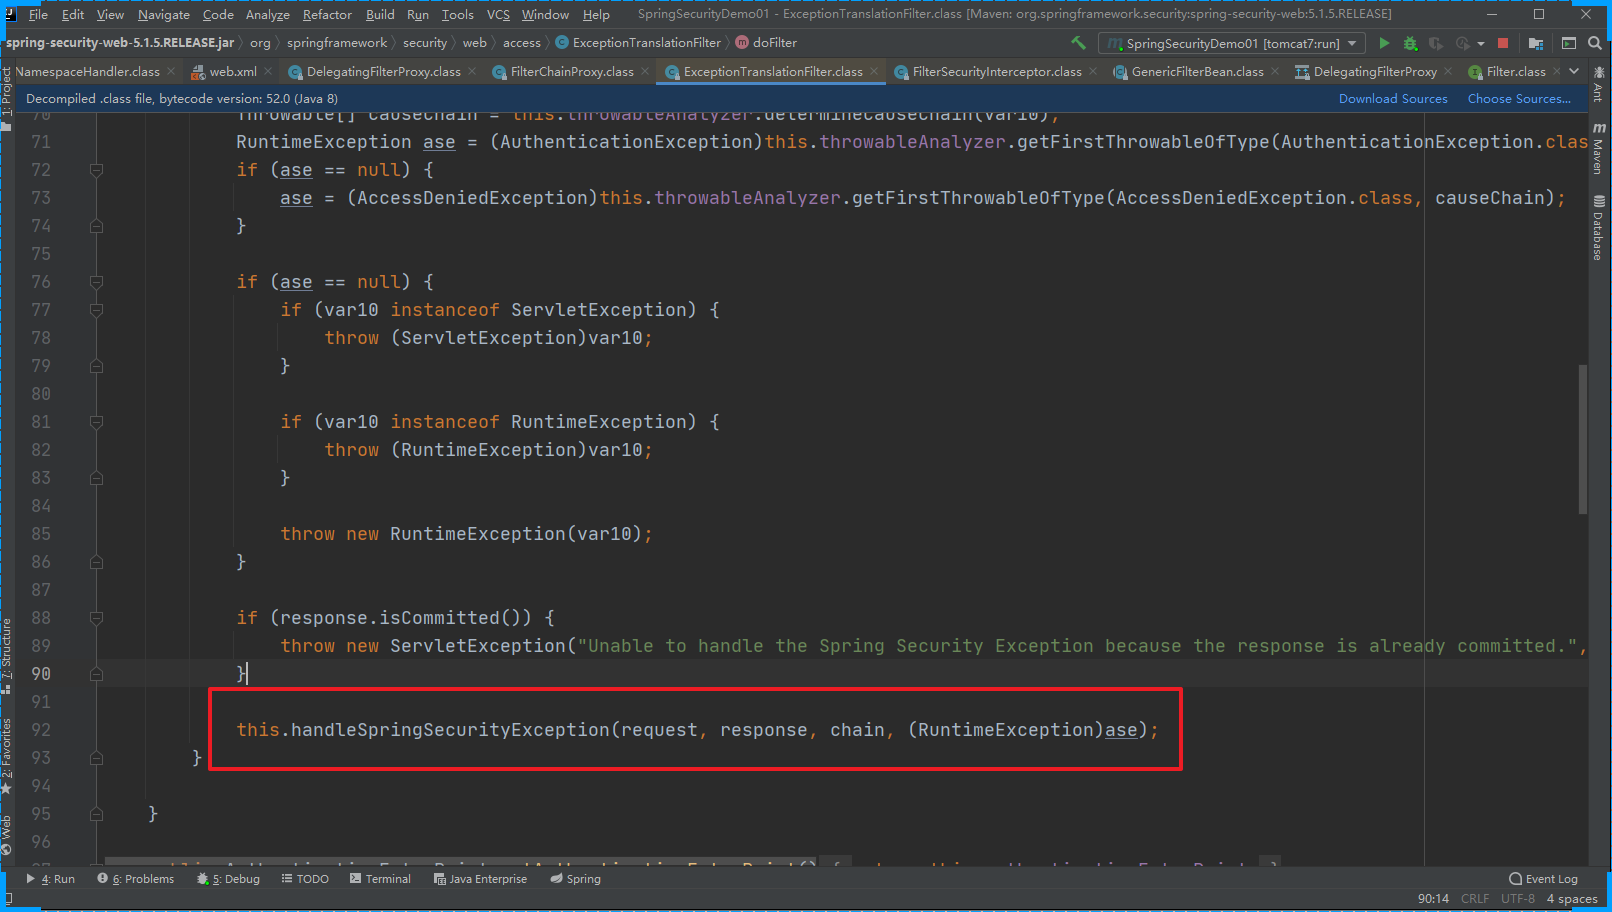

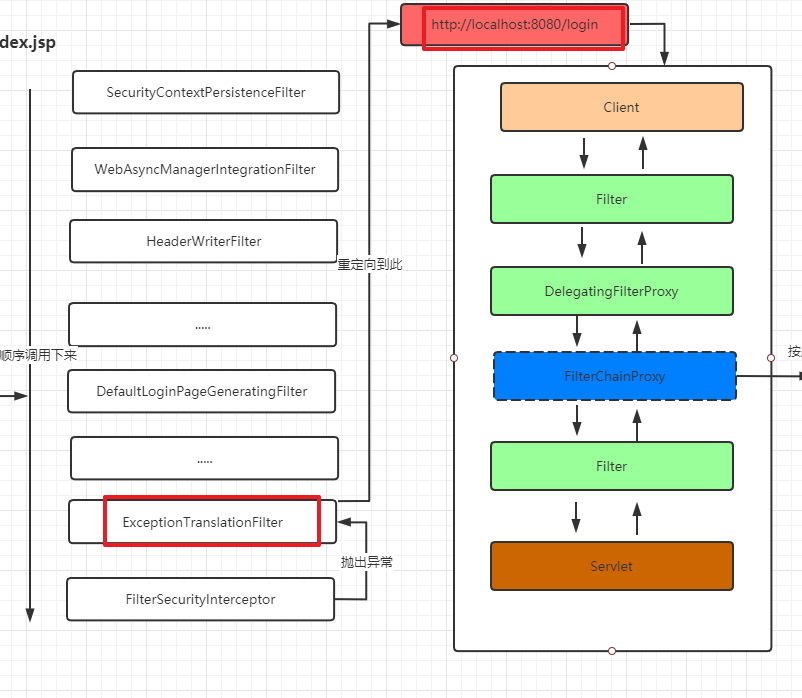
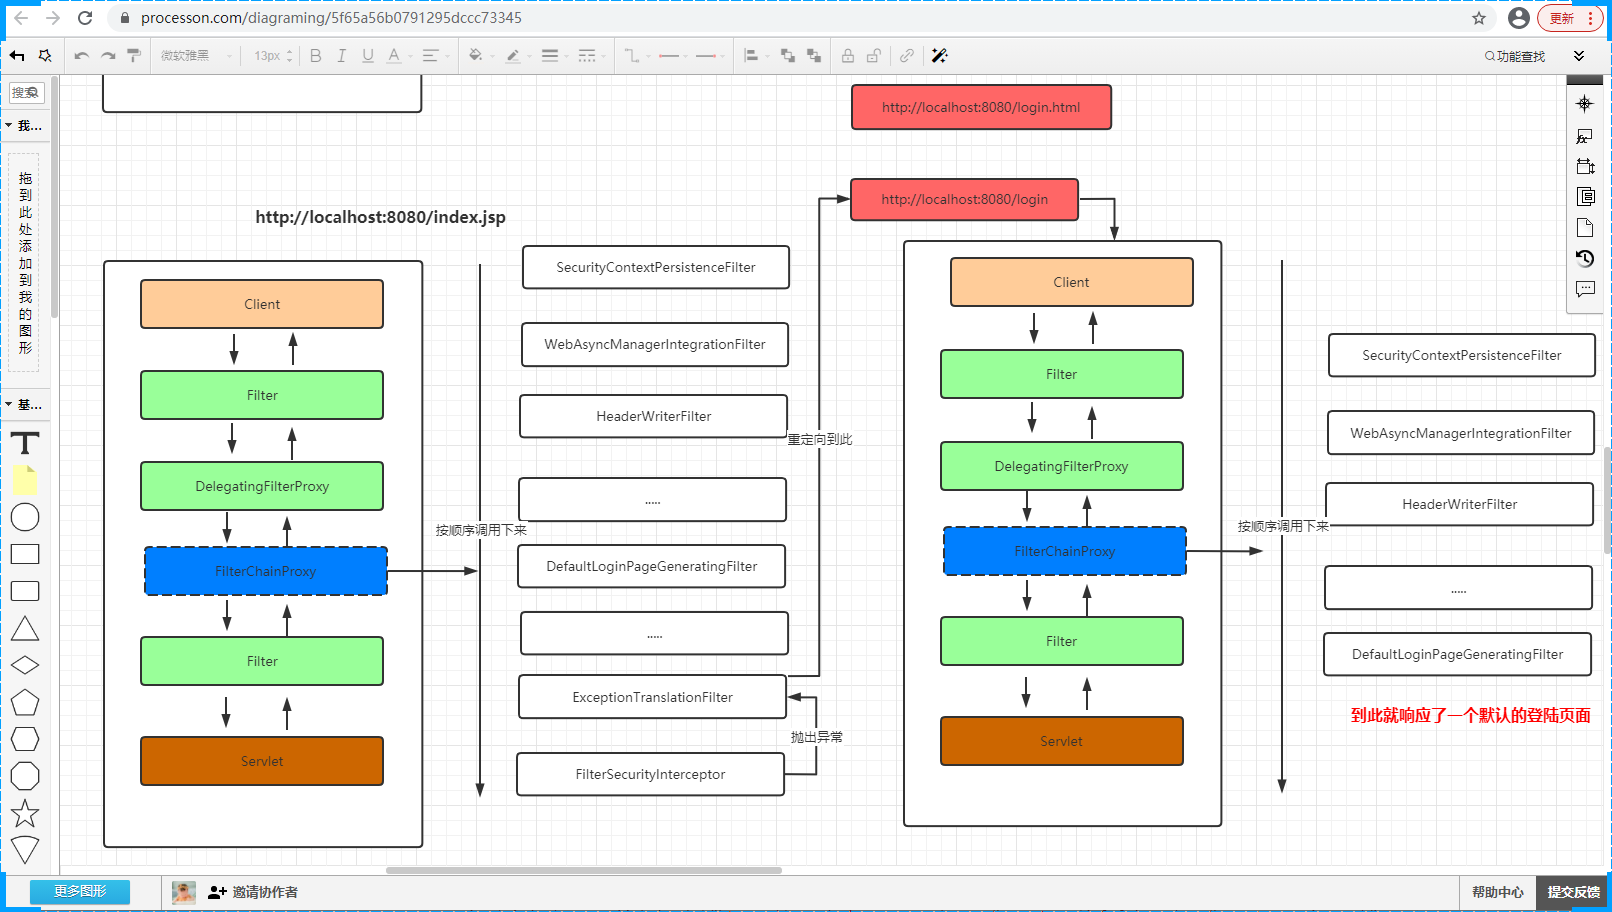
当用第二次提交 http://localhost:8082/login时 我们要关注的是 DefaultLoginPageGeneratingFilter 这个过滤器
public void doFilter(ServletRequest req, ServletResponse res, FilterChain chain) throws IOException, ServletException {HttpServletRequest request = (HttpServletRequest)req;HttpServletResponse response = (HttpServletResponse)res;boolean loginError = this.isErrorPage(request);boolean logoutSuccess = this.isLogoutSuccess(request);if (!this.isLoginUrlRequest(request) && !loginError && !logoutSuccess) {// 正常的业务请求就直接放过chain.doFilter(request, response);} else {// 需要跳转到登录页面的请求String loginPageHtml = this.generateLoginPageHtml(request, loginError, logoutSuccess);// 直接响应登录页面response.setContentType("text/html;charset=UTF-8");response.setContentLength(loginPageHtml.getBytes(StandardCharsets.UTF_8).length);response.getWriter().write(loginPageHtml);}
}
generateLoginPageHtml
private String generateLoginPageHtml(HttpServletRequest request, boolean loginError, boolean logoutSuccess) {String errorMsg = "Invalid credentials";if (loginError) {HttpSession session = request.getSession(false);if (session != null) {AuthenticationException ex = (AuthenticationException)session.getAttribute("SPRING_SECURITY_LAST_EXCEPTION");errorMsg = ex != null ? ex.getMessage() : "Invalid credentials";}}StringBuilder sb = new StringBuilder();sb.append("<!DOCTYPE html>\n<html lang=\"en\">\n  <head>\n    <meta charset=\"utf-8\">\n    <meta name=\"viewport\" content=\"width=device-width, initial-scale=1, shrink-to-fit=no\">\n    <meta name=\"description\" content=\"\">\n    <meta name=\"author\" content=\"\">\n    <title>Please sign in</title>\n    <link href=\"https://maxcdn.bootstrapcdn.com/bootstrap/4.0.0-beta/css/bootstrap.min.css\" rel=\"stylesheet\" integrity=\"sha384-/Y6pD6FV/Vv2HJnA6t+vslU6fwYXjCFtcEpHbNJ0lyAFsXTsjBbfaDjzALeQsN6M\" crossorigin=\"anonymous\">\n    <link href=\"https://getbootstrap.com/docs/4.0/examples/signin/signin.css\" rel=\"stylesheet\" crossorigin=\"anonymous\"/>\n  </head>\n  <body>\n     <div class=\"container\">\n");String contextPath = request.getContextPath();if (this.formLoginEnabled) {sb.append("      <form class=\"form-signin\" method=\"post\" action=\"" + contextPath + this.authenticationUrl + "\">\n        <h2 class=\"form-signin-heading\">Please sign in</h2>\n" + createError(loginError, errorMsg) + createLogoutSuccess(logoutSuccess) + "        <p>\n          <label for=\"username\" class=\"sr-only\">Username</label>\n          <input type=\"text\" id=\"username\" name=\"" + this.usernameParameter + "\" class=\"form-control\" placeholder=\"Username\" required autofocus>\n        </p>\n        <p>\n          <label for=\"password\" class=\"sr-only\">Password</label>\n          <input type=\"password\" id=\"password\" name=\"" + this.passwordParameter + "\" class=\"form-control\" placeholder=\"Password\" required>\n        </p>\n" + this.createRememberMe(this.rememberMeParameter) + this.renderHiddenInputs(request) + "        <button class=\"btn btn-lg btn-primary btn-block\" type=\"submit\">Sign in</button>\n      </form>\n");}if (this.openIdEnabled) {sb.append("      <form name=\"oidf\" class=\"form-signin\" method=\"post\" action=\"" + contextPath + this.openIDauthenticationUrl + "\">\n        <h2 class=\"form-signin-heading\">Login with OpenID Identity</h2>\n" + createError(loginError, errorMsg) + createLogoutSuccess(logoutSuccess) + "        <p>\n          <label for=\"username\" class=\"sr-only\">Identity</label>\n          <input type=\"text\" id=\"username\" name=\"" + this.openIDusernameParameter + "\" class=\"form-control\" placeholder=\"Username\" required autofocus>\n        </p>\n" + this.createRememberMe(this.openIDrememberMeParameter) + this.renderHiddenInputs(request) + "        <button class=\"btn btn-lg btn-primary btn-block\" type=\"submit\">Sign in</button>\n      </form>\n");}if (this.oauth2LoginEnabled) {sb.append("<h2 class=\"form-signin-heading\">Login with OAuth 2.0</h2>");sb.append(createError(loginError, errorMsg));sb.append(createLogoutSuccess(logoutSuccess));sb.append("<table class=\"table table-striped\">\n");Iterator var7 = this.oauth2AuthenticationUrlToClientName.entrySet().iterator();while(var7.hasNext()) {Entry<String, String> clientAuthenticationUrlToClientName = (Entry)var7.next();sb.append(" <tr><td>");String url = (String)clientAuthenticationUrlToClientName.getKey();sb.append("<a href=\"").append(contextPath).append(url).append("\">");String clientName = HtmlUtils.htmlEscape((String)clientAuthenticationUrlToClientName.getValue());sb.append(clientName);sb.append("</a>");sb.append("</td></tr>\n");}sb.append("</table>\n");}sb.append("</div>\n");sb.append("</body></html>");return sb.toString();
}
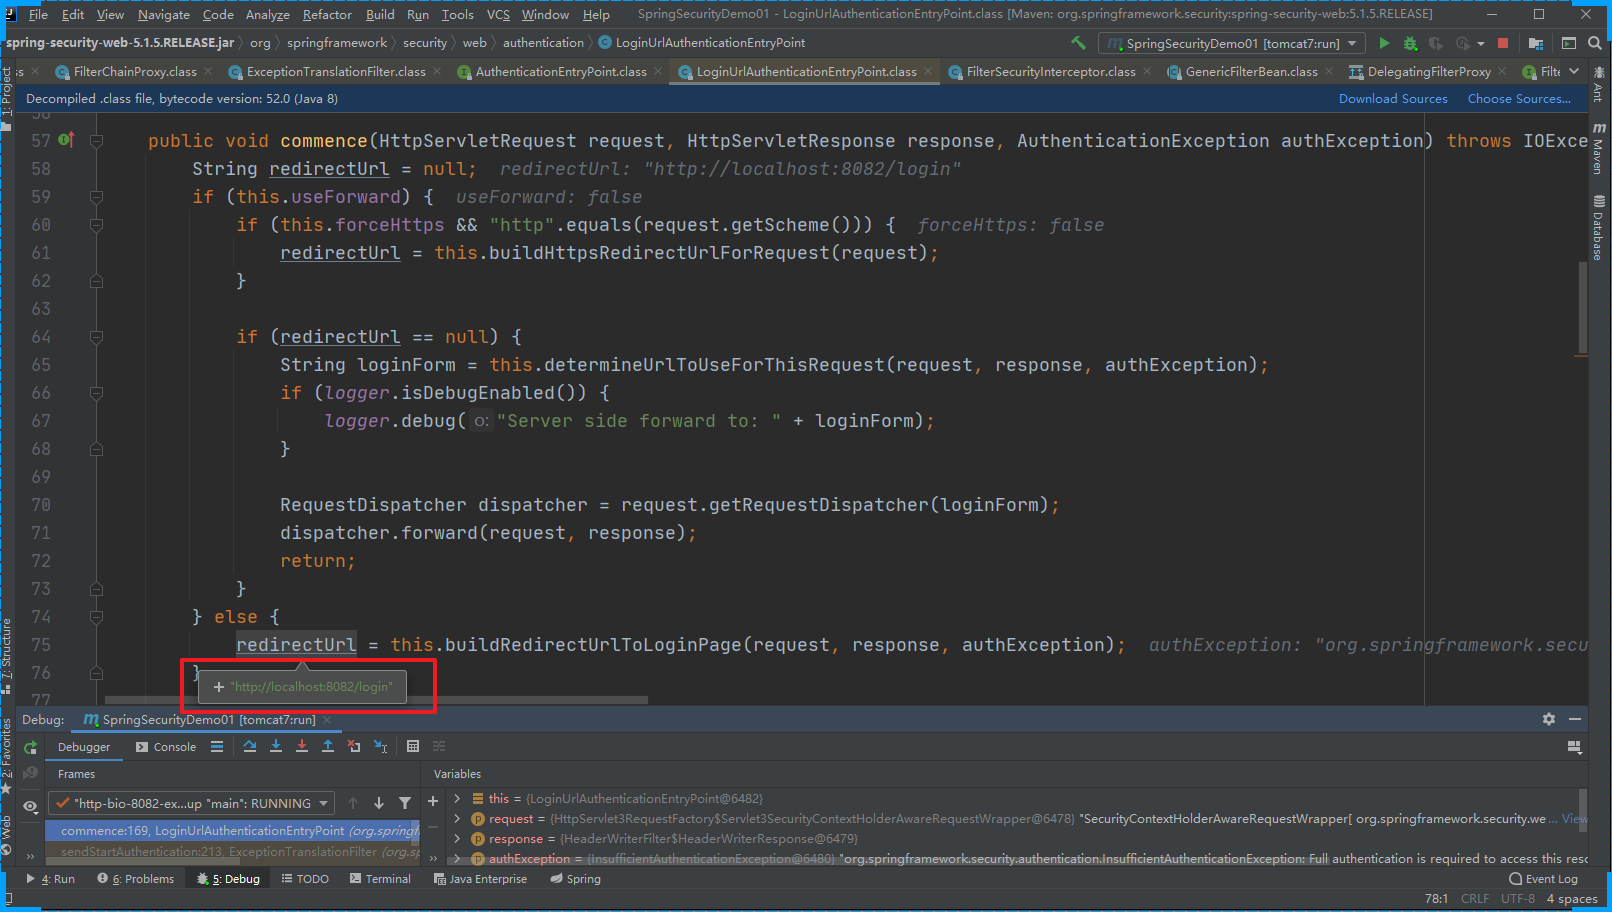
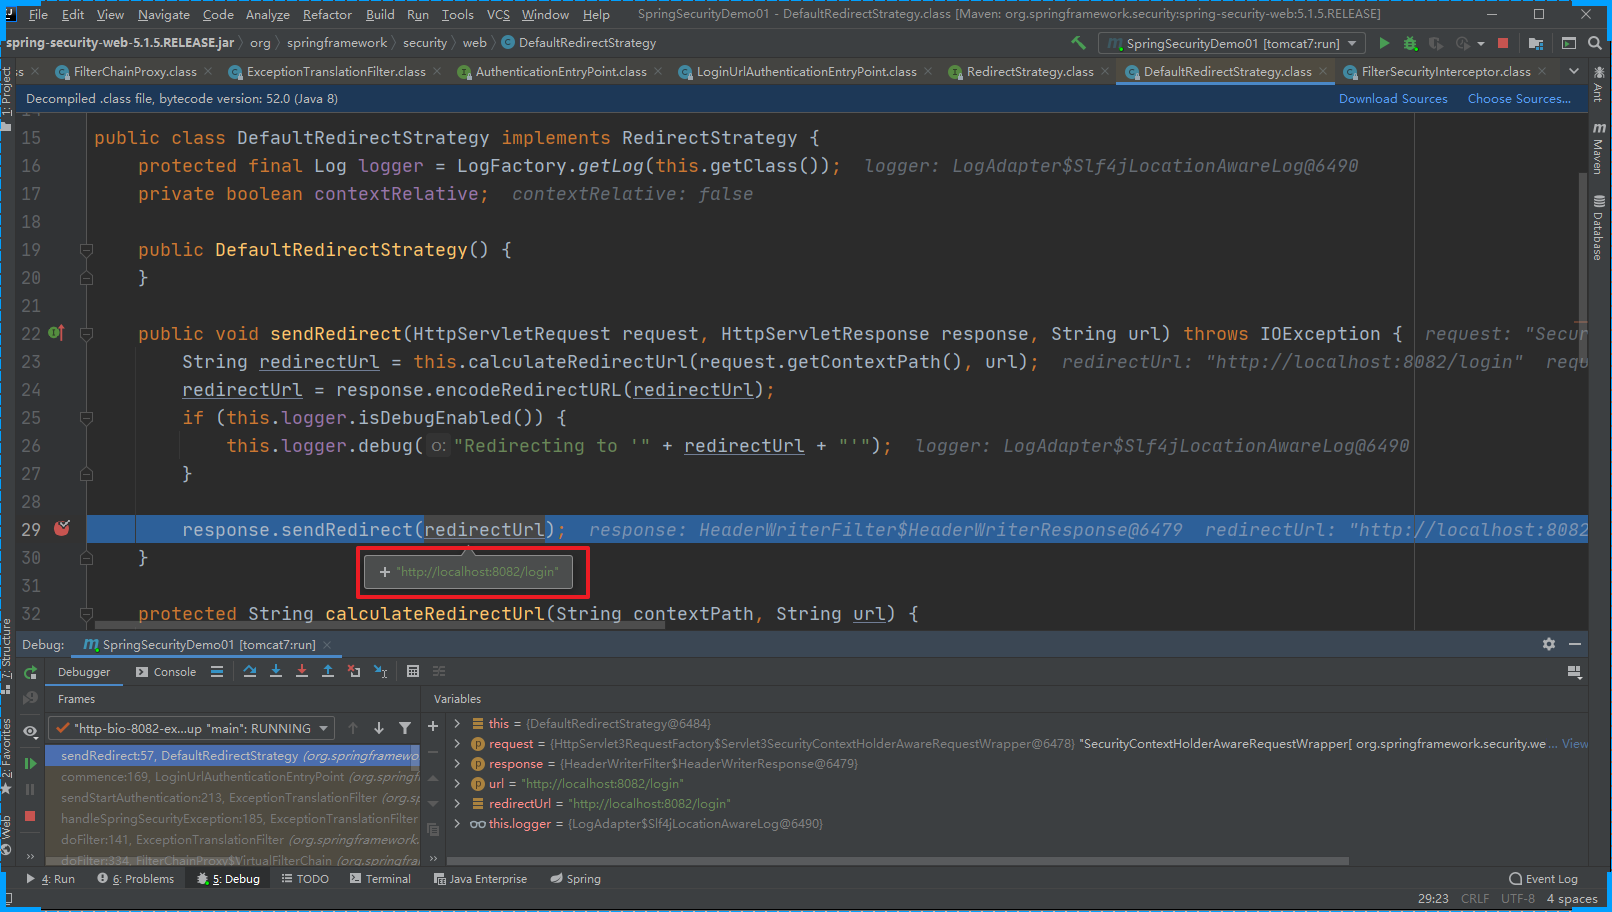
第一次请求的完整的流程
页面调试也可以验证我的推论


 "类和对象(中)")
