
这个项目介绍了如何制作和控制一只仿生手。作者最初受到Instagram上一个视频的启发,该视频展示了使用MPU6050传感器追踪手部动作并在屏幕上显示3D模型。作者决定将这个想法进一步发展,使用OpenCV来控制一只真实的仿生手。
大家好,在这篇教程中,我想和大家分享一下如何制作并控制一只自己的仿生手。这个想法源于我在无意中刷Instagram时,看到一段短视频:一个人通过MPU6050传感器来跟踪手部运动,并在屏幕上显示手的3D模型。因为我之前也使用过这个传感器,所以觉得这个我也能完成。我一直喜欢将编程与现实世界结合起来,于是我想,为什么不将这些测量数据传输到一个真实的仿生手上呢?后来我决定,使用OpenCV代替MPU6050会更加高效,部分原因也是我想借此机会学习另一种技能。
特别感谢Gaël Langevin,他在InMoov项目中设计了这个手的模型,并慷慨地分享了出来。
所需材料
InMoov手及前臂
- 3D打印机
- 焊接工具
- 约1公斤的耗材(PETG 或 ABS 或 PLA)
- 3米钓鱼线(能承重约20公斤)
- 5根扩展弹簧(3/16″ x 1-3/4)
- RTV硅胶 Ecoflex™ 00-10
螺丝、螺母和螺栓
- 10个M2x4平头木螺丝
- 10个M3x4mm平头螺丝
- 4个M3x12mm平头木螺丝
- 20个M3x12mm平头螺丝
- 25个M3x16mm平头螺丝
- 10个M3x20mm平头螺丝
- 35个M3螺母
电子元件
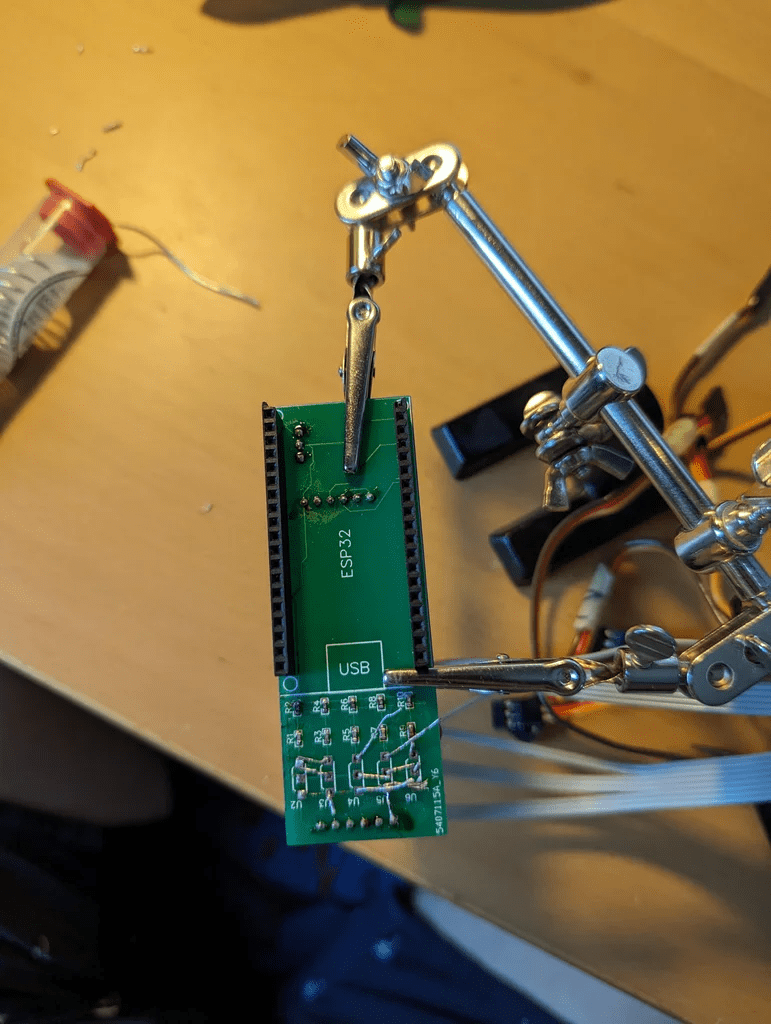
- 1块ESP32 38-pin 开发模块
- 1根micro USB数据线
- 5个线性霍尔传感器(49E)
- 5个直径2.5mm x 1mm的磁盘磁铁
- 1根16芯彩排线
- 5个1k电阻
- 5个2k电阻
- 6个伺服电机(JX PDI-6225MG-300)
- 1块定制PCB(可选)
- 1个电源(理想情况下为6V或5V,功率约100W,因为每个伺服电机的电流可达3A)
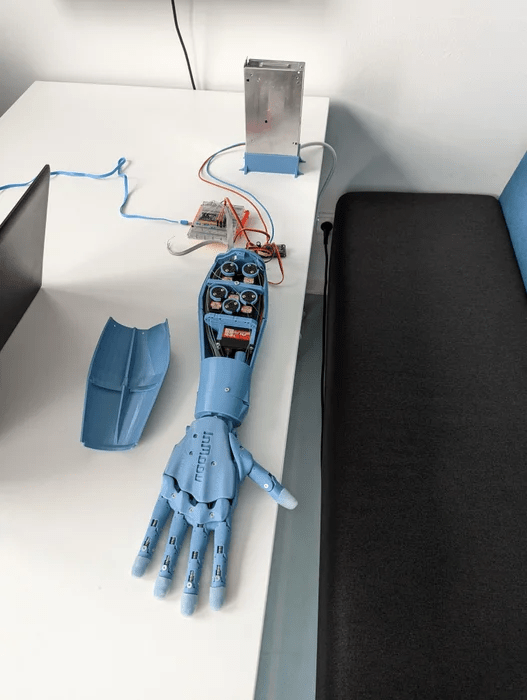
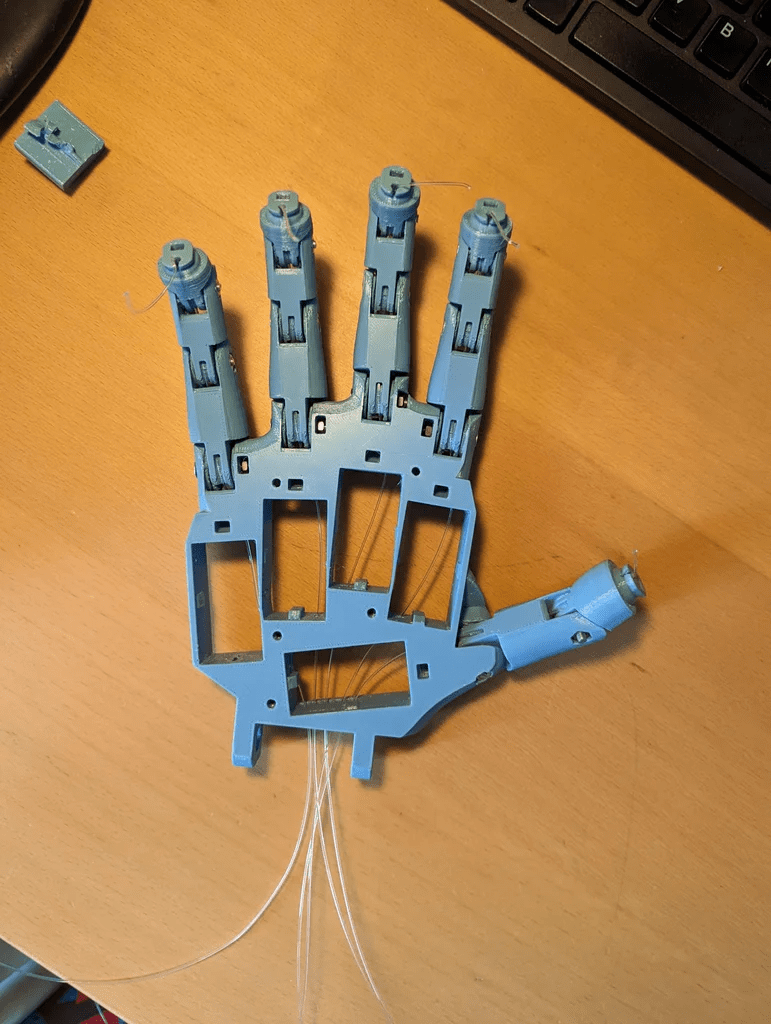
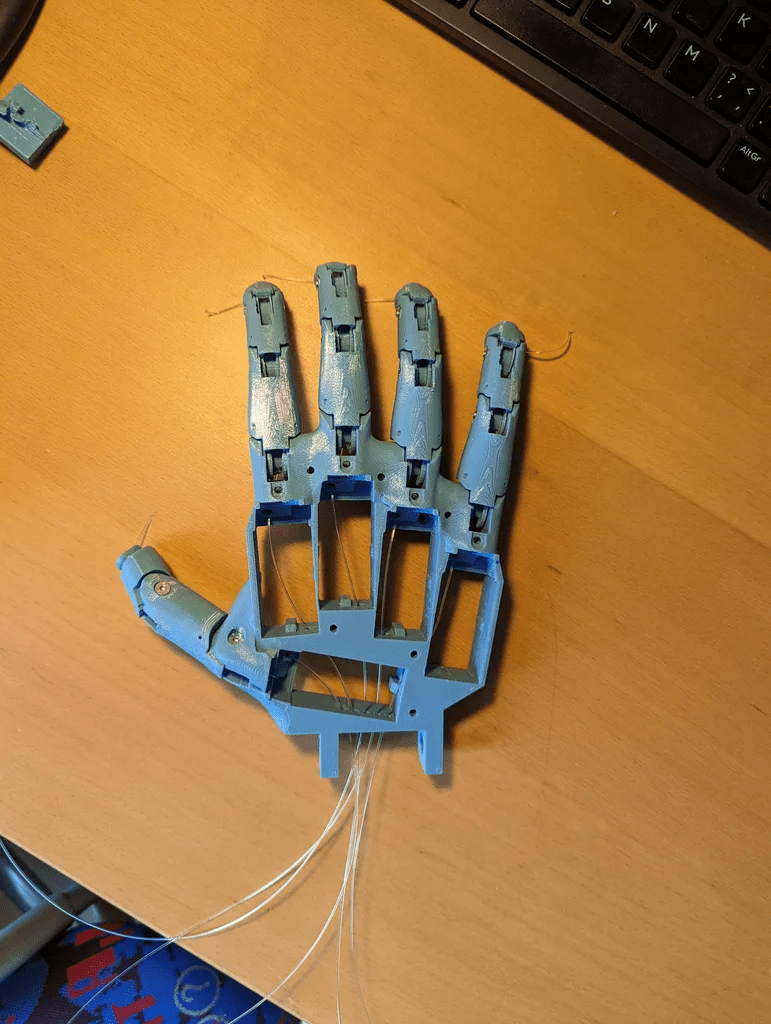
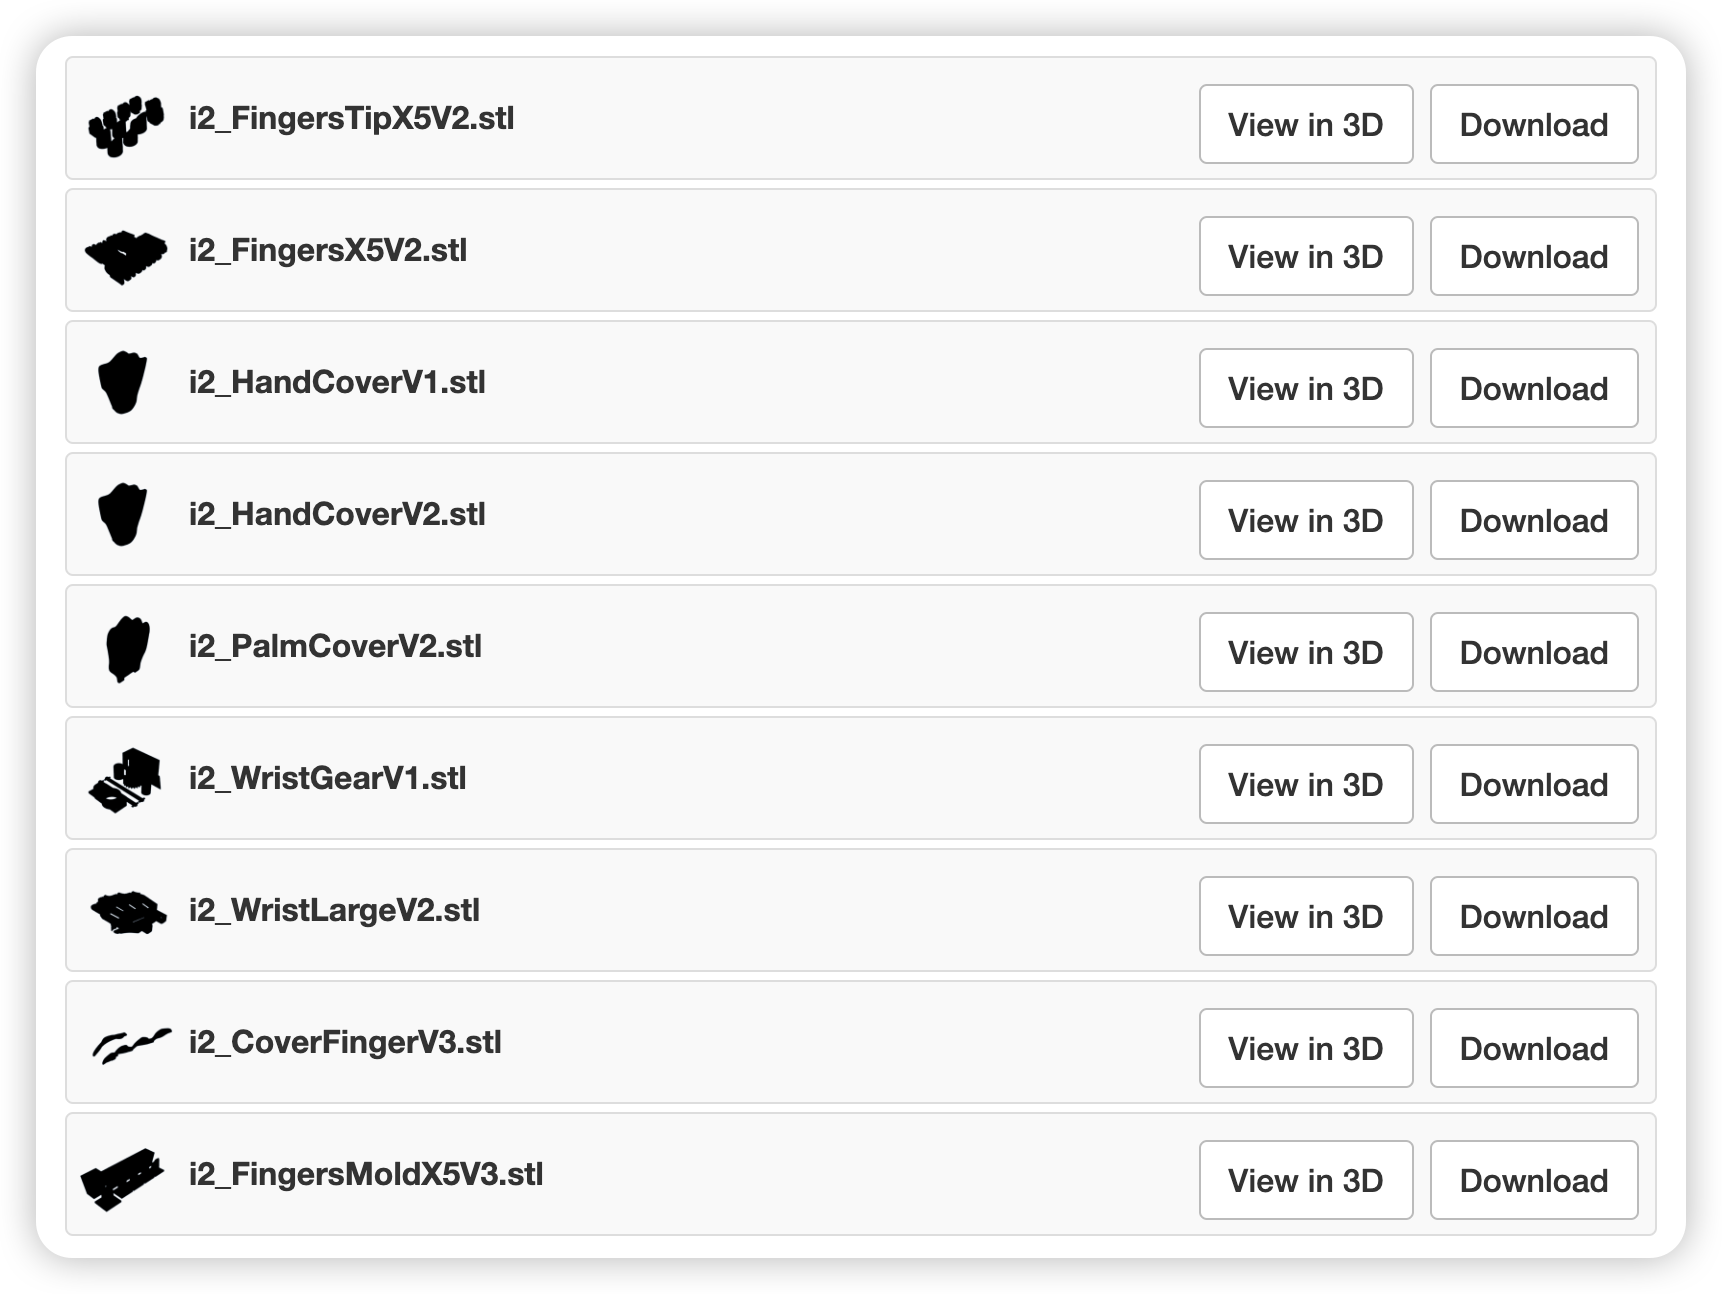
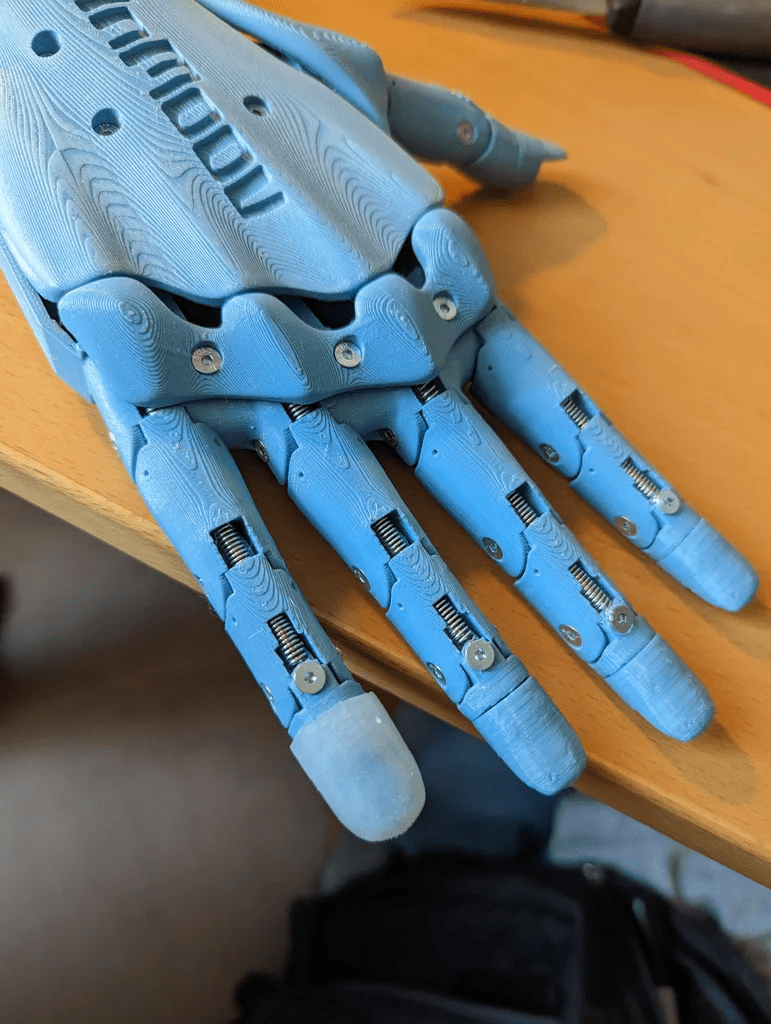
步骤1:3D打印手部
3D打印文件见文末。
打印时,建议使用稍高的填充率(约30%),以提高部件的耐用性。关于材料,InMoov使用的是ABS,不过如果你没有稳定打印ABS的设备,PETG或PLA同样可以使用。
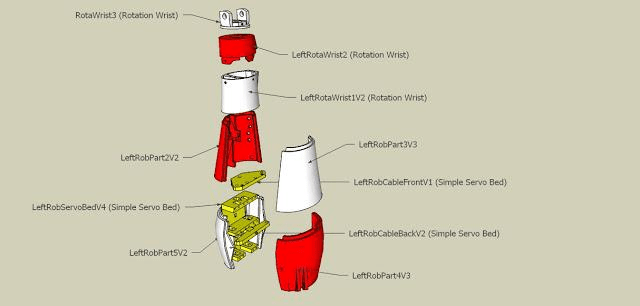
步骤2:3D打印前臂
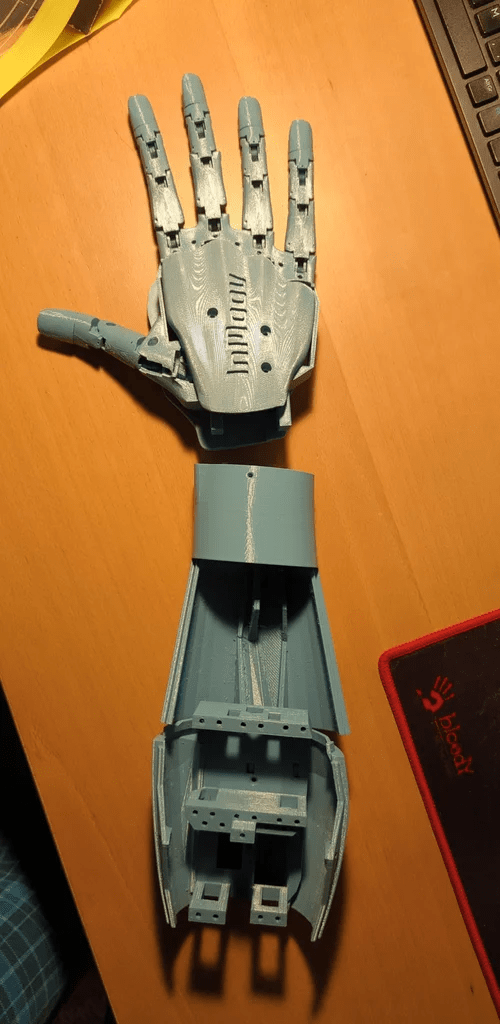
同样地,手部所需的文件如下,并且也在inmoov STL零件库中。请注意,在inmoov零件库中有原版inmoov机器人的文件。这个手是i2版本,因此你只需要前臂部分的一些零件。另外一个需要注意的是,当打印Bolt_entretoise7时,你只需要中间的螺栓和夹子(其他部分是为旧版手设计的)。
3D打印文件文末下载。
你还可以打印一个我自己在Fusion 360中设计的小展示支架。
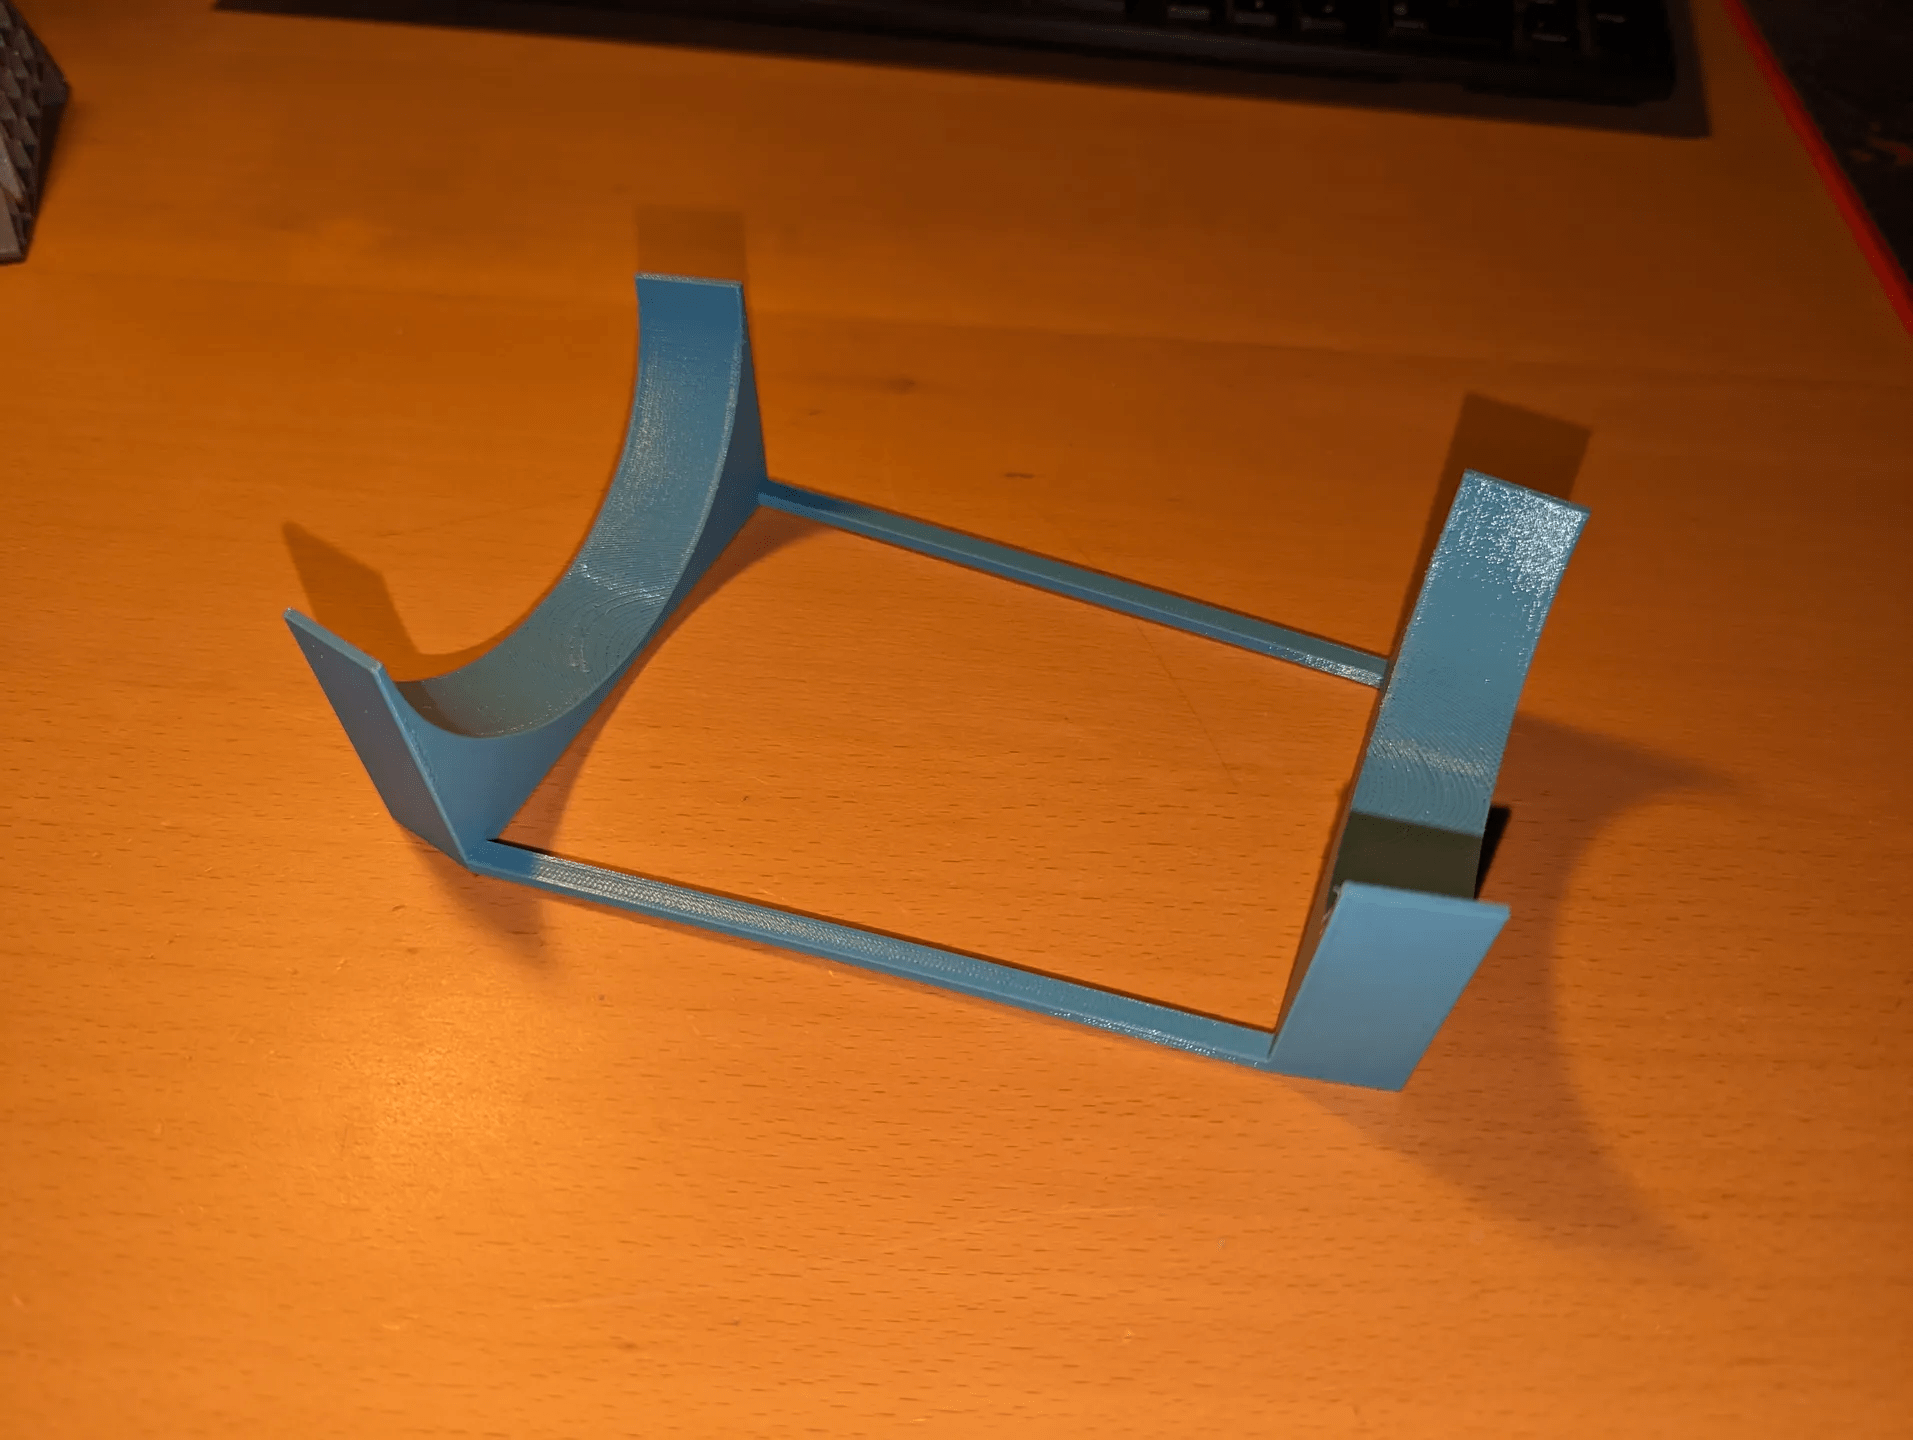
链接:https://www.printables.com/model/593999-inmoov-hand-stand?lang=cs
步骤3:组装
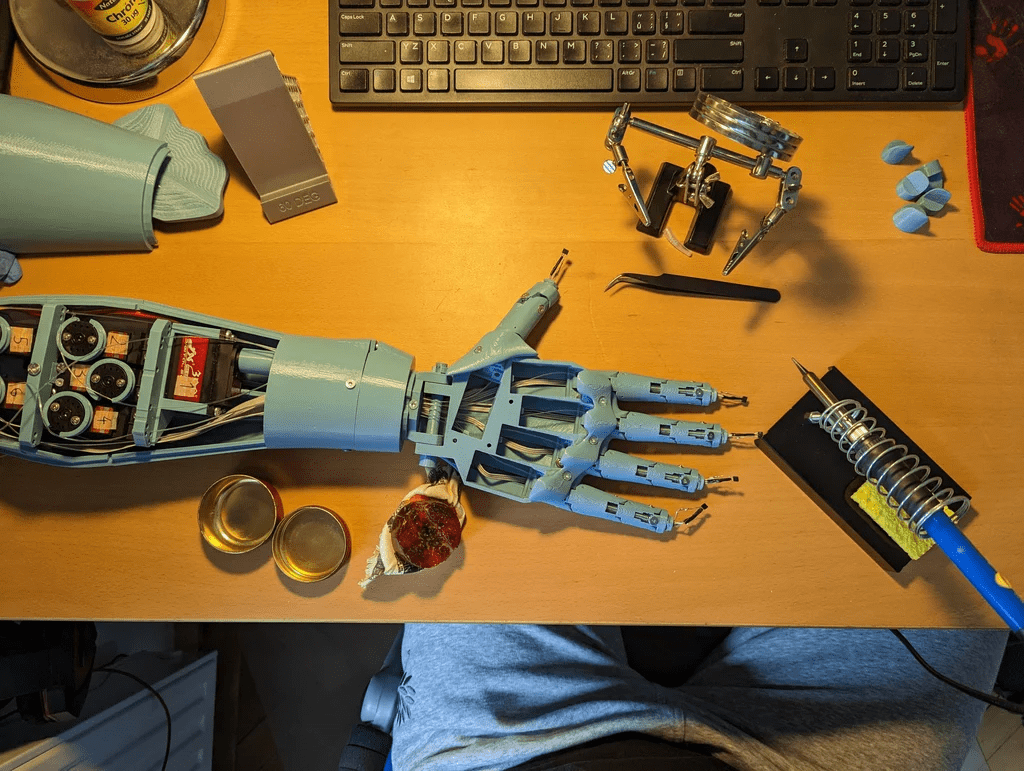
在组装时,可以参考InMoov提供的hand i2与前臂的教程,这些教程非常详细,提供了所有必要的信息。
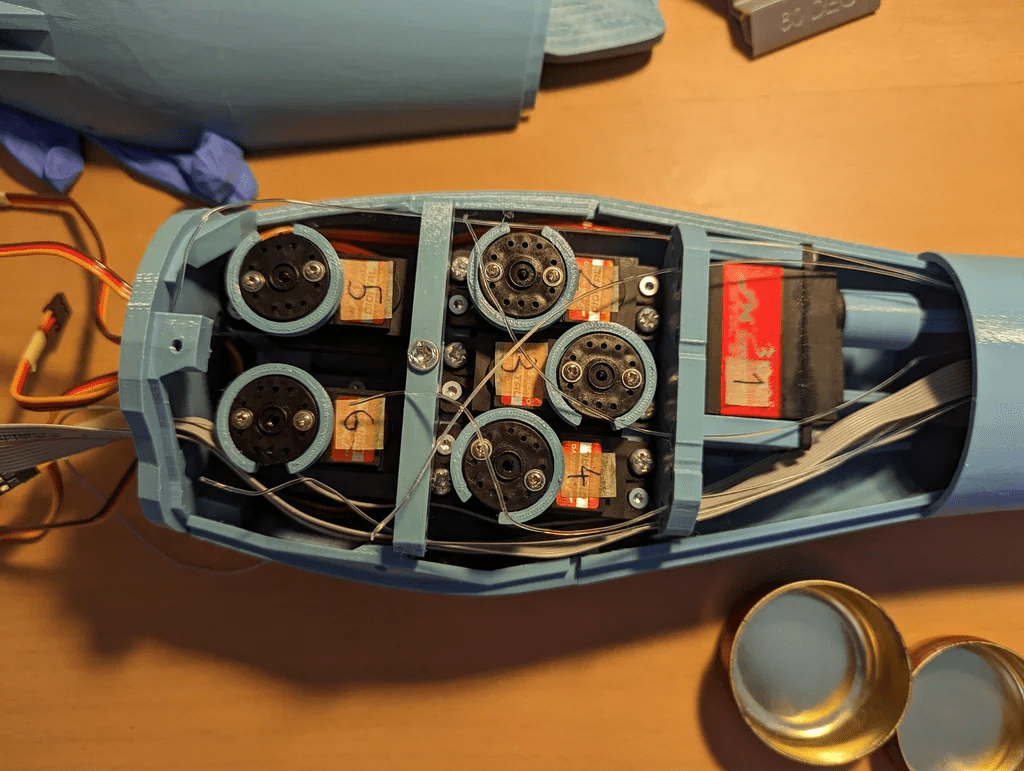
初始部件的组装相对简单,只需用螺丝将整个设计固定在一起。稍微复杂的部分是确保钓鱼线的布置不打结,以及将霍尔传感器正确安装在指尖。
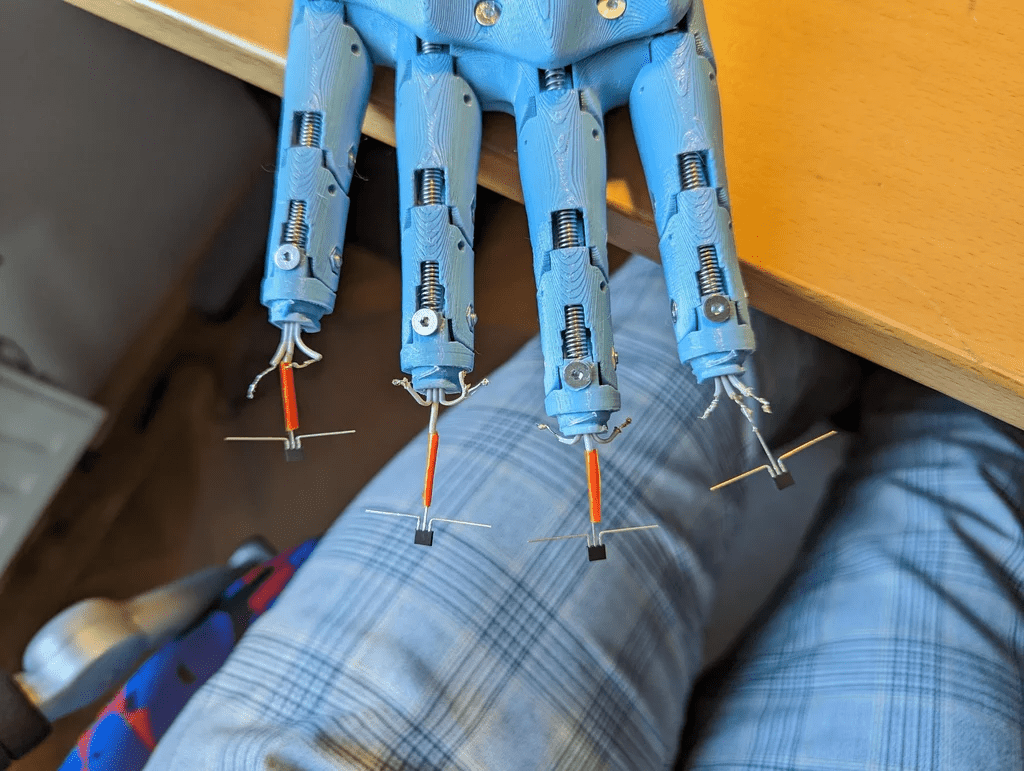
步骤4:硅胶指尖

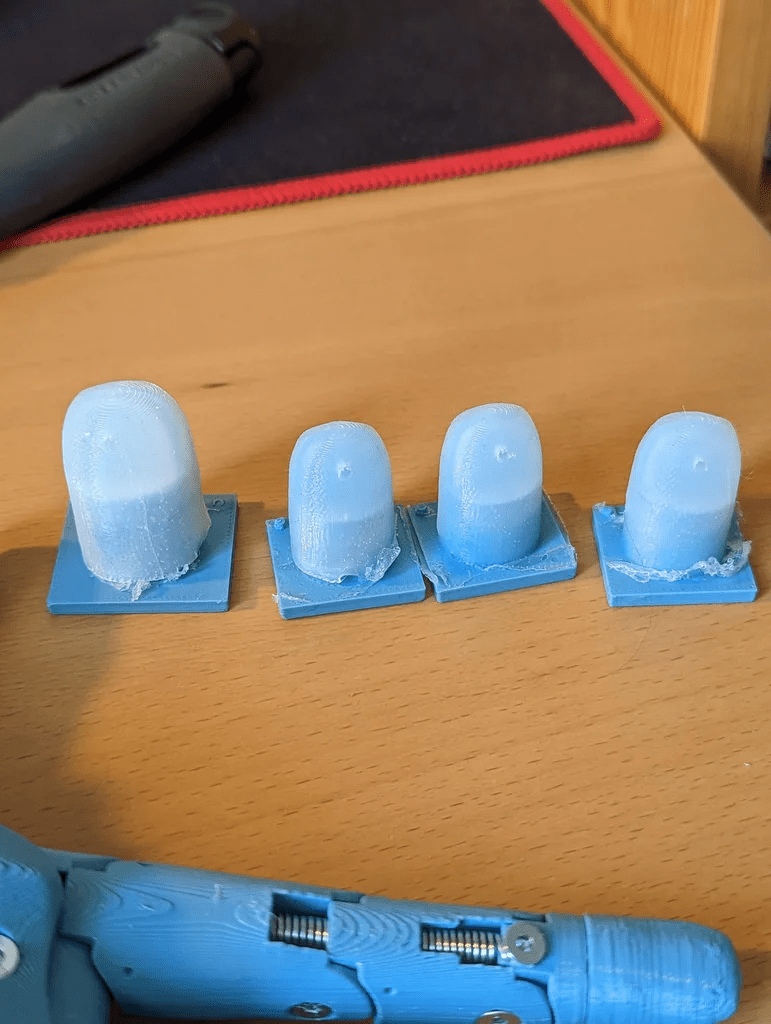
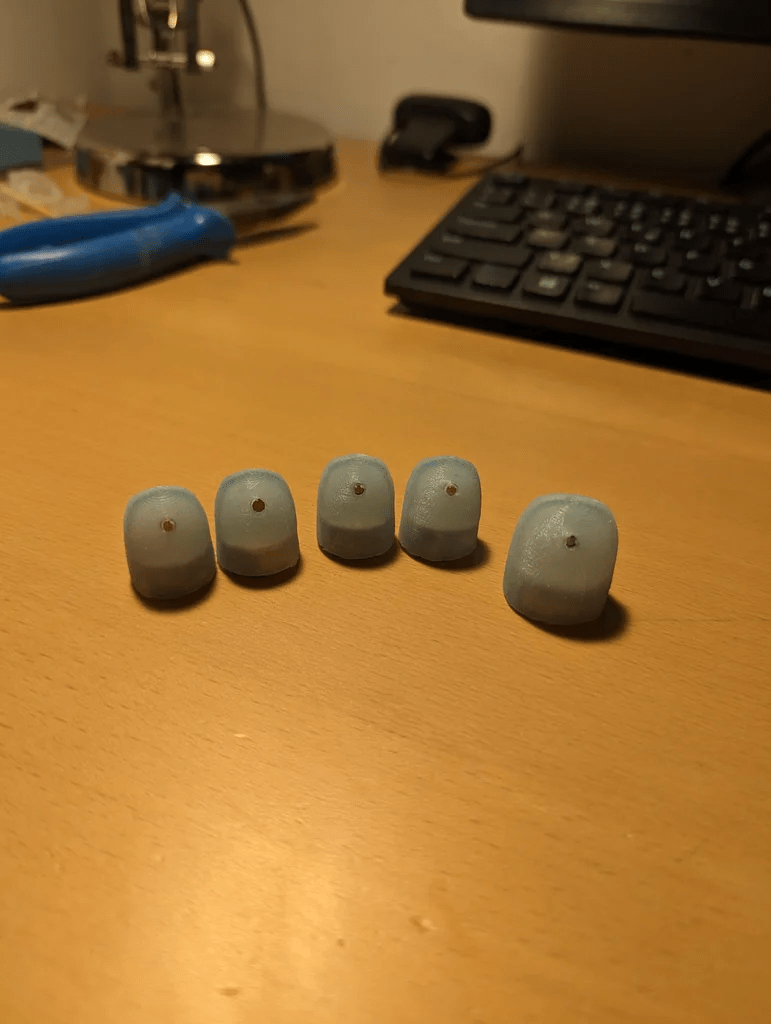
对于指尖来说,使用非常柔软的硅胶是很重要的,因为霍尔传感器的读取有一定的不确定性。硅胶越软,内部的磁铁运动幅度越大,从而更容易从数据中识别。将硅胶部分粘到3D打印出的部件上之后,可以用它来调整霍尔传感器的突出程度。
在这一切设置好之后,强烈建议将霍尔传感器固定在手指的末端,否则在手指运动过程中,霍尔传感器可能会稍微移动,从而影响测量结果。
步骤5:电路
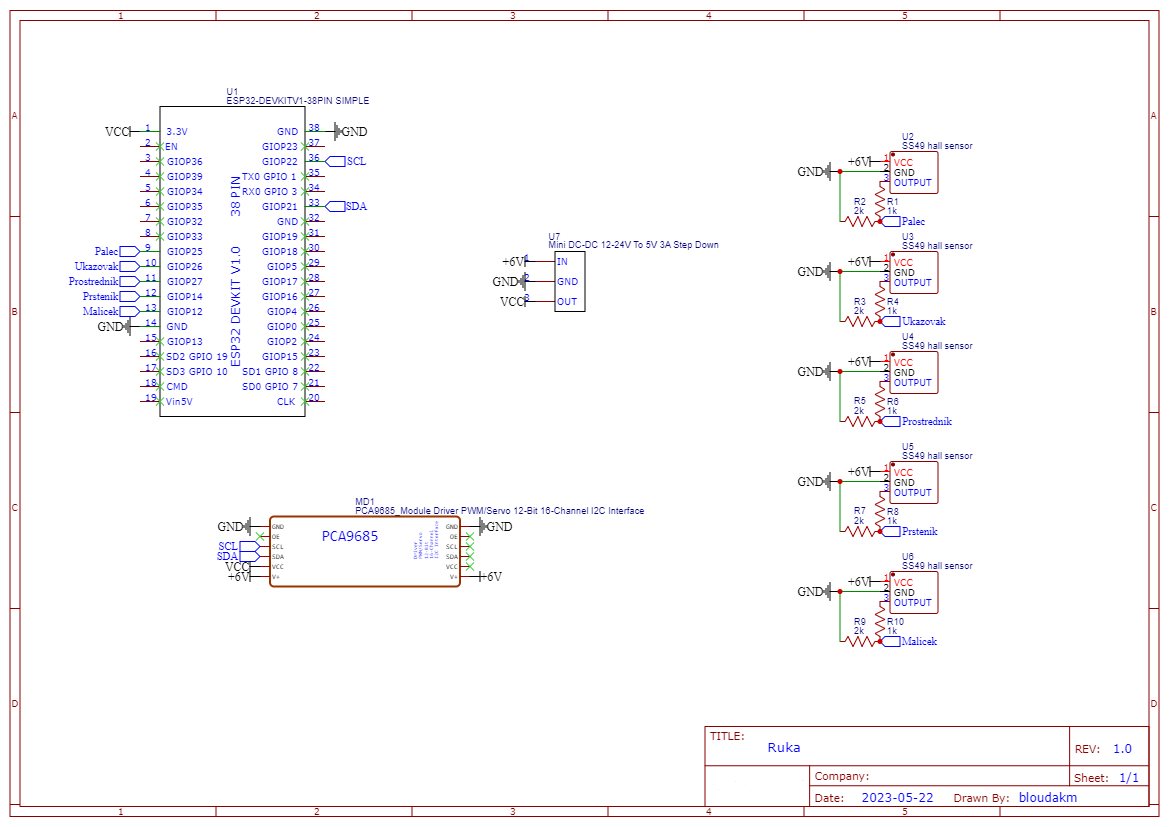
电路方面,使用16路舵机驱动模块会带来显著的效果,但也存在一些缺点。该驱动模块有两种不同的版本,虽然它们几乎相同,但在反极性保护电路(用于电容)所使用的晶体管上有区别,一个版本可承受约8A电流,而另一个版本仅可承受约0.5A,这远低于舵机实际需要的电流。因此,最好不要让伺服电机通过驱动模块供电,或者按照视频中所述进行小改动,并在使用电容时要格外小心。
关于霍尔传感器,我们需要使用一个电压分压器,因为它输出的电压范围在0V到5V之间,而ESP32只能正确读取0V到3.3V的ADC值。
对于整个电路,可以选择使用面包板,或者更好的是使用定制PCB(作者版本的GitHub链接)。
步骤6:测试
视频1
视频2
由于每个伺服电机和霍尔传感器都略有不同,所以需要对它们进行测试。
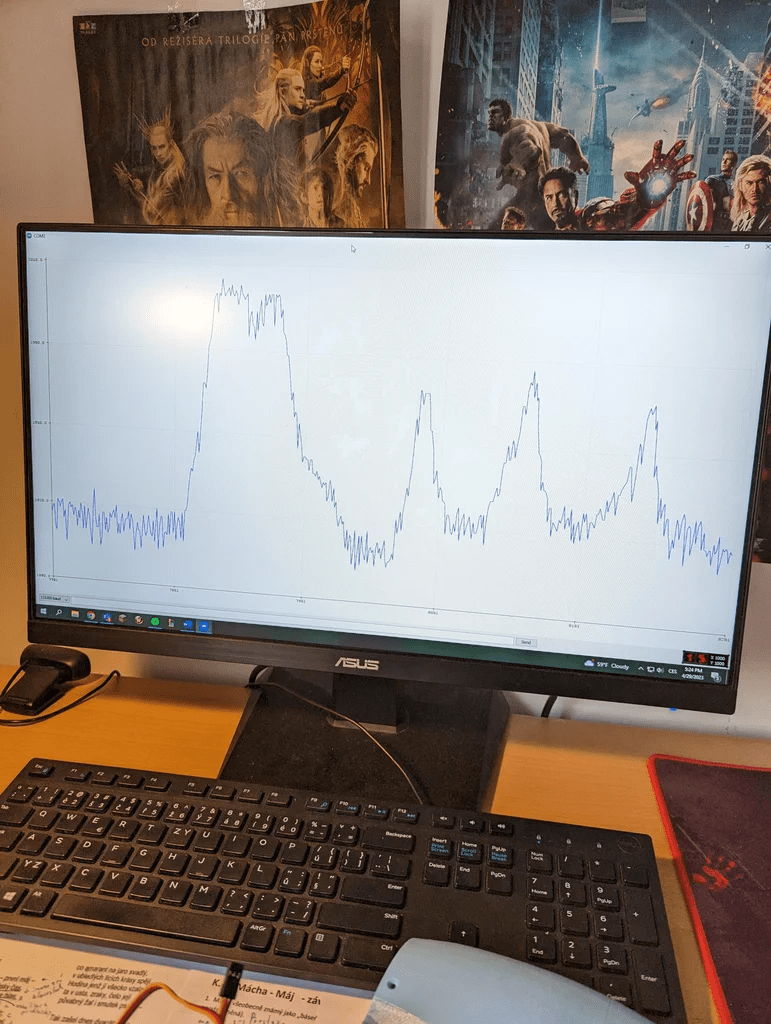
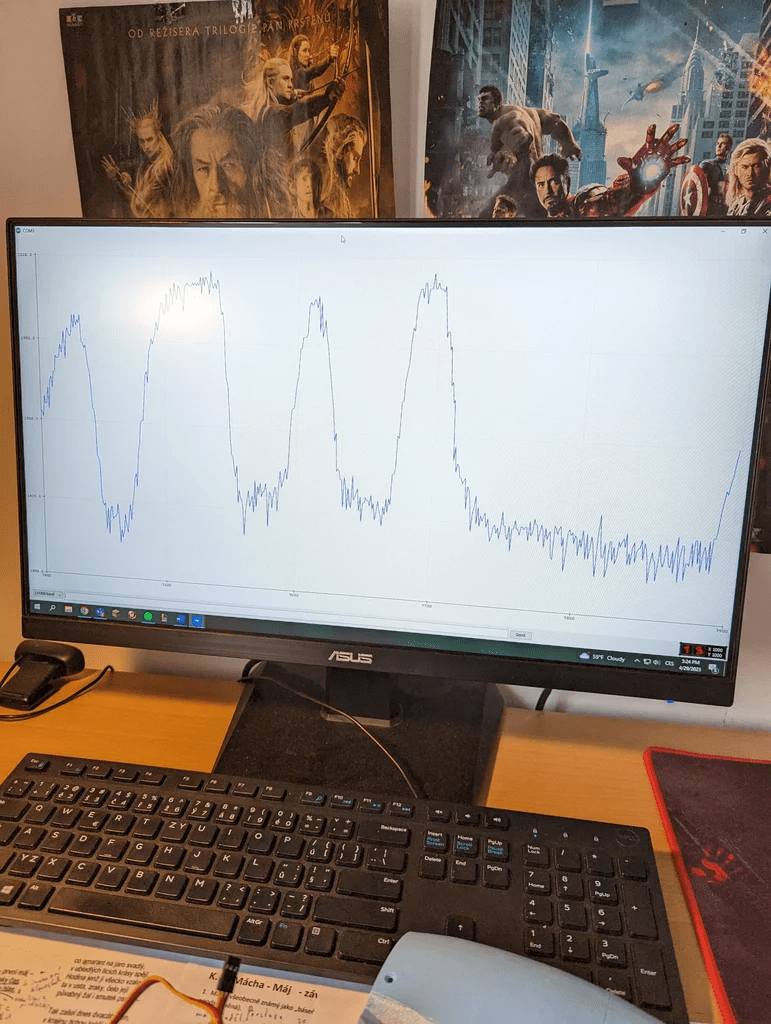
最重要的是测试霍尔传感器,因为它们测量的值将决定仿生手是否施加了足够的压力。我建议使用Arduino IDE的绘图功能来绘制数据,以观察数值何时超过自然不确定性范围。
为此,我们可以使用这个非常简单的代码片段:
int hall = "Pin number your hall sensor is connected to";void setup() {Serial.begin(115200);pinMode(hall, INPUT);
}void loop() {Serial.println(analogRead(hall));delay(10);
}
步骤7:代码
OpenCV(在VSCode中运行的Python代码)
就运行在带有网络摄像头的PC上的代码而言,我们需要完成两个主要任务:
第一个任务是使用OpenCV追踪手部及其元素。基于这些元素我们可以计算每根手指的位置。
第二个任务是通过串口将数据发送到ESP32,以便控制伺服电机。这些数据可以相对简化,因为我们不需要发送精确的角度值,而只需发送每个手指是否弯曲的信息。因此,我们可以发送五个0或1,并在末尾加一个符号以便后续识别每个数字的索引。
这种方法将手部追踪和数据传输简化为一个二进制状态系统,使得数据处理和传输更加高效,同时仍能提供足够的信息来控制仿生手的动作。
首先,我们需要为Python代码导入以下库:
import cv2
import mediapipe as mp
import time
import serial
然后,我们需要创建一个用于处理摄像头数据的类:
class HandDetector():# Constructor of the class with parameters for the measurementdef __init__(self, mode=False, maxHands=1, detectionCon=0.5, trackCon=0.5):self.mode = modeself.maxHands = maxHandsself.detectionCon = detectionConself.trackCon = trackConself.mpHands = mp.solutions.handsself.hands = self.mpHands.Hands()self.mpDraw = mp.solutions.drawing_utils# Function for finding and drawing the handdef findHands(self, frame, draw=True):imgRGB = cv2.cvtColor(frame, cv2.COLOR_BGR2RGB)self.results = self.hands.process(imgRGB)if self.results.multi_hand_landmarks:for handLms in self.results.multi_hand_landmarks:if draw:self.mpDraw.draw_landmarks(frame, handLms, self.mpHands.HAND_CONNECTIONS)return frame# Function for finding each hand landmark and drawing its positiondef findPosition(self, frame, handNo=0, draw=False):lmList = []if self.results.multi_hand_landmarks:myHand = self.results.multi_hand_landmarks[handNo]for id, lm in enumerate(myHand.landmark):h, w, c = frame.shapecx, cy = int(lm.x * w), int(lm.y * h)lmList.append([id, cx, cy])if draw and id == 0:cv2.circle(frame, (cx, cy), 15, (255, 0, 255), -1)return lmList
接下来定义主函数:
def main():# The prevTime and currentTime are used to calculate the FPS laterprevTime = 0currentTime = 0# Array for storing the info about the handhand = [["Wrist", False], ["Index", False], ["Middle", False], ["Ring", False], ["Thumb", False], ["Pinky", False]]# Initializing the Serial and opencvser = serial.Serial(port="The name of the port the ESP32 is connected to")# I had to include the "cv2.CAP_DSHOW" because I had issues with the webcam loading on my linux machinecap = cv2.VideoCapture(0, cv2.CAP_DSHOW)detector = HandDetector()#MAIN LOOP OF THE CODE## Releasing the stuff allocated for opencvcap.release()cv2.destroyAllWindows()main()
以及代码的主循环:
while (True):# Finding the hands and reading the position of hte landmarksret, frame = cap.read()frame = detector.findHands(frame)lmList = detector.findPosition(frame)if len(lmList) > 0: j = 1change = False# Loop which checks if the top of the finger is below the second most topfor i in range(1, 6):if i == 1 and lmList[4][1] < lmList[3][1] and not hand[4][1]:# In case that it is true it changes all the needed datahand[4][1] = Truechange = Trueprint(hand[4][0], hand[4][1])elif i == 1 and lmList[4][1] > lmList[3][1] and hand[4][1]:hand[4][1] = Falsechange = Trueprint(hand[4][0], hand[4][1])elif i != 1:if lmList[i*4][2] > lmList[(i*4)-2][2] and not hand[j][1]:hand[j][1] = Truechange = Trueprint(hand[j][0], hand[j][0])elif lmList[i*4][2] < lmList[(i*4)-2][2] and hand[j][1]:hand[j][1] = Falsechange = Trueprint(hand[j][0], hand[j][0])if j == 3:j += 2else:j += 1# If there has been any change in the state of the hand this code block will runif change:msg = ""# Converts the boolean values to 0s and 1sfor i in range(6):if hand[i][1]:msg += "1"else:msg += "0"# Adds the ending symbol and sends the data over to the ESP32msg += '\n'print(msg)ser.write(msg.encode("Ascii"))# Calculates the FPS and displays it on the framecurrentTime = time.time()fps = 1/(currentTime-prevTime)prevTime = currentTimecv2.putText(frame, str(int(fps)), (10, 70), cv2.FONT_HERSHEY_SIMPLEX, 3, (255, 0, 255), 3)# Shows what the webcam sees on a framecv2.imshow("frame", frame)# If we press "q" it quits running the programif cv2.waitKey(1) & 0xFF == ord("q"):break
整个代码 OpenCV:
import cv2
import mediapipe as mp
import time
import serialclass HandDetector():def __init__(self, mode=False, maxHands=2, detectionCon=0.5, trackCon=0.5):self.mode = modeself.maxHands = maxHandsself.detectionCon = detectionConself.trackCon = trackConself.mpHands = mp.solutions.handsself.hands = self.mpHands.Hands()self.mpDraw = mp.solutions.drawing_utilsdef findHands(self, frame, draw=True):imgRGB = cv2.cvtColor(frame, cv2.COLOR_BGR2RGB)self.results = self.hands.process(imgRGB)if self.results.multi_hand_landmarks:for handLms in self.results.multi_hand_landmarks:if draw:self.mpDraw.draw_landmarks(frame, handLms, self.mpHands.HAND_CONNECTIONS)return framedef findPosition(self, frame, handNo=0, draw=False):lmList = []if self.results.multi_hand_landmarks:myHand = self.results.multi_hand_landmarks[handNo]for id, lm in enumerate(myHand.landmark):h, w, c = frame.shapecx, cy = int(lm.x * w), int(lm.y * h)lmList.append([id, cx, cy])if draw and id == 0:cv2.circle(frame, (cx, cy), 15, (255, 0, 255), -1)return lmListdef main():prevTime = 0currentTime = 0hand = [["Wrist", False], ["Index", False], ["Middle", False], ["Ring", False], ["Thumb", False], ["Pinky", False]]ser = serial.Serial(port="COM3")cap = cv2.VideoCapture(0, cv2.CAP_DSHOW)detector = HandDetector()while (True):ret, frame = cap.read()frame = detector.findHands(frame)lmList = detector.findPosition(frame)if len(lmList) > 0: j = 1change = Falsefor i in range(1, 6):if i == 1 and lmList[4][1] < lmList[3][1] and not hand[4][1]:hand[4][1] = Truechange = Trueprint(hand[4][0], hand[4][1])elif i == 1 and lmList[4][1] > lmList[3][1] and hand[4][1]:hand[4][1] = Falsechange = Trueprint(hand[4][0], hand[4][1])elif i != 1:if lmList[i*4][2] > lmList[(i*4)-2][2] and not hand[j][1]:hand[j][1] = Truechange = Trueprint(hand[j][0], hand[j][0])elif lmList[i*4][2] < lmList[(i*4)-2][2] and hand[j][1]:hand[j][1] = Falsechange = Trueprint(hand[j][0], hand[j][0])if j == 3:j += 2else:j += 1if change:msg = ""for i in range(6):if hand[i][1]:msg += "1"else:msg += "0"msg += '\n'print(msg)ser.write(msg.encode("Ascii")) currentTime = time.time()fps = 1/(currentTime-prevTime)prevTime = currentTimecv2.putText(frame, str(int(fps)), (10, 70), cv2.FONT_HERSHEY_SIMPLEX, 3, (255, 0, 255), 3)cv2.imshow("frame", frame)if cv2.waitKey(1) & 0xFF == ord("q"):breakcap.release()cv2.destroyAllWindows()main()
ESP32(Arduino IDE)
我们可以充分利用ESP32是双核这一特点,类似于PC的代码,我们同样需要完成两项主要工作。
首先是接收来自PC的数据。正如前面提到的,数据基本上是一个带有六位二进制数和结束符的字符串。此外,由于只有在状态变化时才会传输数据,我们可以立即将这些值(转换为true或false)分配给相应的变量。将这个任务分配给核心0,而主循环则在核心1上运行。
第二项工作就是控制手部运动。为此,我们需要不停地检查这些变量的状态是否发生变化,一旦有变化,伺服电机就会按小步长进行线性移动。在每一步后,首先需要检查变量是否没有再次变化,并且还要测量霍尔传感器读取的值。如果霍尔传感器的值过高,意味着磁铁距离手指核心太近,此时也要停止伺服电机的运动。
最初,我们需要用于伺服驱动的库,并且还将包含用于I2C通信的Wire库:
#include <Wire.h>
#include <Adafruit_PWMServoDriver.h>
之后,我们需要定义脉冲长度的值,这些值因伺服类型而异,所以强烈建议查找特定伺服的信息或者像这样测试它们。
// Operating Speed of my Servo (6V): 0.21 sec/60°#define SERVOMIN "Your value (mine was 70)" // This is the 'minimum' pulse length count (out of 4096)
#define SERVOMAX "Your value (mine was 510)" // This is the 'maximum' pulse length count (out of 4096)
#define SERVO_FREQ 50 // Analog servos run at ~50 Hz updates
现在我们必须定义其余要使用到的变量:
// Initializing servo driver object
Adafruit_PWMServoDriver pwm = Adafruit_PWMServoDriver(); // Index, Middle, Ring, Thumb, Pinky
// "state0" is the state the hand on the webcam is in and "state"
// is the stuff happening on the actual hand
bool state0[6] = {false, false, false, false, false, false};
bool state[6] = {false, false, false, false, false, false};// Variable which indicates if there has been any change made to the state
bool change = false;// Variables needed for reading the data from Serial
char sData;
String state;// Variable for the hall sensor
// Index, Middle, Ring, Thumb, Pinky
// {pin, measured value, maximum value}
// ALL OF THE MAX VALUES WERE MEASURED BY ME THUS THEY WILL MOST LIKELY NOT BE SAME FOR YOU
int hall[5][3] = {{26, 0, 2200}, {27, 0, 2400}, {14, 0, 2300}, {25, 0, 2200}, {12, 0, 2300}};// Setting the index numbers of each motor
int wrist = 0;
int thumb = 4;
int index = 1;
int middle = 2;
int ring = 3; // IMPORTANT this motor will rotate in the oposite direction
int pinky = 5; // IMPORTANT this motor will rotate in the oposite direction// Function for calculating the PWM based on the degree you want
int degToPwm(int degree) {return map(degree, 0, 320, SERVOMIN, SERVOMAX);
}// Setting the degree thresholds used
int deg = degToPwm(75);
int deg1 = degToPwm(95);
int deg2 = degToPwm(85);
int startDeg = degToPwm(180);
接下来,需要定义我们将要使用的函数:
// Initialization of the task
TaskHandle_t recieveData;// Function which reads the data from Serial
void recieveDataCode(void * parameter) {for(;;) {// Loop which runs when there is a message sentwhile(Serial.available()) {// Reading by each charactersData = Serial.read();// If the character is the line ending symbol we know it is the end of the messageif(sData == '\n') {// Loop for converting the string 0s and 1s to booleanfor(int i = 0; i < 6; i++) {state0[i] = state.substring(i, i+1).toInt();}// Reseting the state temporary variablestate = "";// Showing a change in state happenedchange = true;break;} else { // If the character is not the line ending symbol we add it to the temporary statestate += sData;}}delay(10);}
}// Function for actually moving the servos
void moveFinger(int fingerId, bool flex, int iteration) {// Because the ring and pinky motors move in opposite direction // we have to check which motors we are movingif(fingerId != ring && fingerId != pinky) {// We also need to check if we want the finger to flex or straightenif(flex) {// Moreover the thumb moves a little less so we also check for thatif(fingerId == thumb) {// Because we want to be able to control the movement throughout we have to // divide it into smaller partsfloat fPwm = SERVOMIN + (float(103)*float(iteration))/float(130);// But we also have to make sure to convert back to int because float would// not be accepted by pwm functionint iPwm = round(fPwm);pwm.setPWM(fingerId, 0, iPwm);} else { // If the finger is not the thumb we just move itpwm.setPWM(fingerId, 0, SERVOMIN + iteration); }} else { // For the case that is retracting we have to just do the oppositeif(fingerId == thumb) {float fPwm = deg - (float(103)*float(iteration))/float(130);int iPwm = round(fPwm);pwm.setPWM(fingerId, 0, iPwm);} else {pwm.setPWM(fingerId, 0, deg1 - iteration); }}} else if(fingerId == ring || fingerId == pinky) { // In the case of the ring or pinky finger we do again the sameif(flex) {pwm.setPWM(fingerId, 0, startDeg - iteration);} else {pwm.setPWM(fingerId, 0, deg2 + iteration);}}
}
补上设置和循环功能:
void setup() {// Starting Serial on the same frequency as on the PCSerial.begin(9600);// Assigning the pinMode to all pins connected to hall sensorfor(int i = 0; i < 5; i++) {pinMode(hall[i][0], INPUT);}// Setup and starting the servo driverpwm.begin();pwm.setOscillatorFrequency(27000000);pwm.setPWMFreq(SERVO_FREQ);delay(10);// Pinning the created task to core 0xTaskCreatePinnedToCore(recieveDataCode,"recieveData",10000,NULL,0, &recieveData,0);delay(500);
}void loop() {// Once there has been a change in the state this code block will runif(change) {// Looping firstly through the total steps of the servosfor(int i = 5; i < 135; i += 5) {// Secondly through all of the hall sensors and reading the valuesfor(int k = 0; k < 5; k++) {hall[k][1] = analogRead(hall[k][0]);// If the measured value is greater than maximum value we stop the movementif(hall[k][1] > hall[k][2]) {state1[k+1] = state0[k+1];}}// Thirdly through all the servo motorsfor(int j = 0; j < 6; j++) {if(state0[j] != state1[j]) {// If the state on the PC does not match the one on the esp32 we // call the function for moving the respective fingermoveFinger(j, state0[j], i);}} // This delay is very important as it sets the speed of the movementsdelay(17);}// At the and we make the state variables equal againfor(int i = 0; i < 6; i++) {state1[i] = state0[i];}}delay(100);
}
ESP32的完整代码:
#include <Wire.h>
#include <Adafruit_PWMServoDriver.h>#define SERVOMIN "Your value"
#define SERVOMAX "Your value"
#define SERVO_FREQ 50 Adafruit_PWMServoDriver pwm = Adafruit_PWMServoDriver(); bool state0[6] = {false, false, false, false, false, false};
bool state1[6] = {false, false, false, false, false, false};bool change = false;char sData;
String state;int hall[5][3] = {{26, 0, 2200}, {27, 0, 2400}, {14, 0, 2300}, {25, 0, 2200}, {12, 0, 2300}};int wrist = 0;
int thumb = 4;
int index = 1;
int middle = 2;
int ring = 3;
int pinky = 5;int degToPwm(int degree) {return map(degree, 0, 320, SERVOMIN, SERVOMAX);
}int deg = degToPwm(75);
int deg1 = degToPwm(95);
int deg2 = degToPwm(85);
int startDeg = degToPwm(180);TaskHandle_t recieveData;void recieveDataCode(void * parameter) {for(;;) {while(Serial.available()) {sData = Serial.read();if(sData == '\n') {for(int i = 0; i < 6; i++) {state0[i] = state.substring(i, i+1).toInt();}state = "";change = true;break;} else {state += sData;}}delay(10);}
}void moveFinger(int fingerId, bool flex, int iteration) {if(fingerId != ring && fingerId != pinky) {if(flex) {if(fingerId == thumb) {float fPwm = SERVOMIN + (float(103)*float(iteration))/float(130);int iPwm = round(fPwm);pwm.setPWM(fingerId, 0, iPwm);} else {pwm.setPWM(fingerId, 0, SERVOMIN + iteration); }} else {if(fingerId == thumb) {float fPwm = deg - (float(103)*float(iteration))/float(130);int iPwm = round(fPwm);pwm.setPWM(fingerId, 0, iPwm);} else {pwm.setPWM(fingerId, 0, deg1 - iteration); }}} else /*if(fingerId == ring || fingerId == pinky)*/ {if(flex) {pwm.setPWM(fingerId, 0, startDeg - iteration);} else {pwm.setPWM(fingerId, 0, deg2 + iteration);}}
}void setup() {Serial.begin(9600);for(int i = 0; i < 5; i++) {pinMode(hall[i][0], INPUT);}pwm.begin();pwm.setOscillatorFrequency(27000000);pwm.setPWMFreq(SERVO_FREQ);delay(10);xTaskCreatePinnedToCore(recieveDataCode,"recieveData",10000,NULL,0, &recieveData,0);delay(500);
}void loop() {if(change) {for(int i = 5; i < 135; i += 5) {for(int k = 0; k < 5; k++) {hall[k][1] = analogRead(hall[k][0]);if(hall[k][1] > hall[k][2]) {state1[k+1] = state0[k+1];}}for(int j = 0; j < 6; j++) {if(state0[j] != state1[j]) {moveFinger(j, state0[j], i);}} delay(17);}for(int i = 0; i < 6; i++) {state1[i] = state0[i];}}delay(100);
}
3D打印文件可以移步DF创客社区下载


