HttpClient
介绍
HttpClient是Apache Jakarta Common下的子项目, 可以用来提供高效的, 最新的,功能丰富的支持HTTP协议的客户端编程工具包, 并且支持Http协议最新的版本和建议

核心API
HttpClient: 请求对象
HttpClients: 请求对象构造器
CloseableHttpClient: 请求对象实现类
HttpGet: 发送get请求
HttpPost: 发送post请求
请求步骤
创建HttpClient对象
创建Http请求对象
代用HttpCliect的execute方法发生请求
入门案例
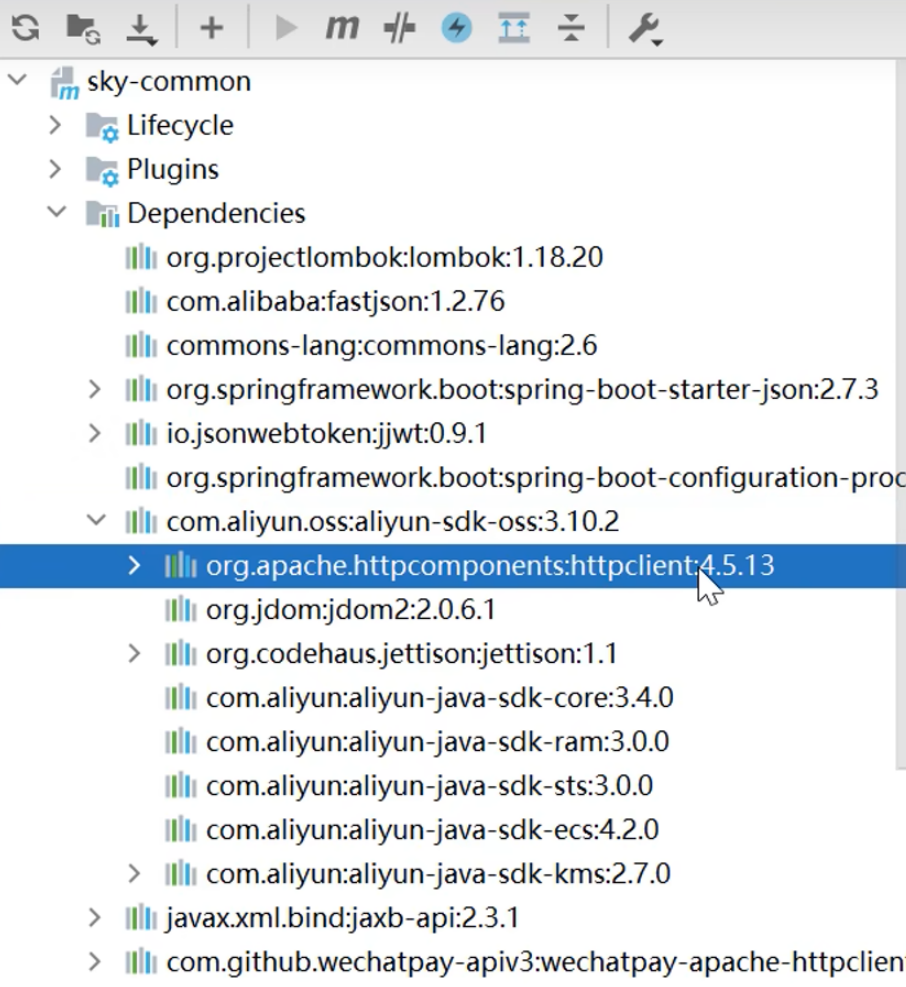
引入依赖: 阿里云OSS依赖已经默认引入HttpClient依赖

发送get请求
@SpringBootTest //创建测试类
public class HttpClientTest {/*** 测试通过httpclient发送get请求*/@Test // 创建测试方法public void testGET() throws IOException {// 创建httpclient对象CloseableHttpClient httpClient = HttpClients.createDefault();// 创建请求对象HttpGet httpGet = new HttpGet("http://localhost:8080/user/shop/status");// 发送请求,接收响应结果CloseableHttpResponse response = httpClient.execute(httpGet);// 获取影响结果的状态码和数据int statusCode = response.getStatusLine().getStatusCode();System.out.println("服务器返回的状态码为:" + statusCode);HttpEntity entity = response.getEntity();String body = EntityUtils.toString(entity);System.out.println("服务端返回的数据为:" + body);// 关闭资源response.close();httpClient.close();}}
发送post请求
@SpringBootTest //创建测试类
public class HttpClientTest {/*** 测试通过httpclient发送post请求*/@Test // 创建测试方法public void testPOST() throws IOException {// 创建httpclient对象CloseableHttpClient httpClient = HttpClients.createDefault();// 创建请求对象HttpPost httpPost = new HttpPost("http://localhost:8080/admin/employee/login");// 创建请求参数 (fastjson提供的方法)JSONObject jsonObject = new JSONObject();jsonObject.put("username", "admin");jsonObject.put("password", "123456");StringEntity entity = new StringEntity(jsonObject.toString());// 指定请求编码方式entity.setContentEncoding("utf-8");// 指定数据格式entity.setContentType("application/json");httpPost.setEntity(entity);// 发起请求CloseableHttpResponse response = httpClient.execute(httpPost);// 解析返回的结果int statusCode = response.getStatusLine().getStatusCode();System.out.println("响应的状态码为" + statusCode);HttpEntity entity1 = response.getEntity();String body = EntityUtils.toString(entity1);System.out.println("响应的数据为" + body);// 关闭资源response.close();httpClient.close();}}
使用工具类. 封装HttpClient的操作
/*** Http工具类*/
public class HttpClientUtil {static final  int TIMEOUT_MSEC = 5 * 1000;/*** 发送GET方式请求* @param url* @param paramMap* @return*/public static String doGet(String url,Map<String,String> paramMap){// 创建Httpclient对象CloseableHttpClient httpClient = HttpClients.createDefault();String result = "";CloseableHttpResponse response = null;try{URIBuilder builder = new URIBuilder(url);if(paramMap != null){for (String key : paramMap.keySet()) {builder.addParameter(key,paramMap.get(key));}}URI uri = builder.build();//创建GET请求HttpGet httpGet = new HttpGet(uri);//发送请求response = httpClient.execute(httpGet);//判断响应状态if(response.getStatusLine().getStatusCode() == 200){result = EntityUtils.toString(response.getEntity(),"UTF-8");}}catch (Exception e){e.printStackTrace();}finally {try {response.close();httpClient.close();} catch (IOException e) {e.printStackTrace();}}return result;}/*** 发送POST方式请求* @param url* @param paramMap* @return* @throws IOException*/public static String doPost(String url, Map<String, String> paramMap) throws IOException {// 创建Httpclient对象CloseableHttpClient httpClient = HttpClients.createDefault();CloseableHttpResponse response = null;String resultString = "";try {// 创建Http Post请求HttpPost httpPost = new HttpPost(url);// 创建参数列表if (paramMap != null) {List<NameValuePair> paramList = new ArrayList();for (Map.Entry<String, String> param : paramMap.entrySet()) {paramList.add(new BasicNameValuePair(param.getKey(), param.getValue()));}// 模拟表单UrlEncodedFormEntity entity = new UrlEncodedFormEntity(paramList);httpPost.setEntity(entity);}httpPost.setConfig(builderRequestConfig());// 执行http请求response = httpClient.execute(httpPost);resultString = EntityUtils.toString(response.getEntity(), "UTF-8");} catch (Exception e) {throw e;} finally {try {response.close();} catch (IOException e) {e.printStackTrace();}}return resultString;}/*** 发送POST方式请求* @param url* @param paramMap* @return* @throws IOException*/public static String doPost4Json(String url, Map<String, String> paramMap) throws IOException {// 创建Httpclient对象CloseableHttpClient httpClient = HttpClients.createDefault();CloseableHttpResponse response = null;String resultString = "";try {// 创建Http Post请求HttpPost httpPost = new HttpPost(url);if (paramMap != null) {//构造json格式数据JSONObject jsonObject = new JSONObject();for (Map.Entry<String, String> param : paramMap.entrySet()) {jsonObject.put(param.getKey(),param.getValue());}StringEntity entity = new StringEntity(jsonObject.toString(),"utf-8");//设置请求编码entity.setContentEncoding("utf-8");//设置数据类型entity.setContentType("application/json");httpPost.setEntity(entity);}httpPost.setConfig(builderRequestConfig());// 执行http请求response = httpClient.execute(httpPost);resultString = EntityUtils.toString(response.getEntity(), "UTF-8");} catch (Exception e) {throw e;} finally {try {response.close();} catch (IOException e) {e.printStackTrace();}}return resultString;}private static RequestConfig builderRequestConfig() {return RequestConfig.custom().setConnectTimeout(TIMEOUT_MSEC).setConnectionRequestTimeout(TIMEOUT_MSEC).setSocketTimeout(TIMEOUT_MSEC).build();}}
小程序开发
介绍
小程序是一种新的开放能力, 可以在微信内被便捷的获取和传播, 同时具有出色的使用体验

官网: https://mp.weixin.qq.com/cgi-bin/
说明: 个人身份无法开通微信支付功能
接入流程:
- 注册: 在微信公众平台注册小程序, 完成注册后可以同步进行信息完善和开发
- 信息完善: 填写小程序基本信息, 包括名称, 头像, 介绍及服务范围等
- 开发小程序: 完成小程序开发者绑定, 开发信息配置后, 开发者可以下载开发者工具, 参考开发文档进行开发
- 提交审核和发布: 完成小程序开发后, 提交代码至微信团队审核, 审核通过后即可发布
准备
注册小程序: 小程序
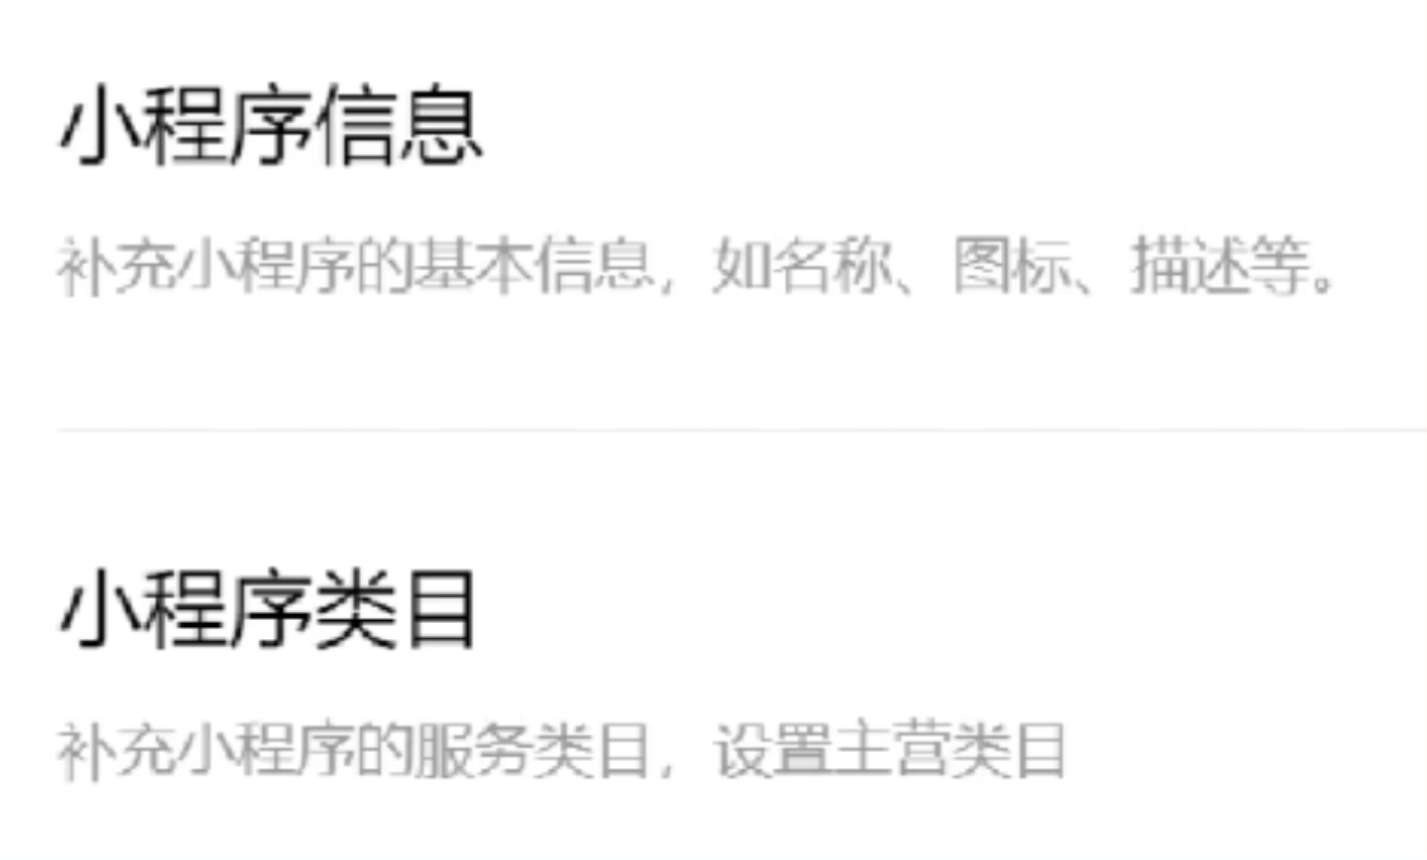
完善小程序信息, 获取AppID和小程序秘钥
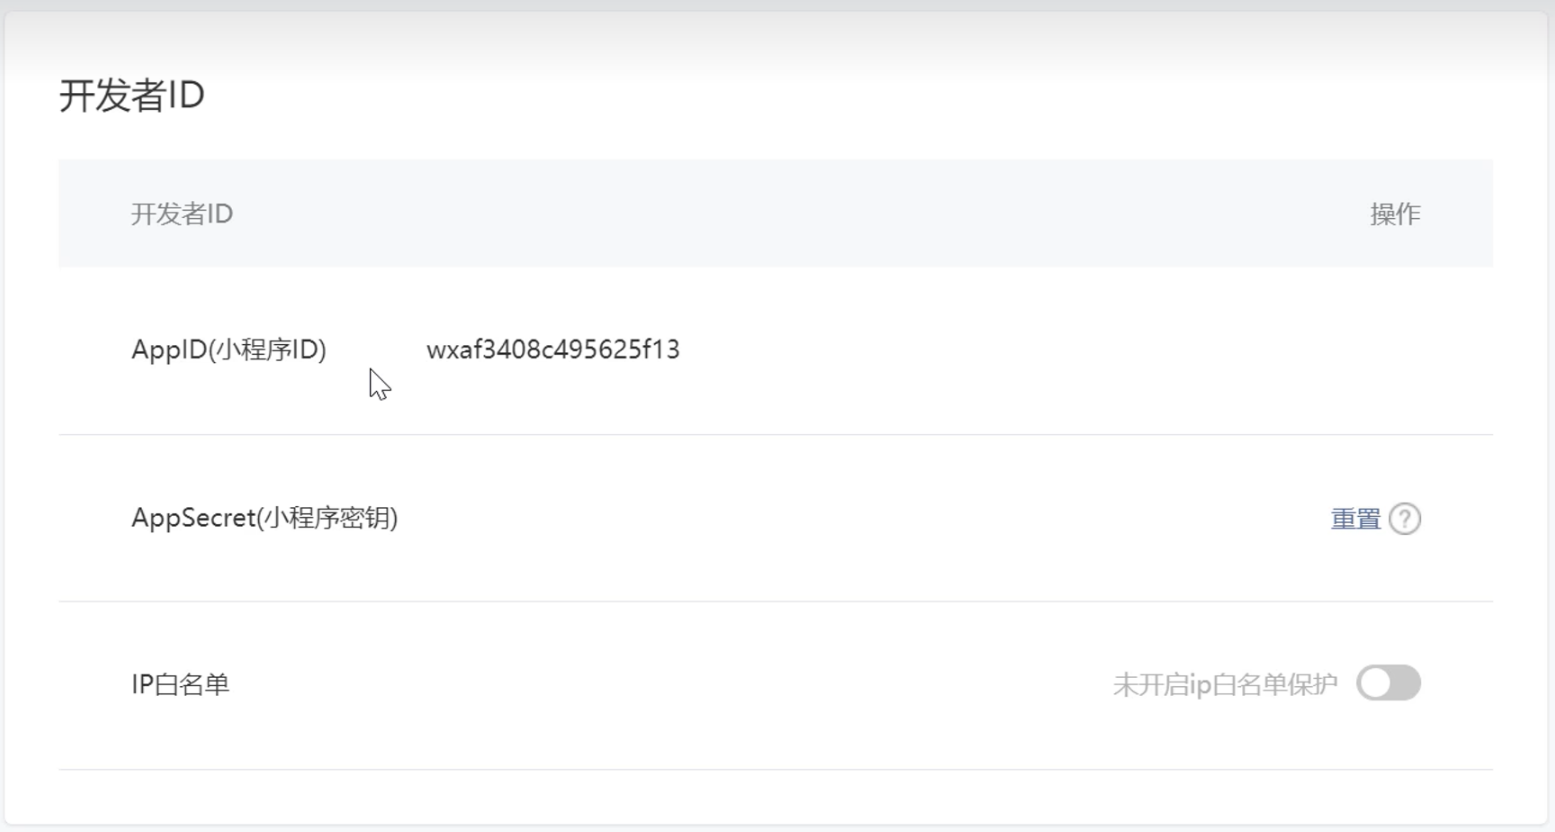
- AppID: wxb161c259ad057fe9
- AppSecret(秘钥): 6695e2fc4c13a6cdd4dc87c3c3baa988
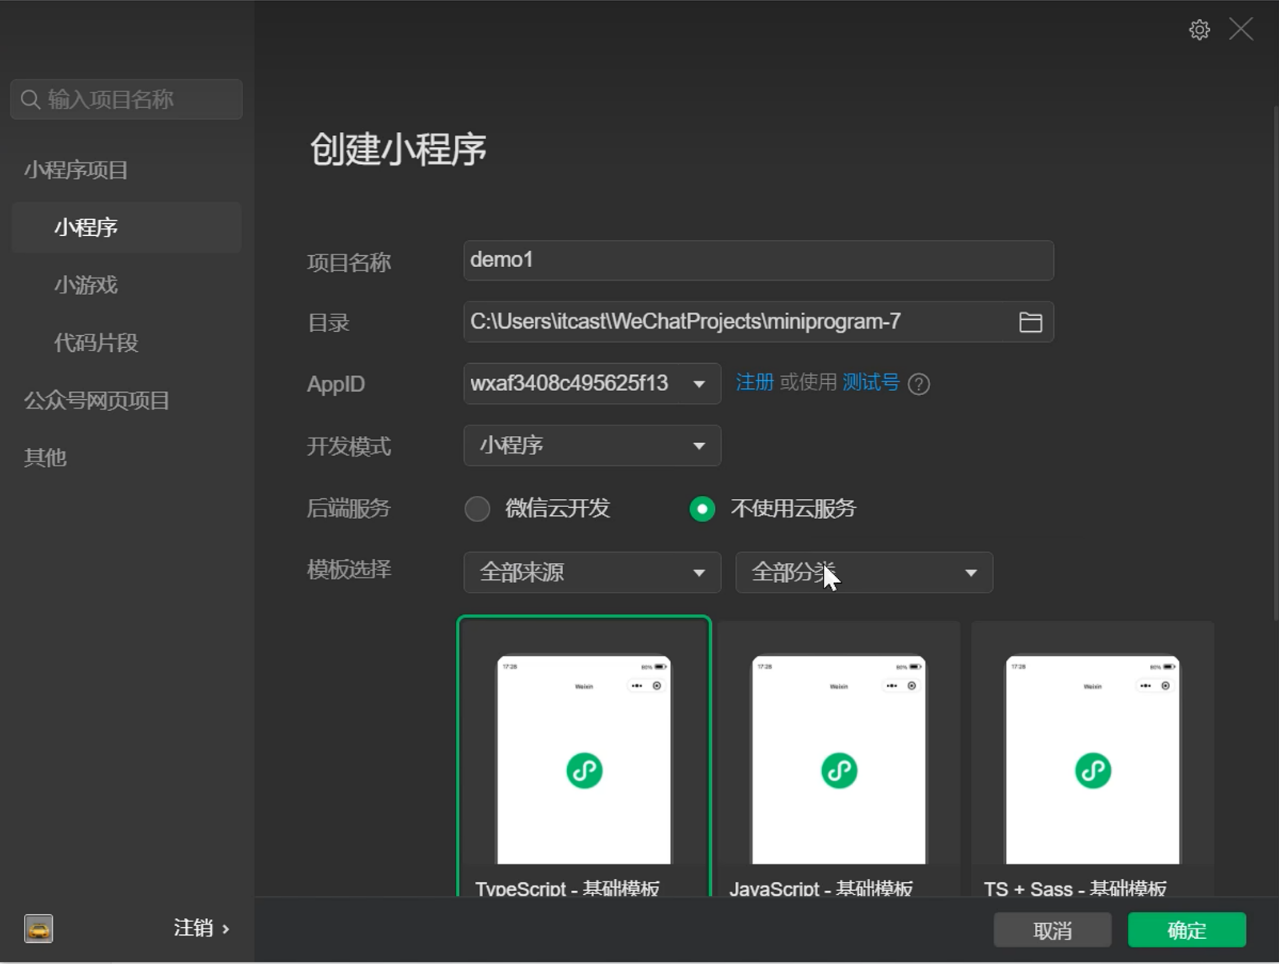
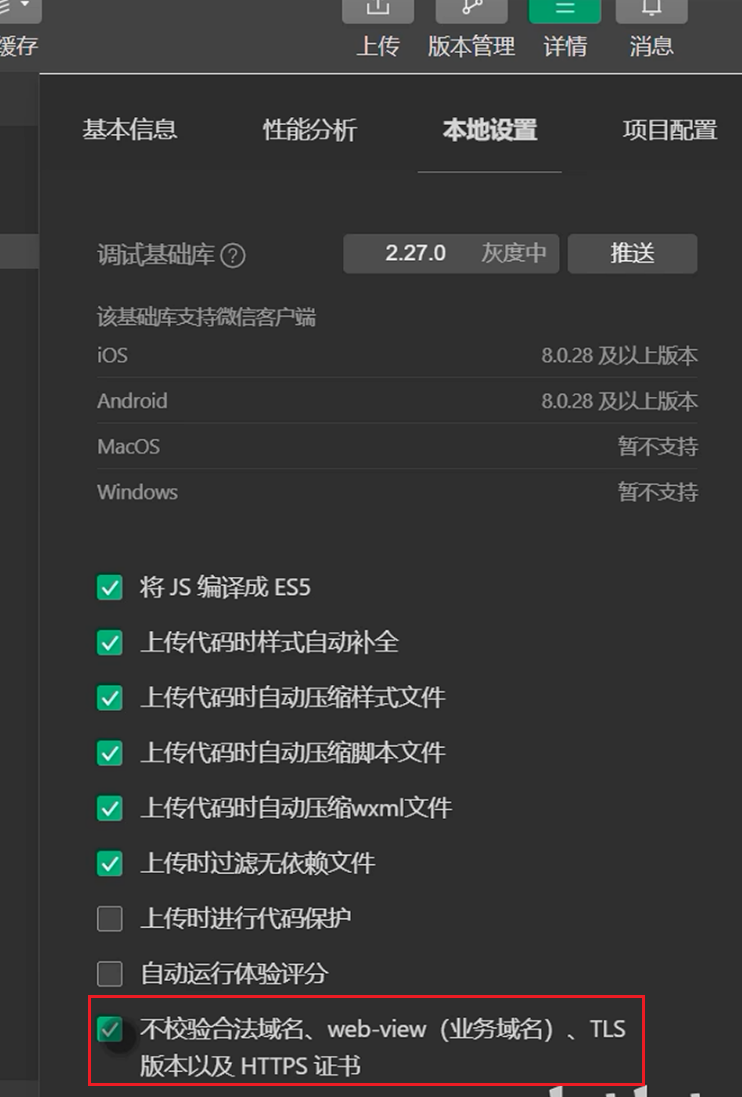
下载开发者工具, 使用开发者工具创建小程序工程


入门
目录结构: 小程序由描述整体程序的app文件和描述页面的page文件组成
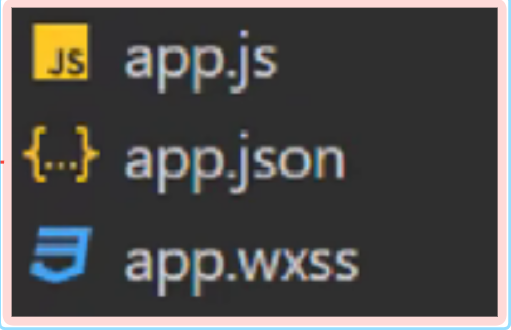
- 小程序的主体部分由三个文件组成,
- 必须放在项目的根目录:
- app.js: 小程序逻辑
- app.json: 小程序公共配置
- app.wxs: 小程序公共样式
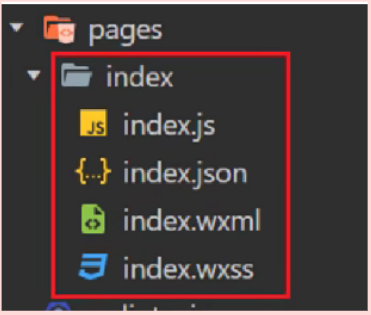
小程序的页面由四个文件组成程
- js: 页面逻辑
- wxml: 页面结构
- json: 页面配置
- wxss: 页面样式表
基础语法: 了解微信小程序的基础语法
page({// 定义数据data: {mag:  'hello word',code: ''},//  获取用户信息getUserInfo() {wx.geyUserProfile({desc: '获取用户信息',success: (res) => {console.log(res.userInfo)}})},//  微信登录: 获取微信用户的授权码wxLogin() {wx.login({success: (res) => {//赋值this.setData({code: res.code})} })},// 发请请求sendRequest() {url: 'http://localhost:8080/user/shop/status',method: 'GET',success: (res)=>{console.log(res.data)  }}
})
<view>// 插值表达式: <view>{{ msg }}</view>// 图片标签: <image style="width 100px; height: 100px;" sec="{{ url }}"></image>// 绑定事件:<button bindtap="getUserInfo" type="primary">获取用户信息</button>
</view>发布小程序: 点击上传按钮, 输入版本号, 提交代码到微信开发者管理后台, 在微信后台提交测试版本
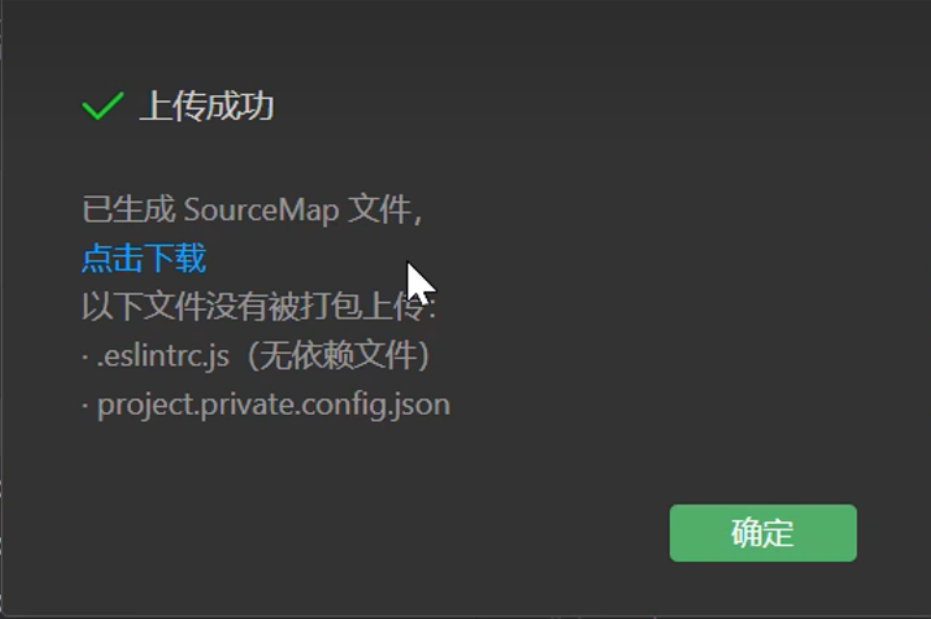

上线小程序: 我们发布的小程序是开发版本 用于测试, 测试完成后, 需要提交审核, 审核通过后才能发布上线


微信登录
准备工作
导入前端代码: 使用微信开发者工具打开 mp-weixin 工程
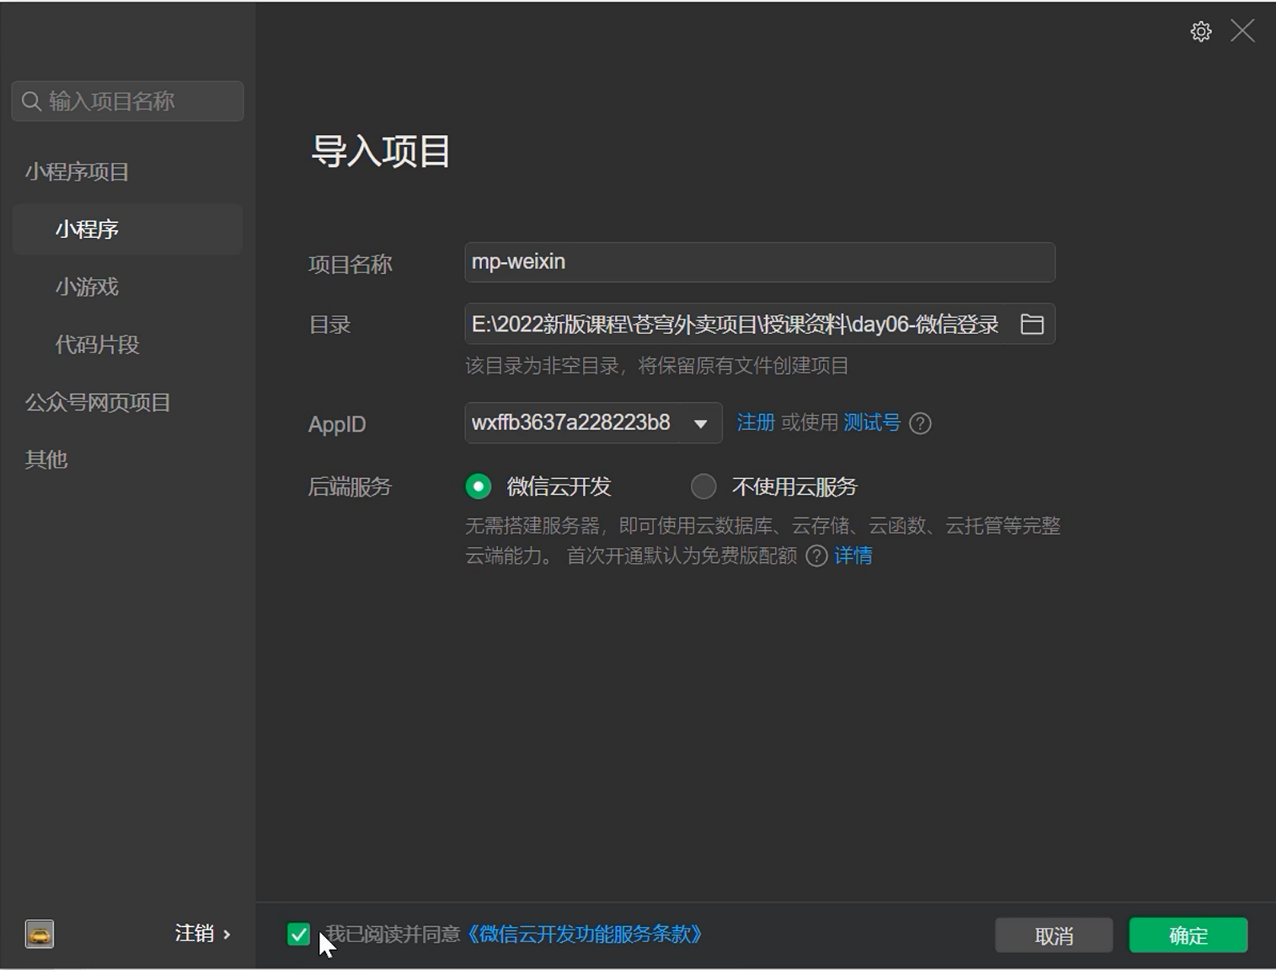
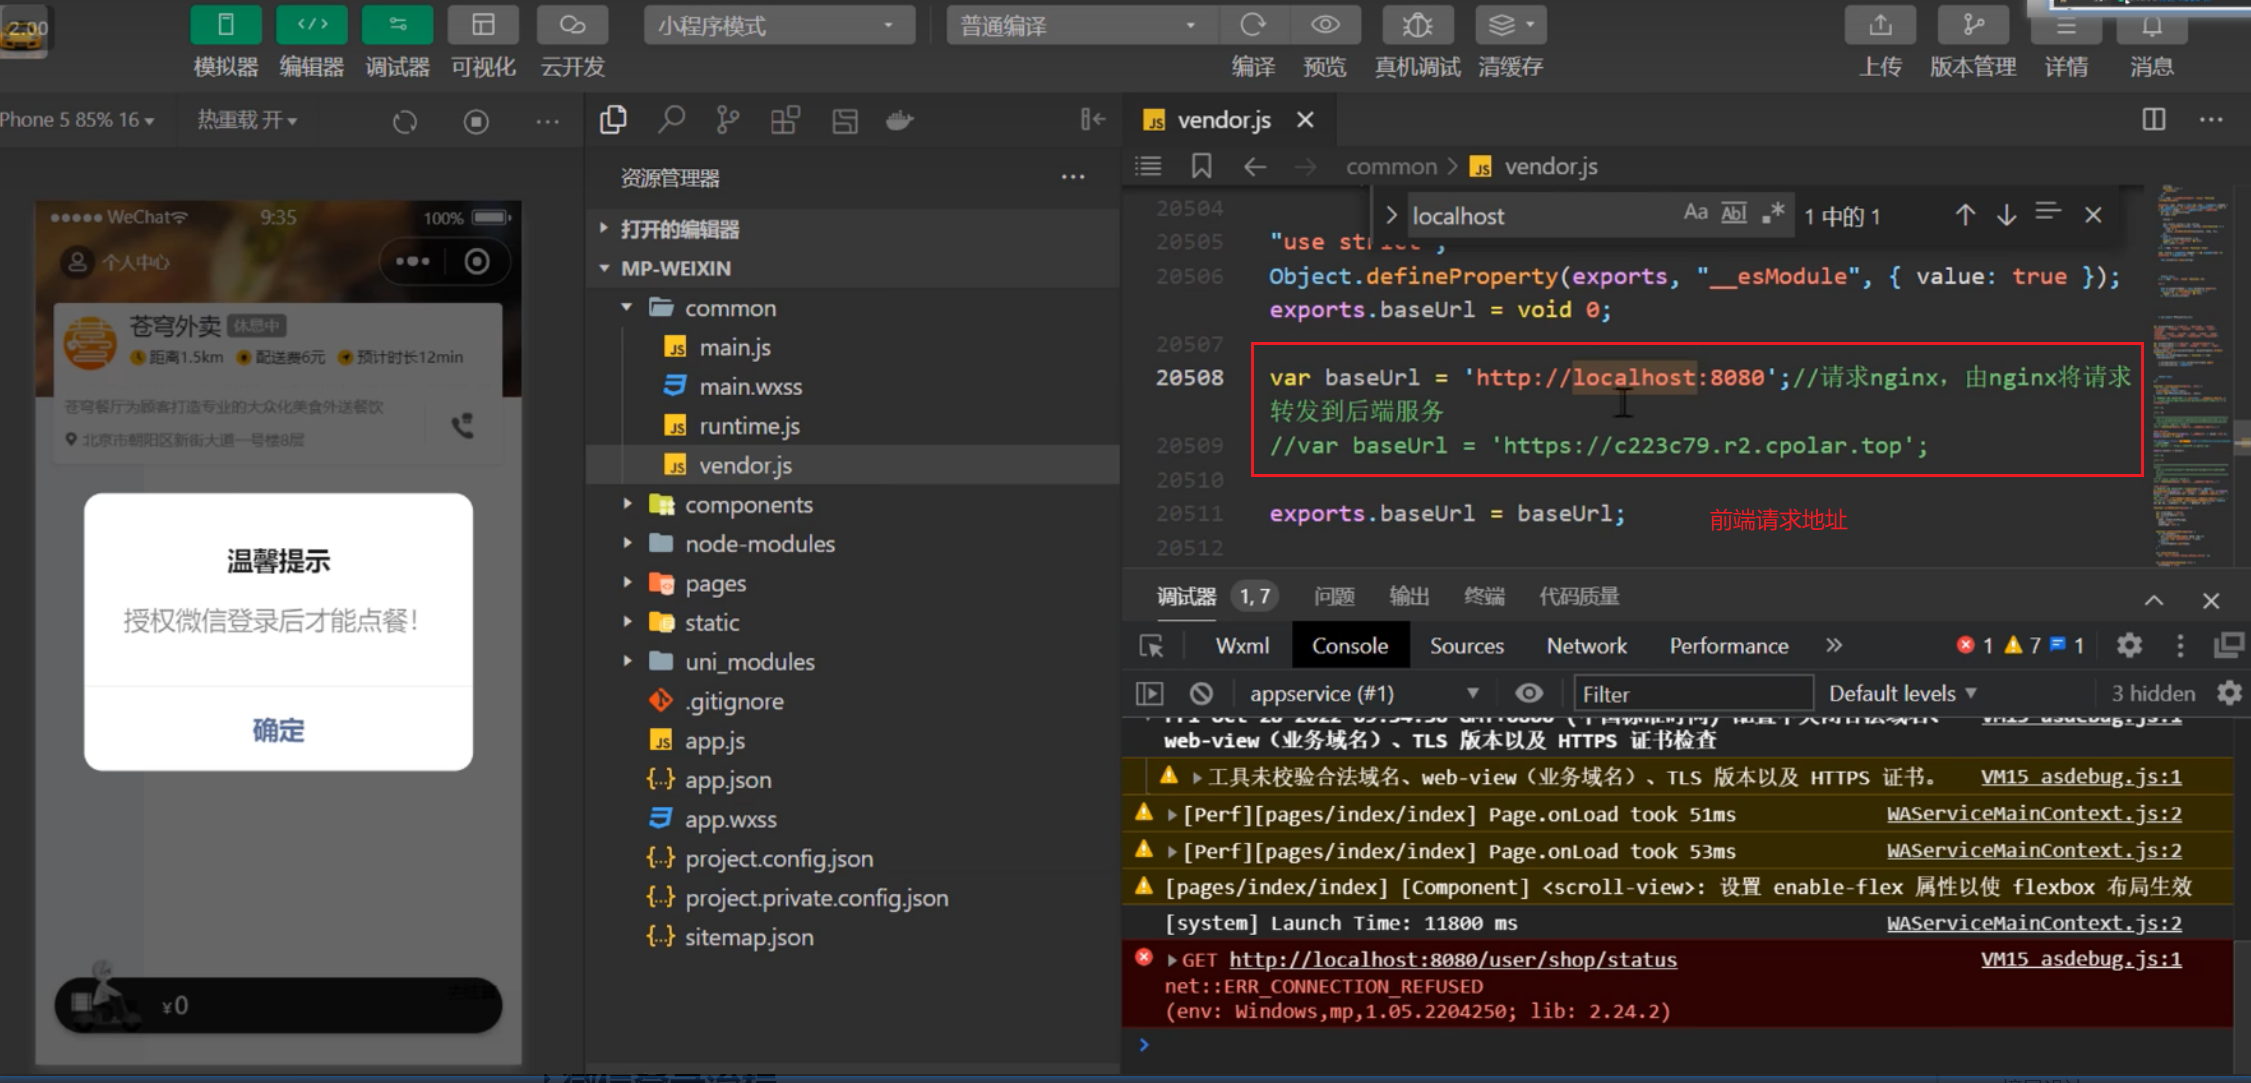
- 注意检查common/vendor.js文件中的baseUrl是否与后端服务一致
了解微信登录流程
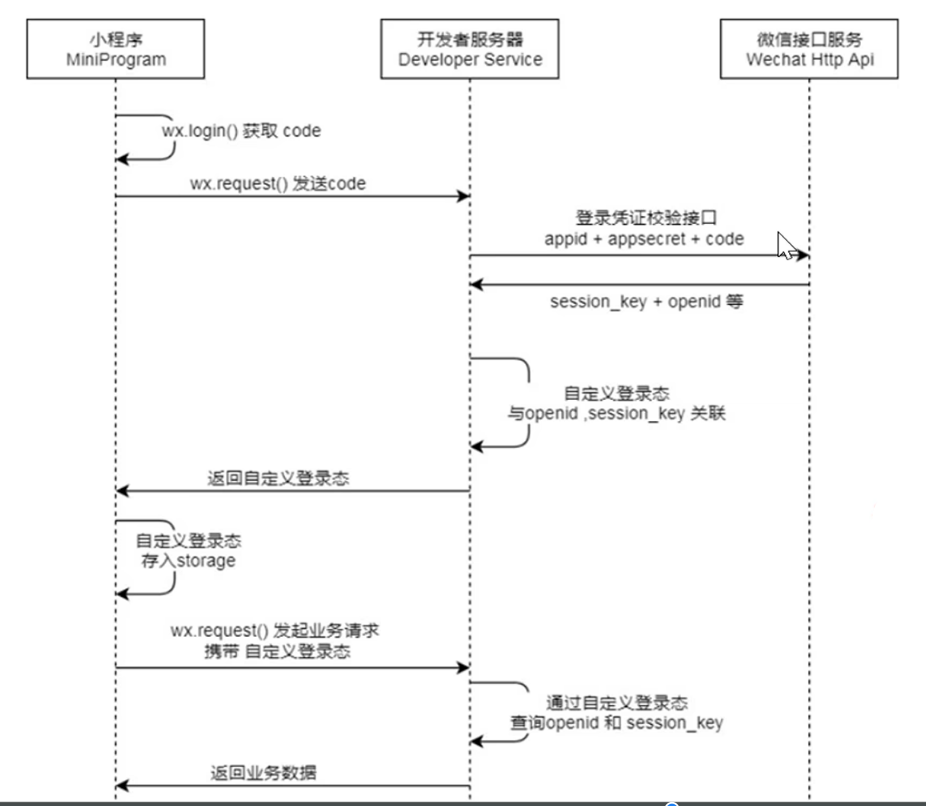
登录流程:
- wx.login()获取code
- wx.request()把code传给后端服务器
- 后端服务器把appid, 小程序秘钥, code授权码传给微信服务器
- 微信服务器返回用户信息,其中最重要的是opedid
- 后端服务器把用户信息储存起来,并生成token令牌,响应给前端
- 前端根据登录状态进行业务操作
- 官网小程序登录 | 微信开放文档
- 测试: 可以使用微信开发者工具获取登录授权码, 使用测试工具校验微信接口
分析和设计
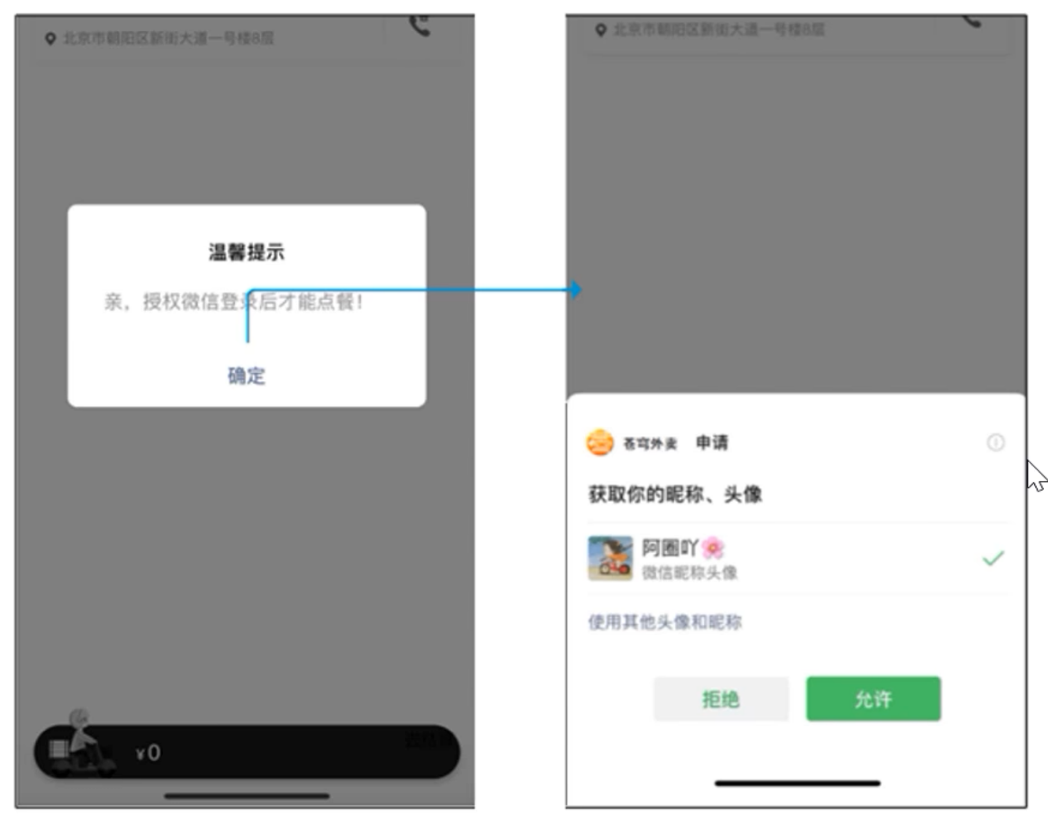
查看原型, 确定需求: 基于微信登录实现小程序的登录功能, 如果是新用户需要自动完成注册
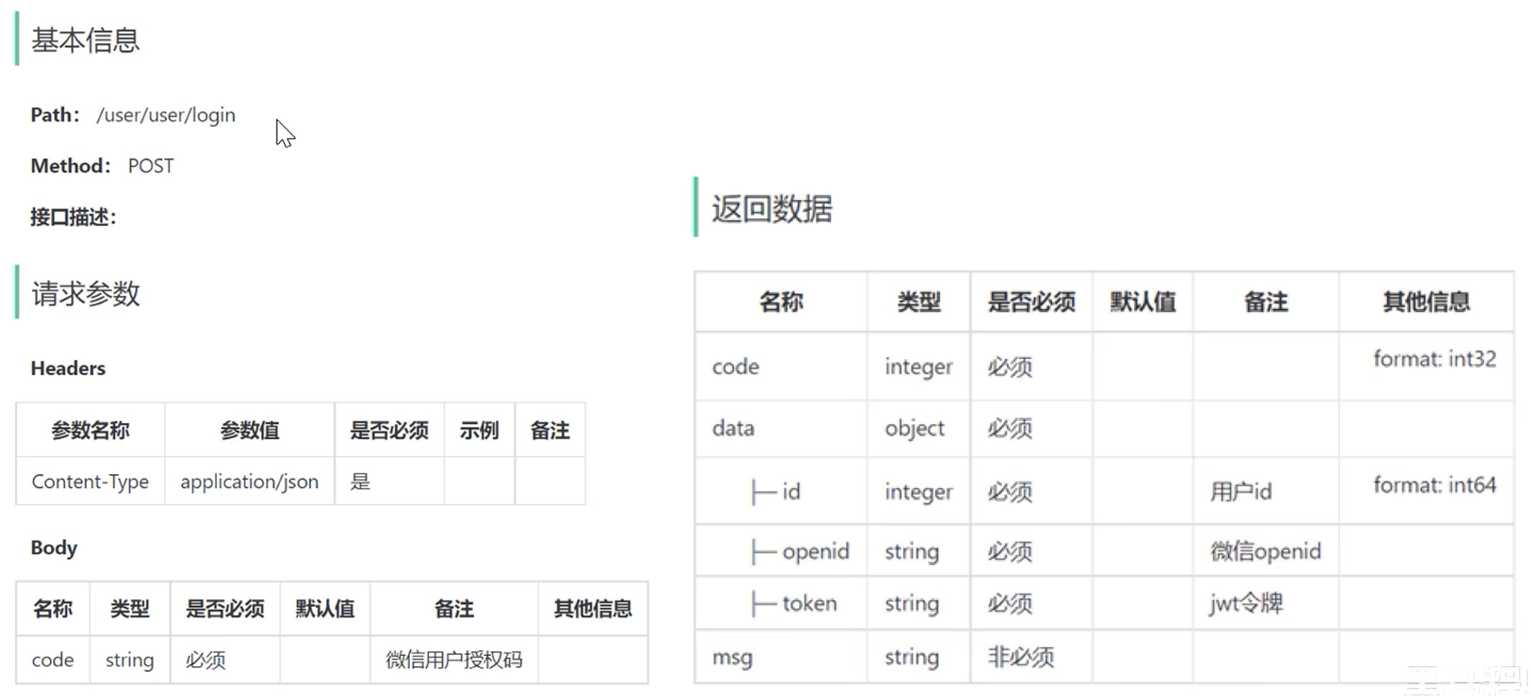
接口设计
数据表设计: user表, 用户存储用户信息
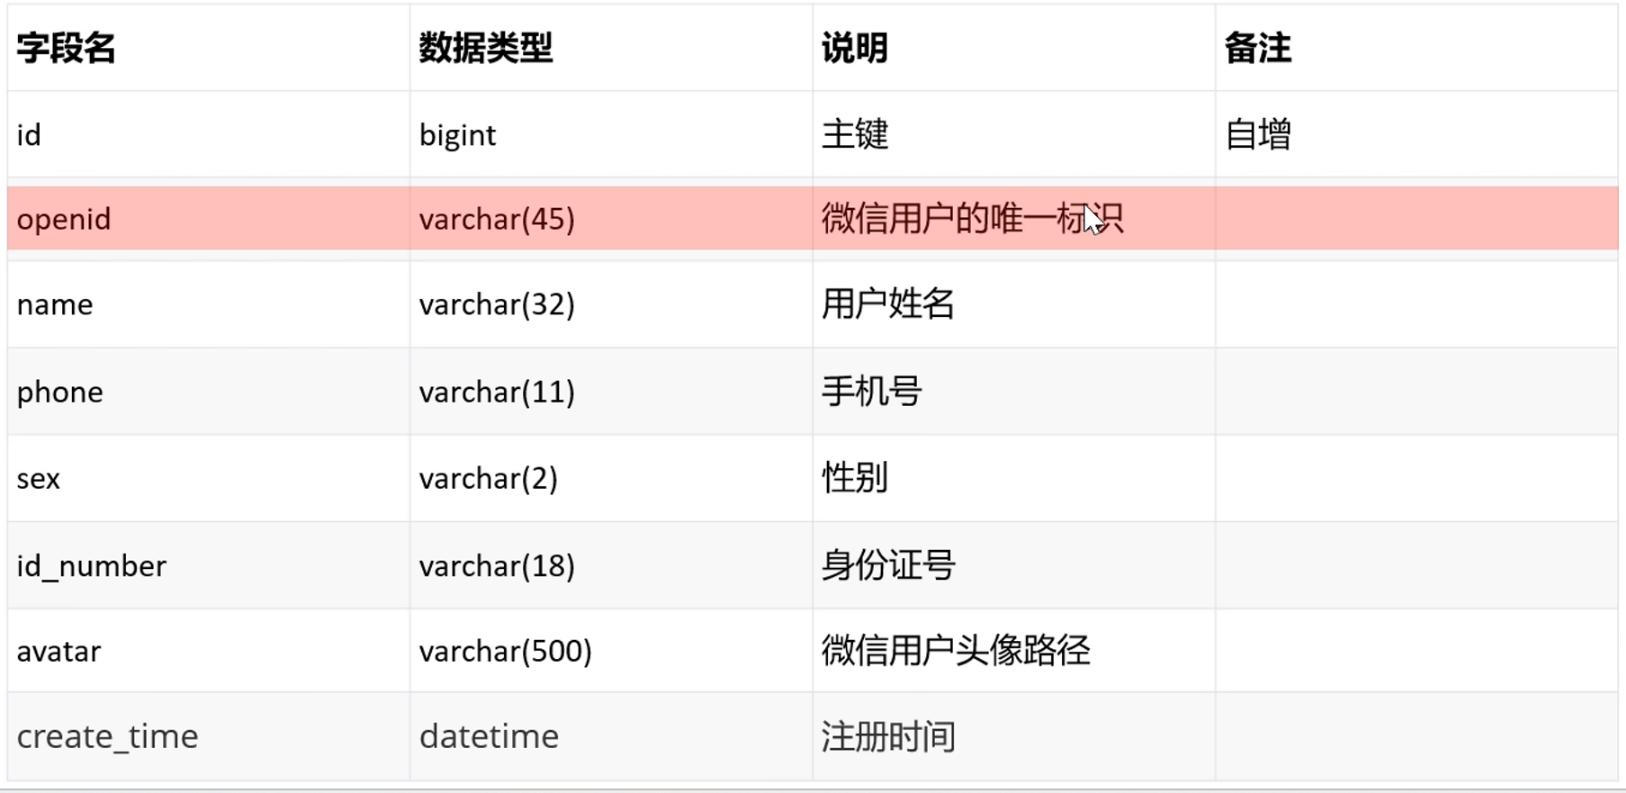
- 个人身份的开发者无法获取微信用户的手机号
代码开发
配置微信登录所需的配置项
sky:jwt:# 设置jwt签名加密时使用的秘钥(客户端)user-secret-key: itheima# 设置jwt过期时间(客户端)user-ttl: 7200000# 设置前端传递过来的令牌名称(客户端)user-token-name: authenticationwechat:appid: ${sky.wechat.appid}secret: ${sky.wechat.secret}sky:wechat:appid: wxb161c259ad057fe9secret: 6695e2fc4c13a6cdd4dc87c3c3baa988配置属性类: 把配置文件中的配置信息封装在配置类的属性中, 供程序调用
// 配置属性封装类, 用于封装配置文件中的数据
// 通过注入该类, 就可以方便的在程序中使用配置类中的数据
@Component
@ConfigurationProperties(prefix = "sky.jwt")
@Data
public class JwtProperties {/*** 管理端员工生成jwt令牌相关配置*/private String adminSecretKey;private long adminTtl;private String adminTokenName;/*** 用户端微信用户生成jwt令牌相关配置*/private String userSecretKey;private long userTtl;private String userTokenName;}
@Component
@ConfigurationProperties(prefix = "sky.wechat")
@Data
public class WeChatProperties {private String appid; //小程序的appidprivate String secret; //小程序的秘钥}
准备DTO: 把前端请求参数封装在DTO对象中
/*** C端用户登录*/
@Data
public class UserLoginDTO implements Serializable {private String code;}
准备VO: 把后端返回给前端的数据封装在VO对象中
@Data
@Builder
@NoArgsConstructor
@AllArgsConstructor
public class UserLoginVO implements Serializable {private Long id;private String openid;private String token;}
Controller: 新建UserController
@RestController
@RequestMapping("/user/user")
@Api(tags = "用户相关接口")
@Slf4j
public class UserController {@Autowiredprivate UserService userService;@Autowiredprivate JwtProperties jwtProperties;@PostMapping("/login")@ApiOperation("微信登录")public Result<UserLoginVO> login(@RequestBody UserLoginDTO userLoginDTO) {log.info("微信用户登录: {}", userLoginDTO);// 微信登录User user = userService.wxLogin(userLoginDTO);// 为微信用户生成JWT令牌Map<String, Object> claims = new HashMap<>();claims.put(JwtClaimsConstant.USER_ID, user.getId());String token = JwtUtil.createJWT(jwtProperties.getUserSecretKey(), jwtProperties.getUserTtl(), claims);// 封装响应数据UserLoginVO userLoginVO = UserLoginVO.builder().id(user.getId()).openid(user.getOpenid()).token(token).build();return Result.success(userLoginVO);}
}
Service: 新建UserService接口和UserServiceImpl实现类
public interface UserService {/*** 微信登录* @param userLoginDTO* @return*/User wxLogin(UserLoginDTO userLoginDTO);
}
@Service
@Slf4j
public class UserServiceImpl implements UserService {// 微信服务接口地址public static final String WX_LOGIN = "https://api.weixin.qq.com/sns/jscode2session";@Autowiredprivate WeChatProperties weChatProperties;@Autowiredprivate UserMapper userMapper;/*** 微信登录** @param userLoginDTO* @return*/public User wxLogin(UserLoginDTO userLoginDTO) {// 获取openidString openid = getOpenid(userLoginDTO.getCode());// 判断openid是否为空, 如果空表示登录失败, 抛出异常if (openid == null) {throw new LoginFailedException(MessageConstant.LOGIN_FAILED);}// 判断当前用户是否为新用户User user = userMapper.getByOpenid(openid);// 新用户要实现自动注册if (user == null) {user = User.builder().openid(openid).createTime(LocalDateTime.now()).build();userMapper.insert(user);}// 返回这个用户对象return user;}/*** 调用微信接口服务, 获取微信用户的openid* @param code* @return*/private String getOpenid(String code) {// 调用微信接口服务, 获得放前微信用户的openidHashMap<String, String> map = new HashMap<>();map.put("appid", weChatProperties.getAppid());map.put("secret", weChatProperties.getSecret());map.put("js_code", code);map.put("grant_type", "authorization_code");String json = HttpClientUtil.doGet(WX_LOGIN, map);JSONObject jsonObject = JSON.parseObject(json);String openid = jsonObject.getString("openid");return openid;}
}Mapper: 新建UserMapper
@Mapper
public interface UserMapper {/*** 根据openid查询用户* @param openid* @return*/@Select("select * from user where openid = #{openid}")User getByOpenid(String openid);/*** 新增用户* @param user*/void insert(User user);
}
<?xml version="1.0" encoding="UTF-8" ?>
<!DOCTYPE mapper PUBLIC "-//mybatis.org//DTD Mapper 3.0//EN""http://mybatis.org/dtd/mybatis-3-mapper.dtd" >
<mapper namespace="com.sky.mapper.UserMapper"><insert id="insert" useGeneratedKeys="true" keyProperty="id">insert into user (openid, name, phone, sex, id_number, avatar, create_time)values (#{openid}, #{name}, #{phone}, #{sex}, #{idNumber}, #{avatar}, #{createTime})</insert></mapper>
JWT校验
定义拦截器
/*** jwt令牌校验的拦截器*/
@Component
@Slf4j
public class JwtTokenUserInterceptor implements HandlerInterceptor {@Autowiredprivate JwtProperties jwtProperties;/*** 校验jwt     ** @param request* @param response* @param handler* @return* @throws Exception*/public boolean preHandle(HttpServletRequest request, HttpServletResponse response, Object handler) throws Exception {//判断当前拦截到的是Controller的方法还是其他资源if (!(handler instanceof HandlerMethod)) {//当前拦截到的不是动态方法,直接放行return true;}//1、从请求头中获取令牌String token = request.getHeader(jwtProperties.getUserTokenName());//2、校验令牌try {log.info("jwt校验:{}", token);Claims claims = JwtUtil.parseJWT(jwtProperties.getUserSecretKey(), token);Long userId = Long.valueOf(claims.get(JwtClaimsConstant.USER_ID).toString());log.info("当前员工id:", userId);BaseContext.setCurrentId(userId);//3、通过,放行return true;} catch (Exception ex) {//4、不通过,响应401状态码response.setStatus(401);return false;}}
}
注册拦截器
/*** 配置类,注册web层相关组件*/
@Configuration
@Slf4j
public class WebMvcConfiguration extends WebMvcConfigurationSupport {private JwtTokenUserInterceptor jwtTokenUserInterceptor;/*** 注册自定义拦截器** @param registry*/protected void addInterceptors(InterceptorRegistry registry) {log.info("开始注册自定义拦截器...");registry.addInterceptor(jwtTokenUserInterceptor).addPathPatterns("/user/**").excludePathPatterns("/user/user/login").excludePathPatterns("/user/shop/status");}}
商品浏览
需求分析
查看产品原型
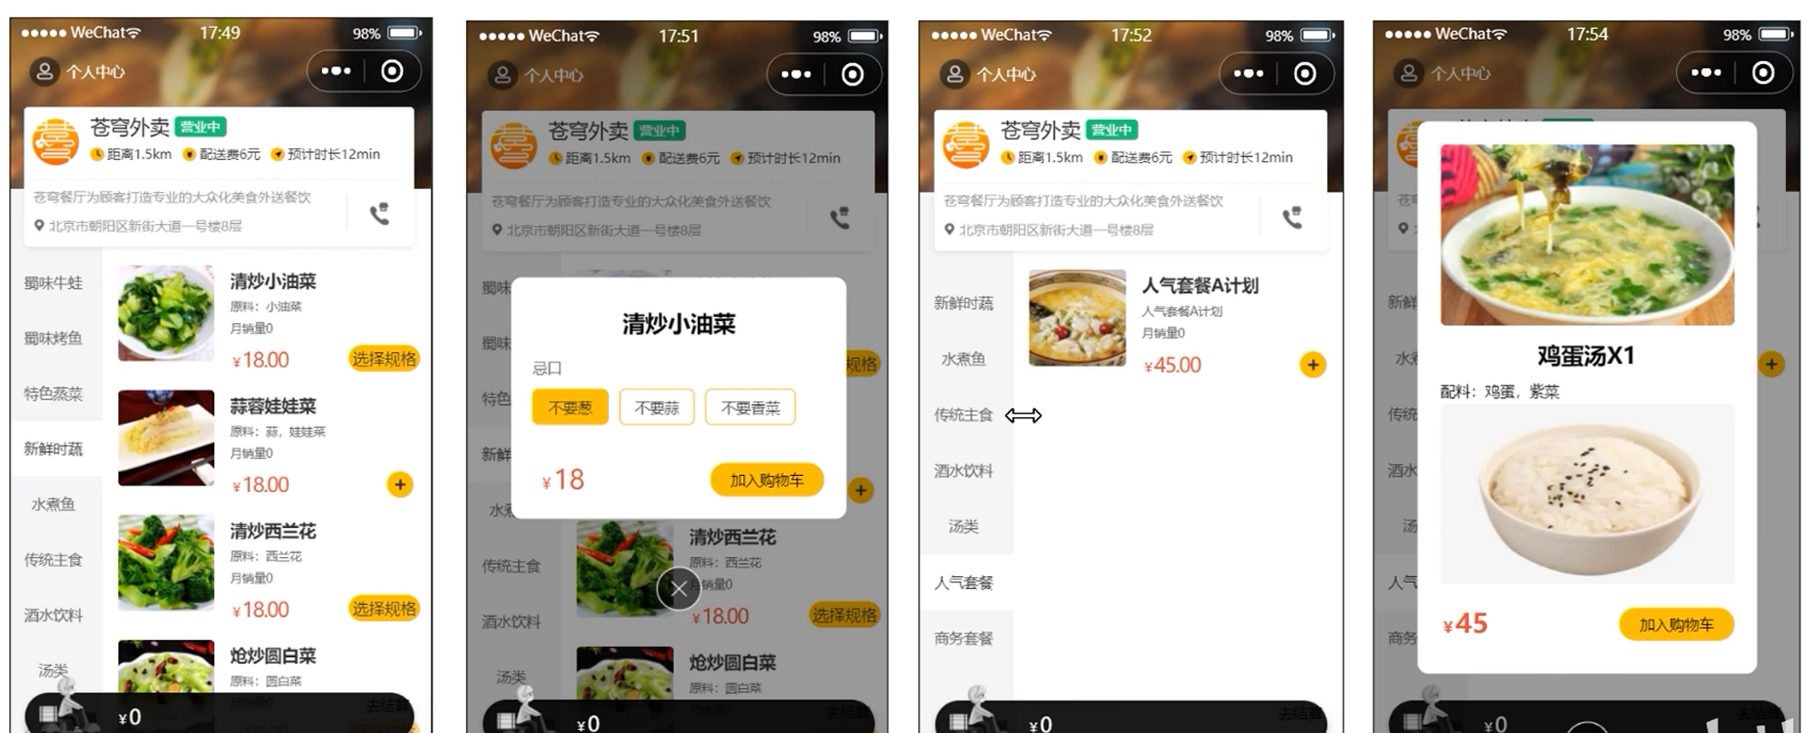
接口设计
查询分类接口
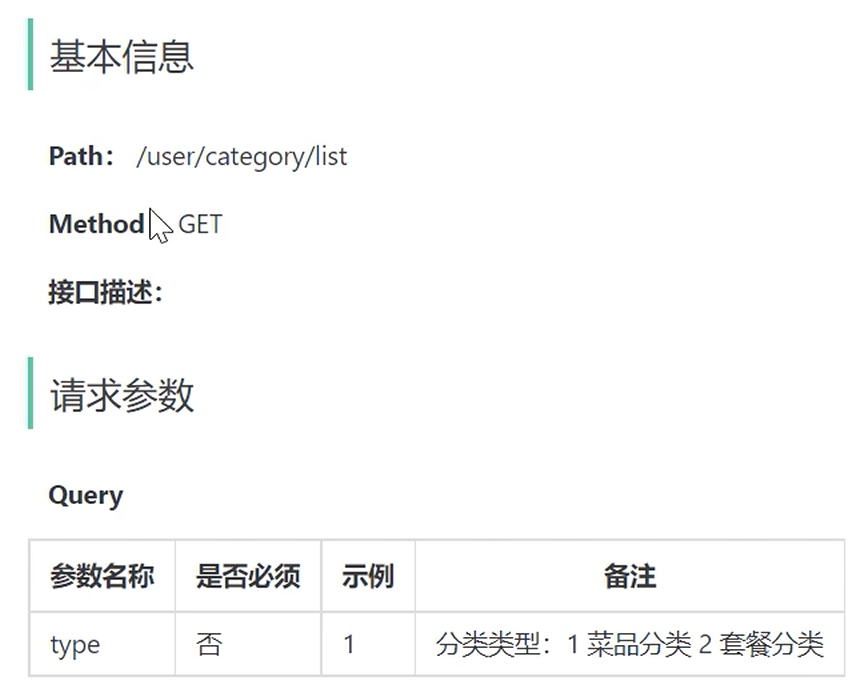

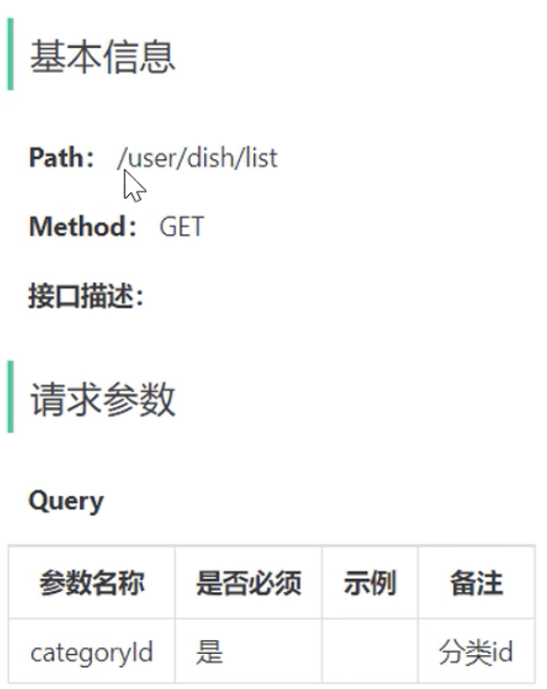
根据分类id查询菜品
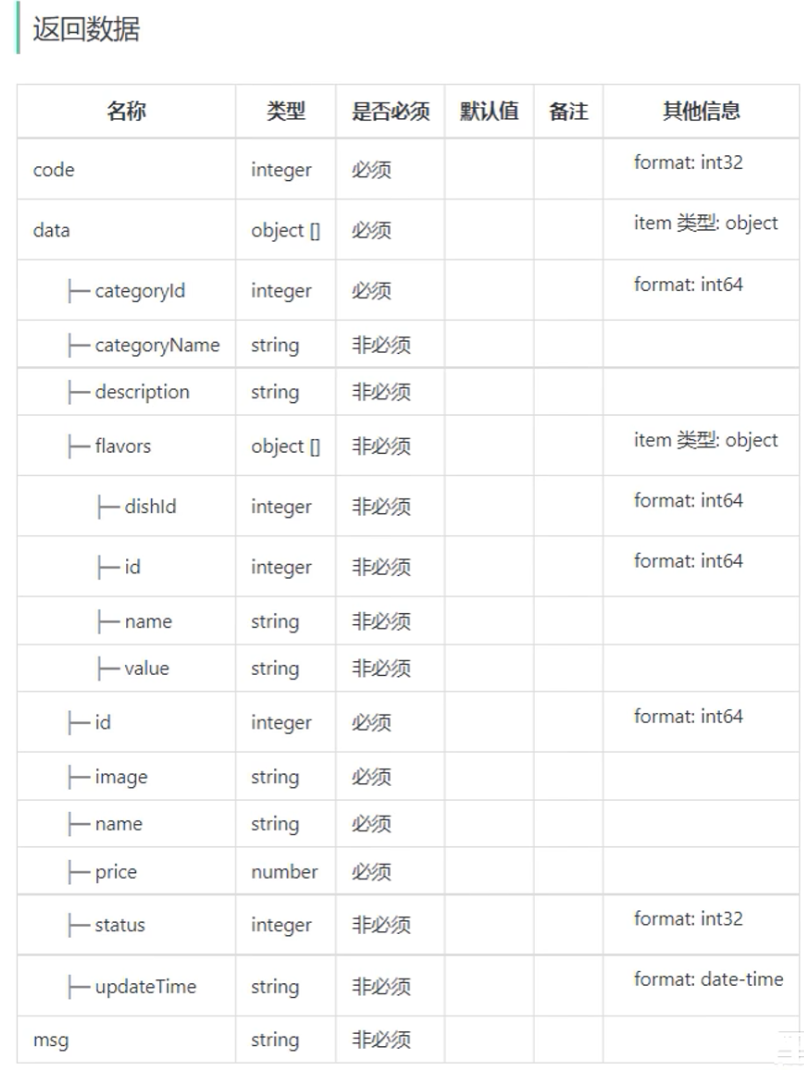
根据分类id查询套餐

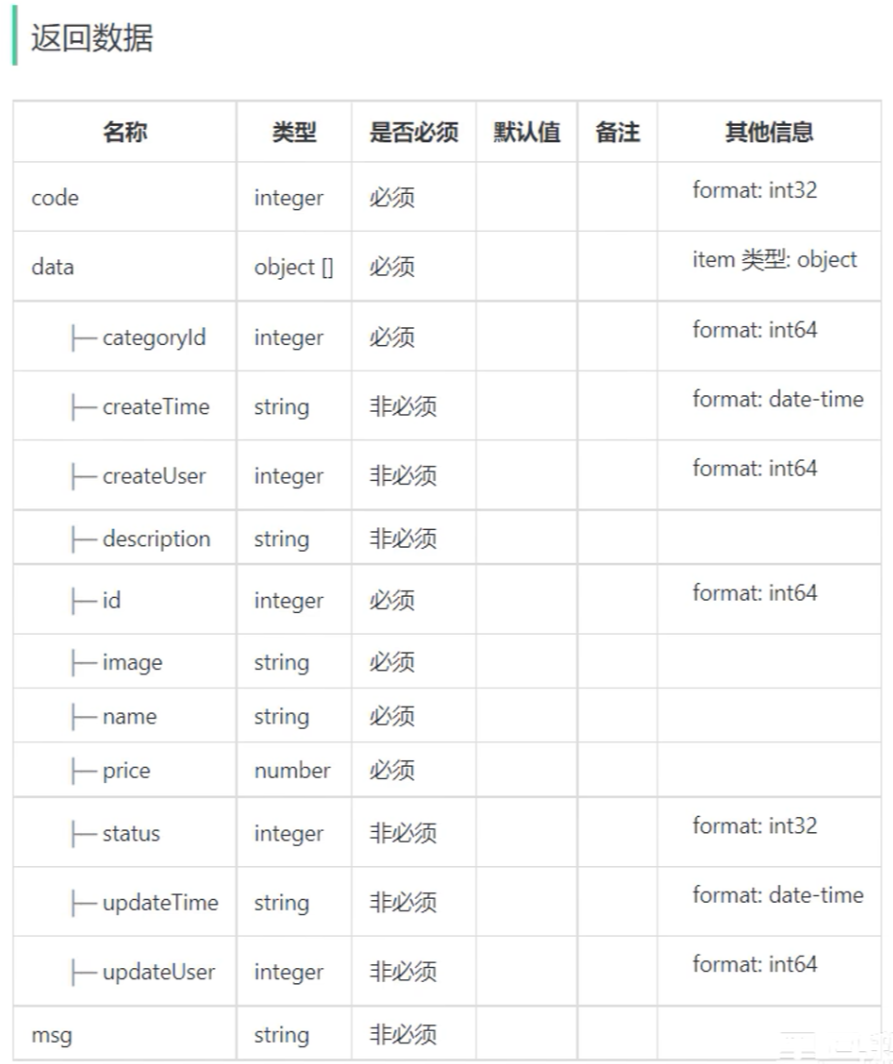
根据套餐id查询包含的菜品

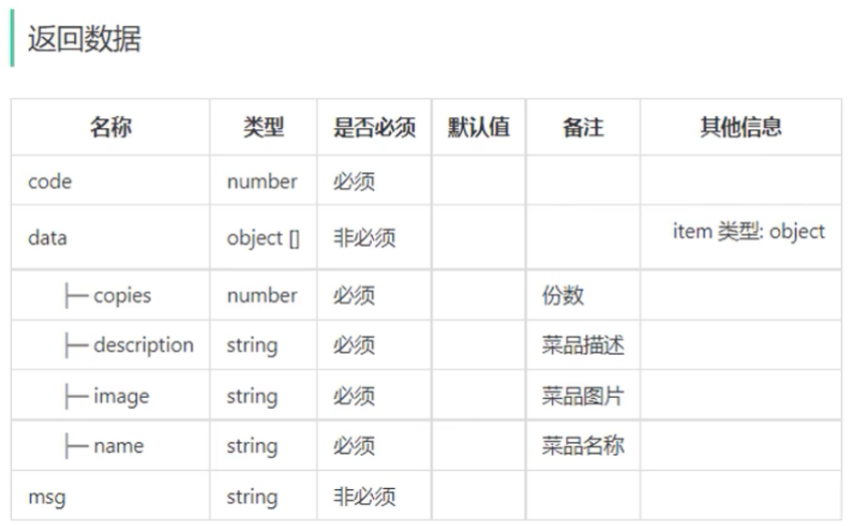
功能实现
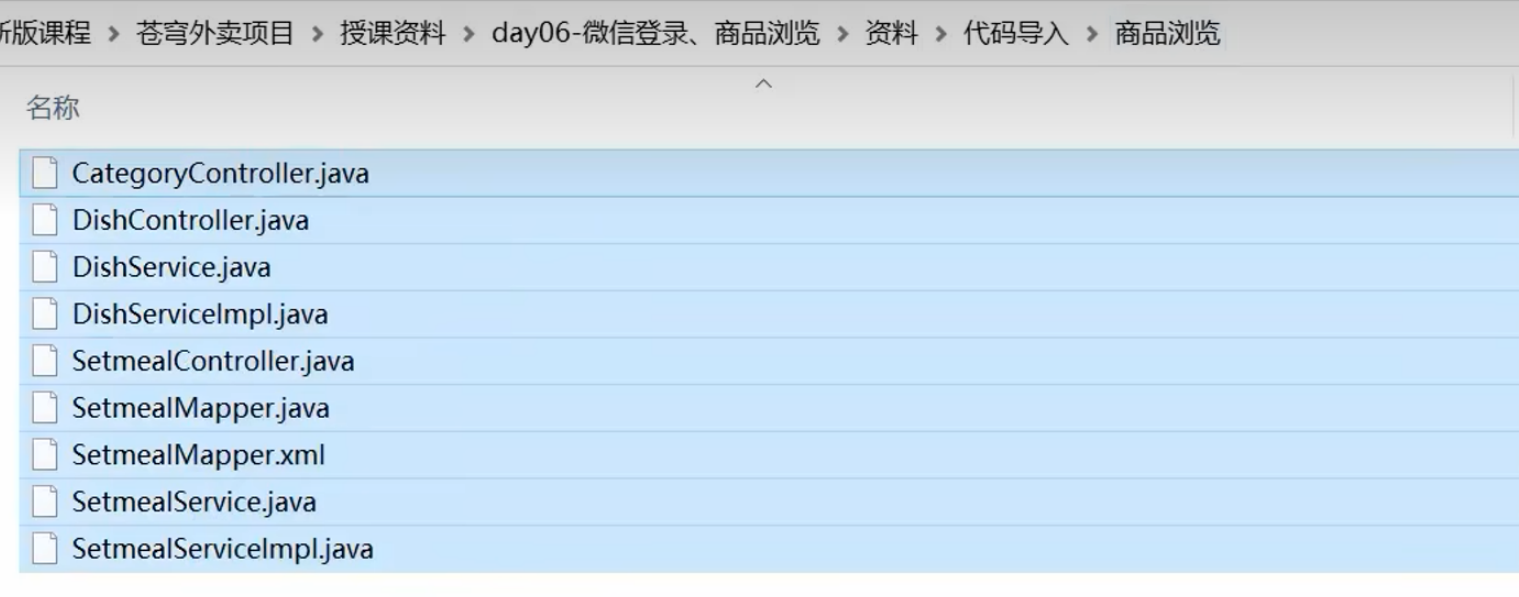
代码导入: day06-微信登录-商品浏览/资料/代码导入
前后端联调功能测试
