
文章目录
- 1、概述
- 2、快速开始
- 2.1使用 npm 安装
- 2.2通过 浏览器引入 安装
- 2.3、使用
- 3、简单案例
- 3.1 路由创建
- 3.2、 页面创建
- 3.3、 Table组件
- 3.4、序号展示
- 3.5、 图片展示及预览
- 3.6、 性别字段处理
1、概述
TDesign 是腾讯推出的设计系统,旨在提供一致的设计语言和视觉风格,帮助用户形成连续、统一的体验认知。
主要特点:
-
提供了丰富的 UI 组件库,方便开发者快速构建界面。
-
提供了一系列设计资产,如图标、颜色、字体等,方便设计师进行设计工作。
-
详细的设计指南帮助设计师和开发者理解和应用 TDesign 的设计原则。
-
TDesign 强调一致的设计语言和视觉风格,确保用户在使用不同产品时能够获得一致的体验。
-
官网地址:TDesign 官网
-
UI 组件库:TDesign Vue 组件库
-
设计指南:TDesign 设计指南
-
设计资产:TDesign 设计资产
2、快速开始
可以参考官方文档:快速搭建
安装
2.1使用 npm 安装
推荐使用 npm 方式进行开发
npm i tdesign-vue // 在 Vue 2.6 及以下使用
npm i tdesign-vue@naruto  // 在 Vue 2.7 使用
2.2通过 浏览器引入 安装
目前可以通过 unpkg.com/tdesign-vue 获取到最新版本的资源,在页面上引入 js 和 css 文件即可开始使用。由于部分组件依赖了@vue/composition-api,除了像其他 Vue2 版本的组件库一样需要引入vue,还需要额外手动引入@vue/composition-api。
<link rel="stylesheet" href="https://unpkg.com/tdesign-vue/dist/tdesign.min.css" />
<script src="https://unpkg.com/vue@2.6/dist/vue.js"></script>
<script src="https://unpkg.com/@vue/composition-api@1.7.0/dist/vue-composition-api.prod.js"></script>
<script src="https://unpkg.com/tdesign-vue/dist/tdesign.min.js"></script>
...
<script>Vue.use(TDesign);
</script>
请注意,我们不推荐使用这种方式,这样无法实现按需加载等优化手段,生产项目会直接受版本更新影响,同时也可能受到 CDN 的稳定性的影响。
npm package 中提供了多种构建产物,可以阅读 这里 了解不同目录下产物的差别。
2.3、使用
TDesign 提供了三种方式使用组件,具体使用方式如下
基础使用
基础使用会全量注册所有组件,如果您的项目大规模使用组件,请放心使用这种方式。
import Vue from 'vue';
import TDesign from 'tdesign-vue';// 引入组件库的少量全局样式变量
import 'tdesign-vue/es/style/index.css';Vue.use(TDesign);
按需引入使用
如果您对产物大小有严格的要求,可以通过 按需引入具体组件 的方式来使用。
借助 Webpack 或 Rollup 等支持 tree-shaking 特性的构建工具,可以达到按需引入的使用效果。
import { Button as TButton } from 'tdesign-vue';// 引入组件库的少量全局样式变量
import 'tdesign-vue/es/style/index.css';Vue.use(TButton);
通过插件按需使用
除此之外,也可以使用 unplugin-vue-components 和 unplugin-auto-import 来实现自动导入:
如果是在 Vue 2.6 版本中使用 您仍需在项目引入组件库的少量全局样式变量及@vue/composition-api
如果是在 Vue 2.7 版本中使用 您不再需要在项目引入@vue/composition-api
import VueCompositionAPI from '@vue/composition-api';
// 引入组件库的少量全局样式变量
import 'tdesign-vue/es/style/index.css';Vue.use(VueCompositionAPI); // 必须是项目的第一个 use
并安装两个 unplugin 相关的第三方包
npm install -D unplugin-vue-components unplugin-auto-import
然后在 Webpack 或 Vite 对应的配置文件添加上述插件。
Vite
import AutoImport from 'unplugin-auto-import/vite';
import Components from 'unplugin-vue-components/vite';
import { TDesignResolver } from 'unplugin-vue-components/resolvers';export default {plugins: [// ...AutoImport({resolvers: [TDesignResolver()],}),Components({resolvers: [TDesignResolver()],}),],
};
Webpack
const AutoImport = require('unplugin-auto-import/webpack');
const Components = require('unplugin-vue-components/webpack');
const { TDesignResolver } = require('unplugin-vue-components/resolvers');module.exports = {// ...plugins: [AutoImport.default({resolvers: [TDesignResolver()],}),Components.default({resolvers: [TDesignResolver()],}),],
};
TDesignResolver 支持的配置,可以点击此链接。
3、简单案例
- 在创建的好项目中新增路由菜单
- 主菜单:权限管理
- 子菜单:用户管理和角色管理
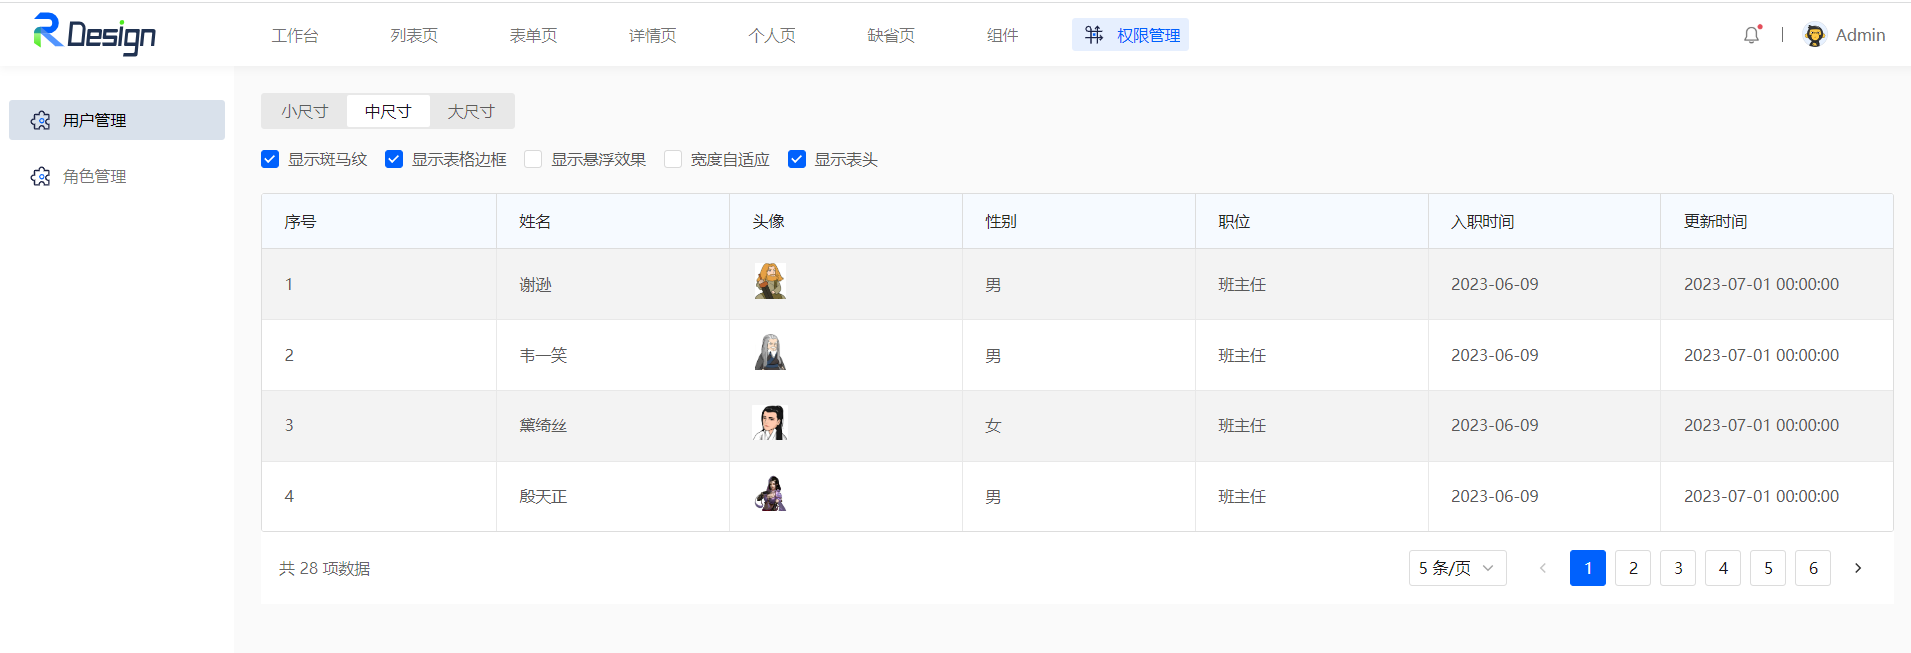
- 在用户管理菜单中新增组件,展示用户列表,如下效果
- 使用TDesign中的table组件展示数据,并可以查看API列表来实现数据的展示(序号、性别)
- 使用TDesign中的ImageViewer组件实现图片展示和预览
3.1 路由创建
在src/router/modules目录下新建文件:permission.ts文件,内容如下:
import Layout from '@/layouts/index.vue'import HomeIcon from '@/assets/test-img/icon_menu_diaodu.svg'
import ModelIcon from '@/assets/test-img/icon_menu_zj.svg'export default [{path: '/permission',name: 'permission',component: Layout,redirect: '/permission/index',meta: {title: '权限管理',icon: HomeIcon},children: [{path: 'index',name: '用户管理',component: () => import('@/pages/permission/user/index.vue'),meta: {title: '用户管理',icon: ModelIcon}},{path: 'role-index',name: '角色管理',component: () => import('@/pages/permission/role/index.vue'),meta: {title: '角色管理',icon: ModelIcon}}]}
]
3.2、 页面创建
在src/pages下新建目录permissio,并且在permission下创建两个目录,分别是user和role,效果如下:
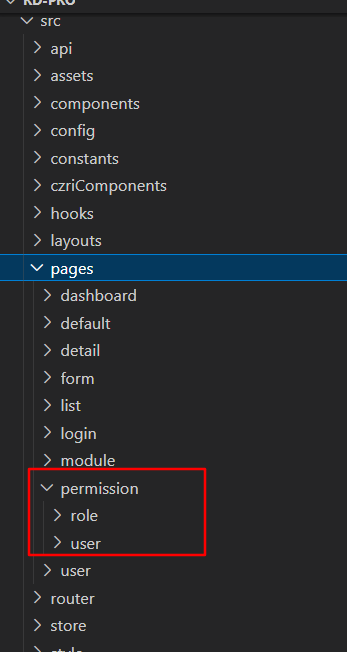
在user目录下新增index.vue文件
3.3、 Table组件
打开TDesign组件中的Table组件,链接:https://tdesign.tencent.com/vue-next/components/table
找到基础表格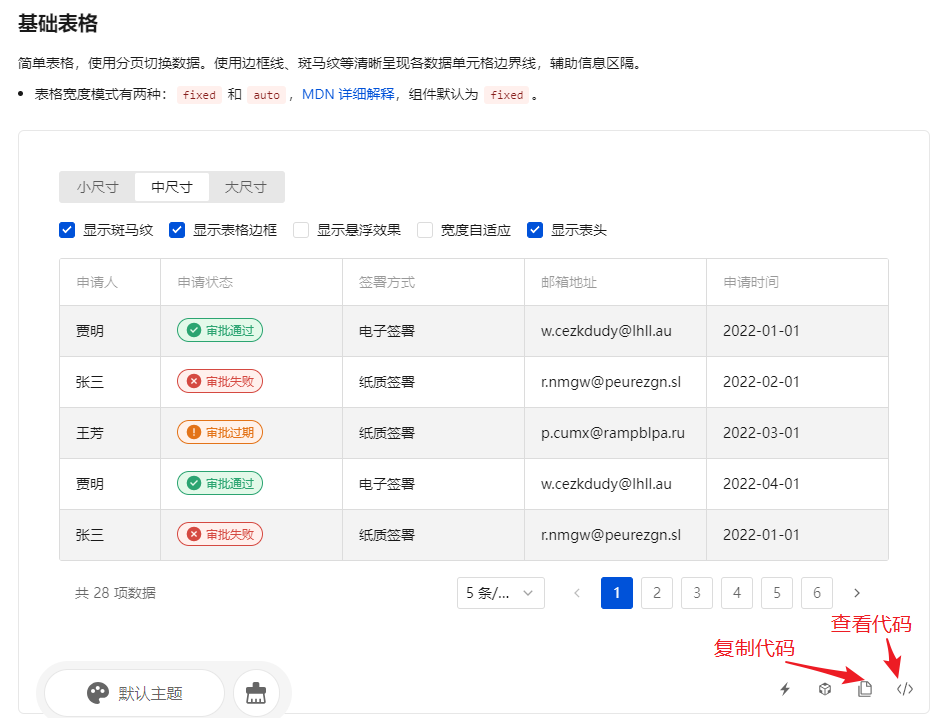
把代码拷贝到新建的index.vue文件中(全部拷贝),代码如下:
<template><t-space direction="vertical"><!-- 按钮操作区域 --><t-radio-group v-model="size" variant="default-filled"><t-radio-button value="small">小尺寸</t-radio-button><t-radio-button value="medium">中尺寸</t-radio-button><t-radio-button value="large">大尺寸</t-radio-button></t-radio-group><t-space><t-checkbox v-model="stripe"> 显示斑马纹 </t-checkbox><t-checkbox v-model="bordered"> 显示表格边框 </t-checkbox><t-checkbox v-model="hover"> 显示悬浮效果 </t-checkbox><t-checkbox v-model="tableLayout"> 宽度自适应 </t-checkbox><t-checkbox v-model="showHeader"> 显示表头 </t-checkbox></t-space><!-- 当数据为空需要占位时,会显示 cellEmptyContent --><t-tablerow-key="index":data="data":columns="columns":stripe="stripe":bordered="bordered":hover="hover":table-layout="tableLayout ? 'auto' : 'fixed'":size="size":pagination="pagination":show-header="showHeader"cell-empty-content="-"resizablelazy-load@row-click="handleRowClick"></t-table></t-space>
</template><script setup lang="jsx">
import { ref } from 'vue';
import { ErrorCircleFilledIcon, CheckCircleFilledIcon, CloseCircleFilledIcon } from 'tdesign-icons-vue-next';const statusNameListMap = {0: { label: '审批通过', theme: 'success', icon: <CheckCircleFilledIcon /> },1: { label: '审批失败', theme: 'danger', icon: <CloseCircleFilledIcon /> },2: { label: '审批过期', theme: 'warning', icon: <ErrorCircleFilledIcon /> },
};
const data = [];
const total = 28;
for (let i = 0; i < total; i++) {data.push({index: i + 1,applicant: ['贾明', '张三', '王芳'][i % 3],status: i % 3,channel: ['电子签署', '纸质签署', '纸质签署'][i % 3],detail: {email: ['w.cezkdudy@lhll.au', 'r.nmgw@peurezgn.sl', 'p.cumx@rampblpa.ru'][i % 3],},matters: ['宣传物料制作费用', 'algolia 服务报销', '相关周边制作费', '激励奖品快递费'][i % 4],time: [2, 3, 1, 4][i % 4],createTime: ['2022-01-01', '2022-02-01', '2022-03-01', '2022-04-01', '2022-05-01'][i % 4],});
}const stripe = ref(true);
const bordered = ref(true);
const hover = ref(false);
const tableLayout = ref(false);
const size = ref('medium');
const showHeader = ref(true);const columns = ref([{ colKey: 'applicant', title: '申请人', width: '100' },{colKey: 'status',title: '申请状态',cell: (h, { row }) => {return (<t-tag shape="round" theme={statusNameListMap[row.status].theme} variant="light-outline">{statusNameListMap[row.status].icon}{statusNameListMap[row.status].label}</t-tag>);},},{ colKey: 'channel', title: '签署方式' },{ colKey: 'detail.email', title: '邮箱地址', ellipsis: true },{ colKey: 'createTime', title: '申请时间' },
]);const handleRowClick = (e) => {console.log(e);
};const pagination = {defaultCurrent: 1,defaultPageSize: 5,total,
};
</script>
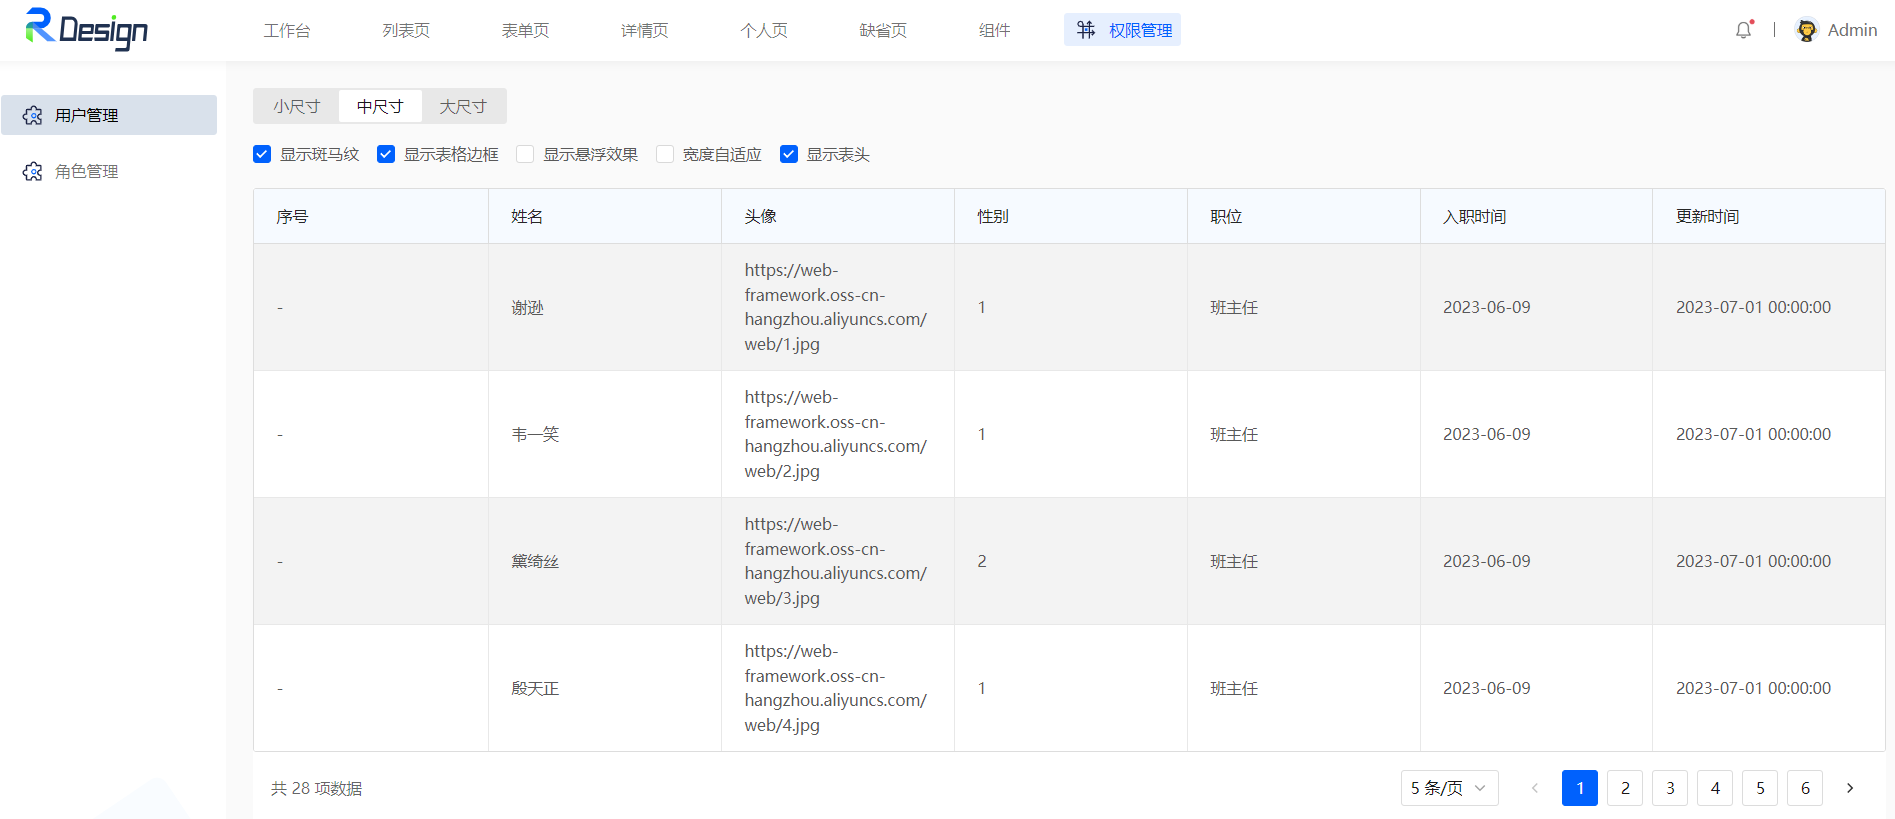
上述代码中,columns字段控制表头,for循环中展示的列表数据,目前展示的是案例中自带的内容,我们需要进行改造
- for循环的作用就是data属性进行赋值,我们可以把之前案例的数据直接拷贝过来,删除for循环,最终data的数据为:
const data = ref([{"id": 1,"name": "谢逊","image": "https://web-framework.oss-cn-hangzhou.aliyuncs.com/web/1.jpg","gender": 1,"job": "班主任","entrydate": "2023-06-09","updatetime": "2023-07-01 00:00:00"},{"id": 2,"name": "韦一笑","image": "https://web-framework.oss-cn-hangzhou.aliyuncs.com/web/2.jpg","gender": 1,"job": "班主任","entrydate": "2023-06-09","updatetime": "2023-07-01 00:00:00"},{"id": 3,"name": "黛绮丝","image": "https://web-framework.oss-cn-hangzhou.aliyuncs.com/web/3.jpg","gender": 2,"job": "班主任","entrydate": "2023-06-09","updatetime": "2023-07-01 00:00:00"},{"id": 4,"name": "殷天正","image": "https://web-framework.oss-cn-hangzhou.aliyuncs.com/web/4.jpg","gender": 1,"job": "班主任","entrydate": "2023-06-09","updatetime": "2023-07-01 00:00:00"}
]);
- 根据我们的原始数据,可以修改columns字段,如下效果:
//表头
const columns = ref([{ colKey: 'rowIndex', title: "序号" },{ colKey: 'name', title: '姓名' },{ colKey: 'image', title: '头像' },{ colKey: 'gender', title: '性别' },{ colKey: 'job', title: '职位' },{ colKey: 'entrydate', title: '入职时间' },{ colKey: 'updatetime', title: '更新时间' },
]);
改造完成后,目前的效果,如下:
在上面的代码中,主要控制数据显示的是<t-table>标签,我们来详细说一下这个标签的内容
<t-tablerow-key="index"    :data="data"         :columns="columns":stripe="stripe":bordered="bordered":hover="hover":table-layout="tableLayout ? 'auto' : 'fixed'":size="size":pagination="pagination":show-header="showHeader"cell-empty-content="-"resizable@row-click="handleRowClick"
>
- row-key
- :data 数据源 (数组)
- :columns 列配置(数组)
- :stripe 是否显示斑马纹
- :bordered 是否显示表格边框
- :hover 是否显示鼠标悬浮状态
- :table-layout 表格布局方式 可选项:auto/fixed
- :size 表格尺寸
- :pagination 分页配置, 用于模块内切换内容的控件
- :show-header 是否显示表头
- cell-empty-content 单元格数据为空时呈现的内容
- resizable 是否允许调整列宽
- @row-click 行点击时触发,泛型 T 指表格数据类型
table组件更多的api参考:https://tdesign.tencent.com/vue-next/components/table?tab=api
大家可以自己试着修改一下,查看效果
3.4、序号展示
目前列表中的序号是空白的,我们需要单独处理序号。
在table组件已经提供了序号的功能,有一个默认的字段rowIndex,我们只需要展示即可,默认从0开始
<t-table><template #rowIndex="{ rowIndex }">{{ rowIndex + 1 }}</template>
</t-table>
<t-table>标签对中的<template></template>可以单独来处理特殊的字段,标签对里面展示列表中的内容#rowIndex中的rowIndex为默认字段
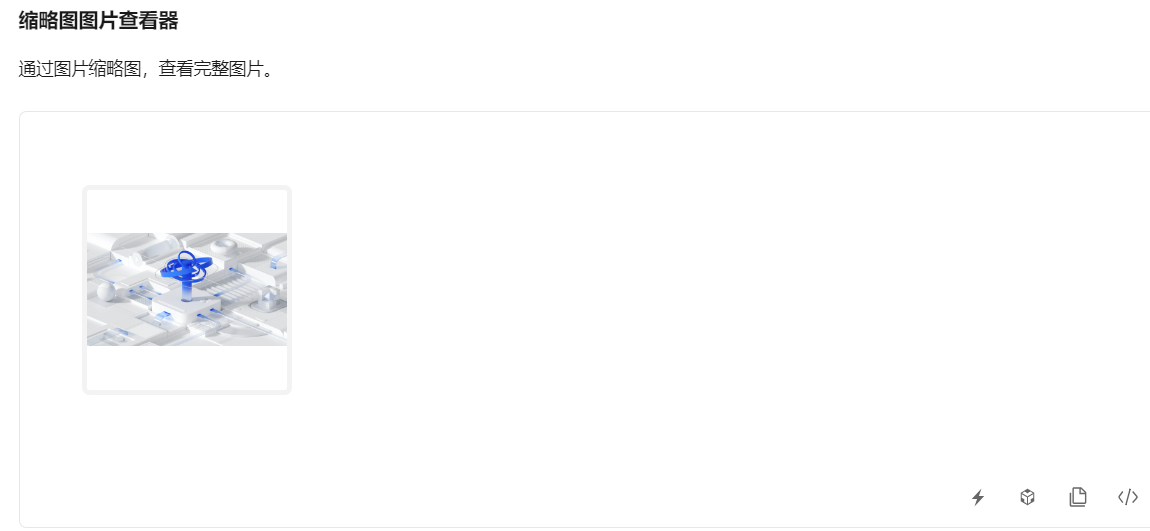
3.5、 图片展示及预览
目前图片展示的一个url链接,我们现在需要展示为图片,并且由预览功能
其实在TDesign中已经提供了对应的组件:ImageViewer
链接:https://tdesign.tencent.com/vue-next/components/image-viewer
找到缩略图图片查看器
代码中需要修改两处,改为自己的图片地址
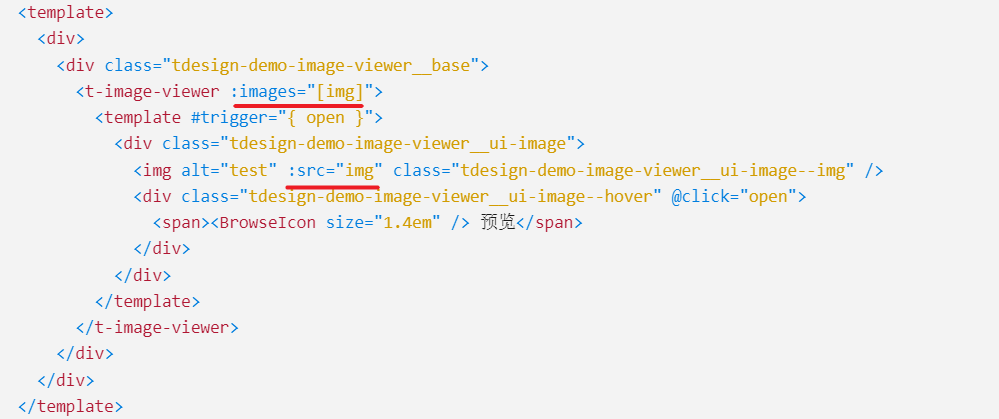
最终的代码如下:
<template #image="{ row }"><div><div class="tdesign-demo-image-viewer__base"><t-image-viewer :images="[row.image]"><template #trigger="{ open }"><div class="tdesign-demo-image-viewer__ui-image"><img alt="test" :src="row.image" class="tdesign-demo-image-viewer__ui-image--img" /><div class="tdesign-demo-image-viewer__ui-image--hover" @click="open"><span><BrowseIcon size="1.4em" /> 预览</span></div></div></template></t-image-viewer></div></div>
</template>
其中 #image="{ row }"中,image是字段名字,row代表整行数据
3.6、 性别字段处理
目前性别展示的还是1或2,我们最终希望展示的男或女,这个处理,我们只需要通过插值表达式即可解决
代码如下:
<template #gender="{ row }">{{ row.gender == 1 ? '男' : '女' }}</template>
附最终代码,如下:
<template><t-space direction="vertical"><!-- 按钮操作区域 --><t-radio-group v-model="size" variant="default-filled"><t-radio-button value="small">小尺寸</t-radio-button><t-radio-button value="medium">中尺寸</t-radio-button><t-radio-button value="large">大尺寸</t-radio-button></t-radio-group><t-space><t-checkbox v-model="stripe"> 显示斑马纹 </t-checkbox><t-checkbox v-model="bordered"> 显示表格边框 </t-checkbox><t-checkbox v-model="hover"> 显示悬浮效果 </t-checkbox><t-checkbox v-model="tableLayout"> 宽度自适应 </t-checkbox><t-checkbox v-model="showHeader"> 显示表头 </t-checkbox></t-space><!-- 当数据为空需要占位时,会显示 cellEmptyContent --><t-table row-key="index" :data="data" :columns="columns" :stripe="stripe" :bordered="bordered" :hover="hover":table-layout="tableLayout ? 'auto' : 'fixed'" :size="size" :pagination="pagination" :show-header="showHeader"cell-empty-content="-" resizable lazy-load @row-click="handleRowClick"><template #rowIndex="{ rowIndex }">{{ rowIndex + 1 }}</template><template #image="{ row }"><div><div class="tdesign-demo-image-viewer__base"><t-image-viewer :images="[row.image]"><template #trigger="{ open }"><div class="tdesign-demo-image-viewer__ui-image"><img alt="test" :src="row.image" class="tdesign-demo-image-viewer__ui-image--img" /><div class="tdesign-demo-image-viewer__ui-image--hover" @click="open"><span><BrowseIcon size="1.4em" /> 预览</span></div></div></template></t-image-viewer></div></div></template><template #gender="{ row }">{{ row.gender == 1 ? '男' : '女' }}</template></t-table></t-space>
</template><script setup lang="jsx">
import { ref } from 'vue';
const data = ref([{"id": 1,"name": "谢逊","image": "https://web-framework.oss-cn-hangzhou.aliyuncs.com/web/1.jpg","gender": 1,"job": "班主任","entrydate": "2023-06-09","updatetime": "2023-07-01 00:00:00"},{"id": 2,"name": "韦一笑","image": "https://web-framework.oss-cn-hangzhou.aliyuncs.com/web/2.jpg","gender": 1,"job": "班主任","entrydate": "2023-06-09","updatetime": "2023-07-01 00:00:00"},{"id": 3,"name": "黛绮丝","image": "https://web-framework.oss-cn-hangzhou.aliyuncs.com/web/3.jpg","gender": 2,"job": "班主任","entrydate": "2023-06-09","updatetime": "2023-07-01 00:00:00"},{"id": 4,"name": "殷天正","image": "https://web-framework.oss-cn-hangzhou.aliyuncs.com/web/4.jpg","gender": 1,"job": "班主任","entrydate": "2023-06-09","updatetime": "2023-07-01 00:00:00"}
]);
const total = 28;
const stripe = ref(true);
const bordered = ref(true);
const hover = ref(false);
const tableLayout = ref(false);
const size = ref('medium');
const showHeader = ref(true);//表头
const columns = ref([{ colKey: 'rowIndex', title: "序号" },{ colKey: 'name', title: '姓名' },{ colKey: 'image', title: '头像' },{colKey: 'gender', title: '性别'},{ colKey: 'job', title: '职位' },{ colKey: 'entrydate', title: '入职时间' },{ colKey: 'updatetime', title: '更新时间' },
]);const handleRowClick = (e) => {console.log(e);
};const pagination = {defaultCurrent: 1,defaultPageSize: 5,total,
};
</script>


