
作者前言
🎂 ✨✨✨✨✨✨🍧🍧🍧🍧🍧🍧🍧🎂
🎂 作者介绍: 🎂🎂
🎂 🎉🎉🎉🎉🎉🎉🎉 🎂
🎂作者id:老秦包你会, 🎂
简单介绍:🎂🎂🎂🎂🎂🎂🎂🎂🎂🎂🎂🎂🎂🎂🎂
喜欢学习C语言、C++和python等编程语言,是一位爱分享的博主,有兴趣的小可爱可以来互讨 🎂🎂🎂🎂🎂🎂🎂🎂
🎂个人主页::小小页面🎂
🎂gitee页面:秦大大🎂
🎂🎂🎂🎂🎂🎂🎂🎂
🎂 一个爱分享的小博主 欢迎小可爱们前来借鉴🎂
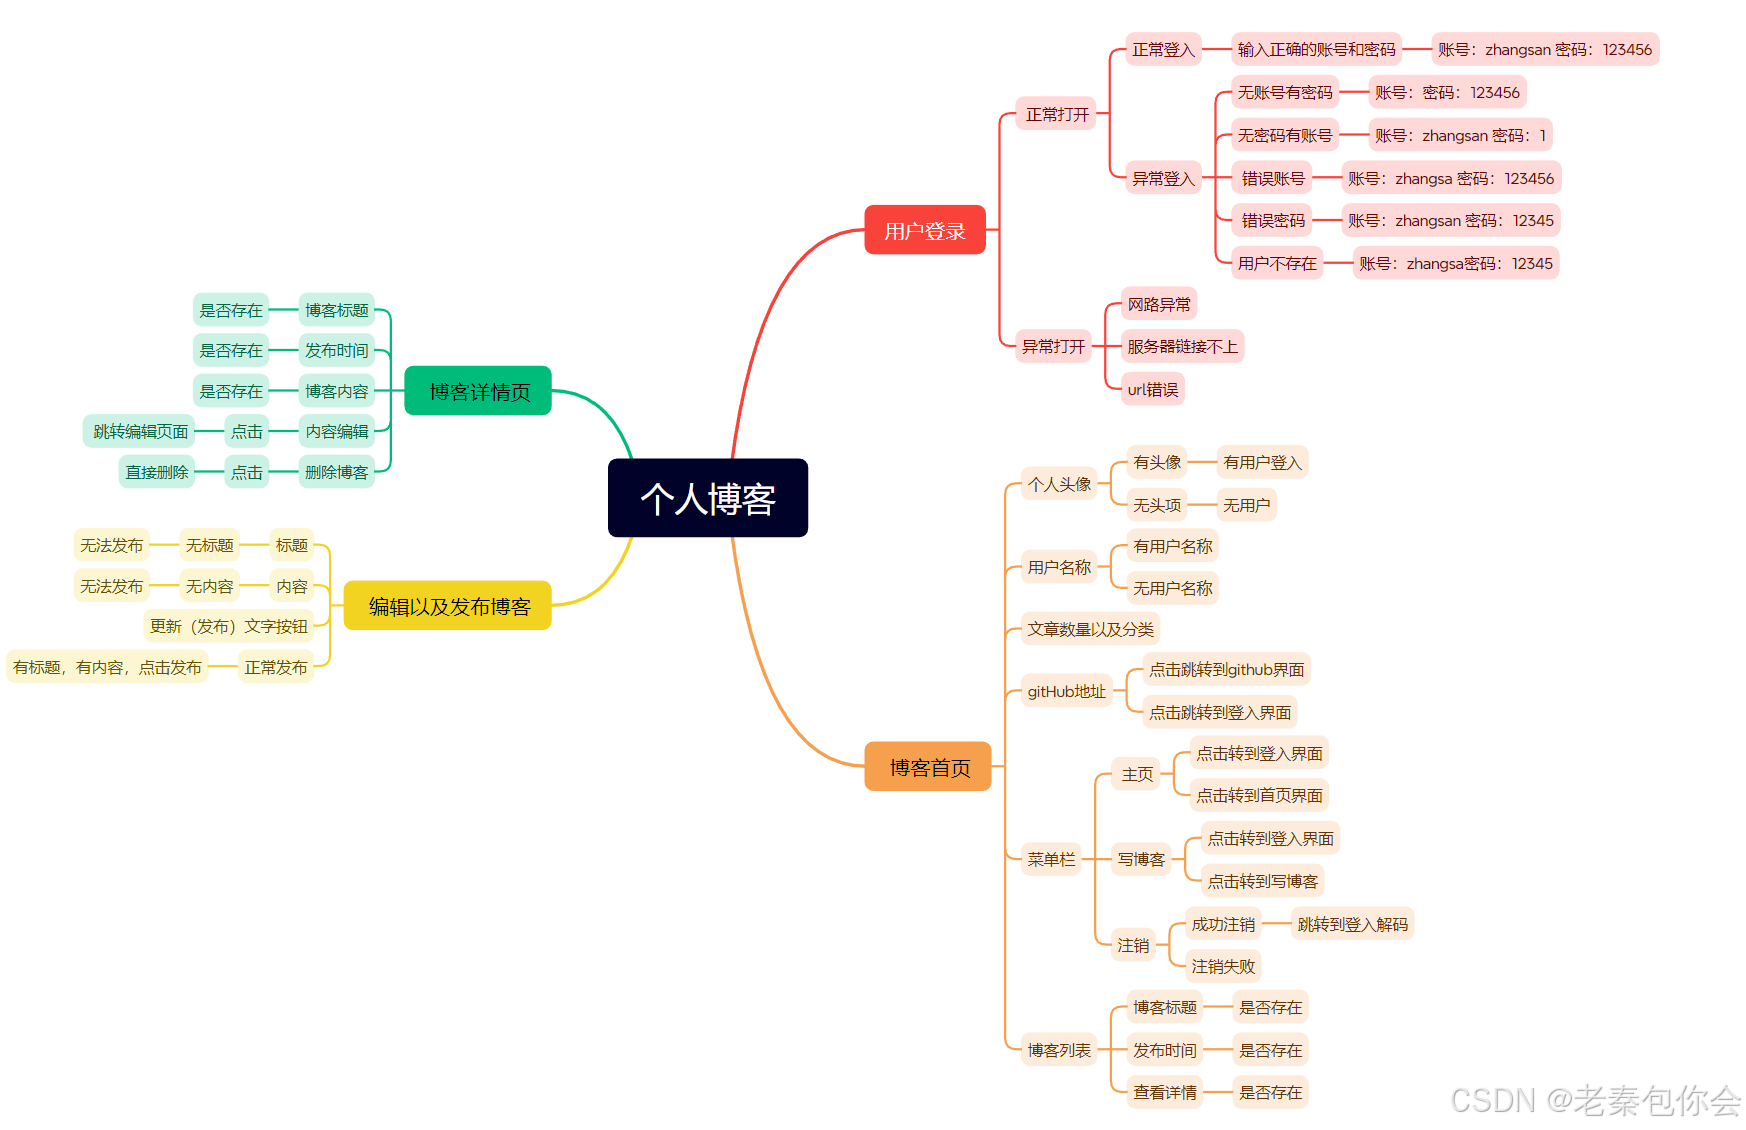
个人博客自动化测试项目
- **作者前言**
- 1.项目背景
- 2. 项目功能
- 3. 测试内容
- 3.1编写测试用例
- 3.2 功能测试
- 3.2.1 登入测试
- 3.2.2 博客首页测试
- 3.2.3博客详情页测试
- 3.2.4发布博客测试
- 4. 自动化测试
- 4.1测试工具
- 4.2测试脚本
- 4.2.1 登入测试脚本
- 4.2.1 博客首页测试脚本
- 4.2.1 博客详情页脚本
- 4.2.1 发布博客测试脚本
- Bug简述
- 测试结论
- gitee
1.项目背景
本项目是基于 SSM 框架(Spring、Spring MVC、MyBatis)开发的 个人博客系统,包括用户登录、博客发布、编辑、删除、查看等功能,提供博客列表页和详情页展示博客内容。用户登录后可以查看自己和其他用户的博客,并通过系统记录博客的发布时间、标题和发布者信息。
2. 项目功能
登录功能:没有实现账户注册功能,用户名以及密码是已经存在的。登录成功后就会跳转到列表页.
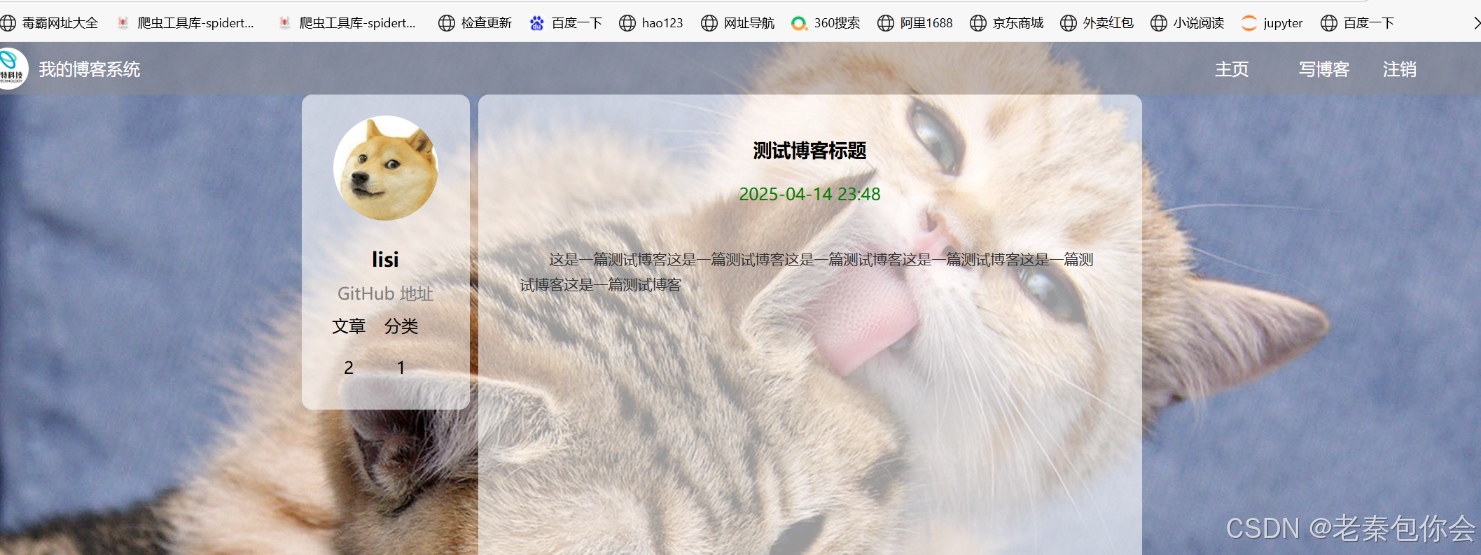
列表页面:可以在列表页查看有限数量的博客简介,其包括博客标题、发布时间以及内容概要。在左侧可以看到登录的用户以及文章数、分类数等的模块。在右上角有主页、写博客和注销三个功能:主页即列表页,写博客即博客编辑页,注销即注销用户,回到登录页面。
详情页面:在列表页面点击“查看全文”按钮就会跳转到详情页,此时就可以看到该篇博客的完整内容。在右上角同样有主页、写博客、删除和注销四个功能:删除即删除该篇博客,删除之后就会跳转到列表页面,该篇博客就被成功删除。
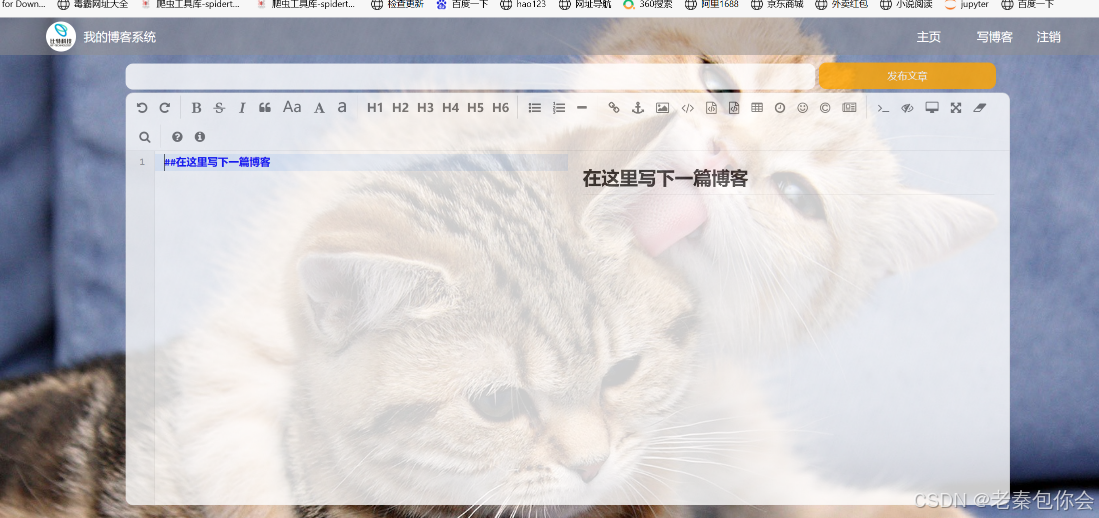
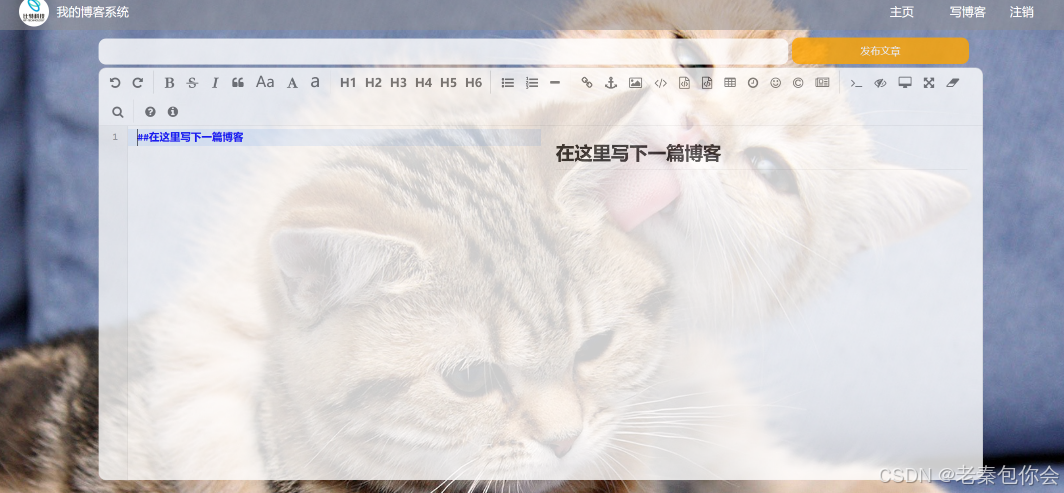
写博客:在登录之后的任意界面点击“写博客”之后就会进入博客编辑页面,此时就可以进行博客的编写,点击“发布文章”后就可以成功发布文章,此时就会跳转到列表页。
3. 测试内容
3.1编写测试用例
3.2 功能测试
3.2.1 登入测试
界面展示:
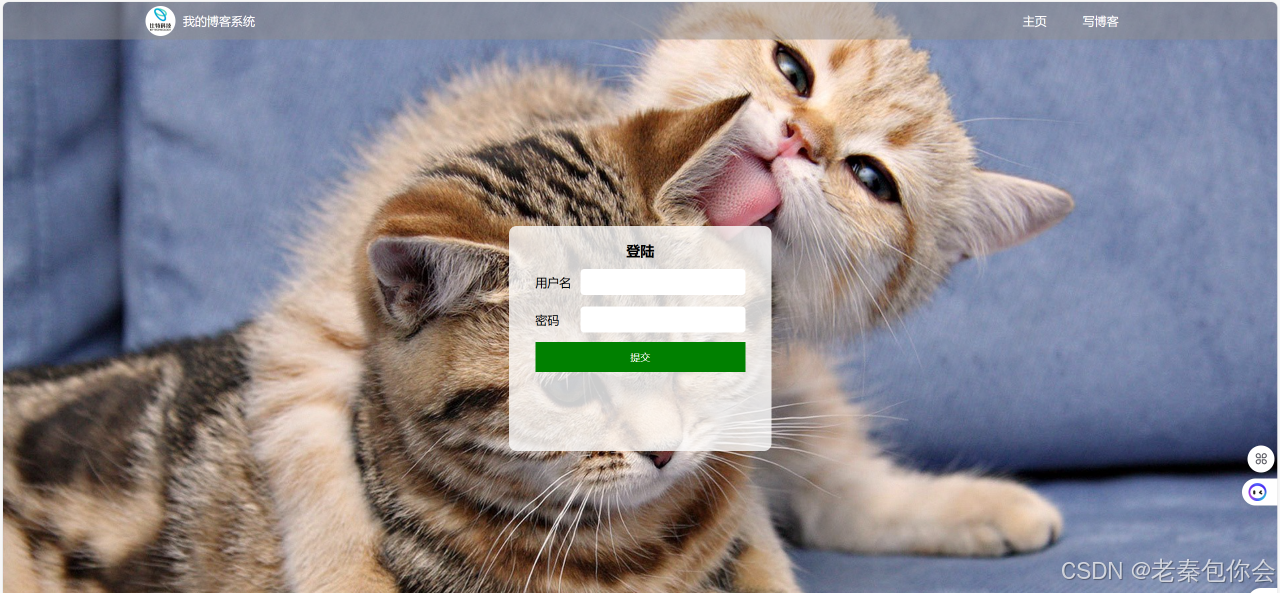
步骤 :
(1)点击登入链接,进入登入界面
(2)输入账号和密码
(3),点击登入按钮,
测试用例1: 输入正确的账号和密码 (账号:zhangsan 密码: 123456)
预期结果 成功登入,跳转到博客首页
实际效果: 成功登入,跳转到博客首页,如图:
测试用例2: 输入正确的账号和错误密码 (账号:zhangsan 密码: 23456)
预期结果 登入失败,出现警告弹窗
实际效果:登入失败,出现警告弹窗, 如图:

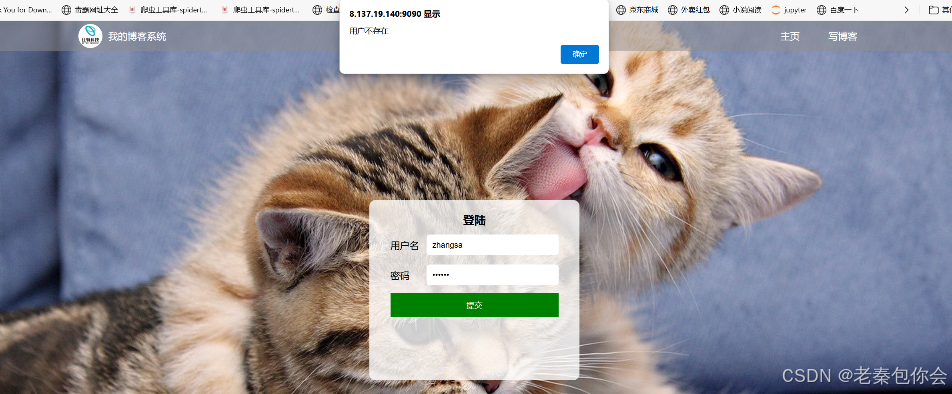
测试用例2: 输入错误的账号和正确密码 (账号:zhangsa 密码: 123456),
预期结果 登入失败,出现警告弹窗
实际效果:
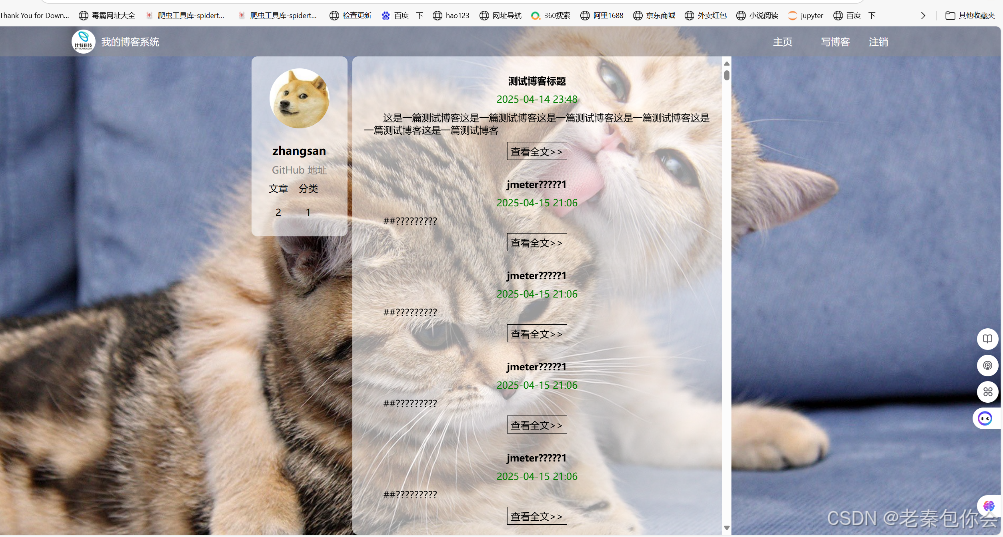
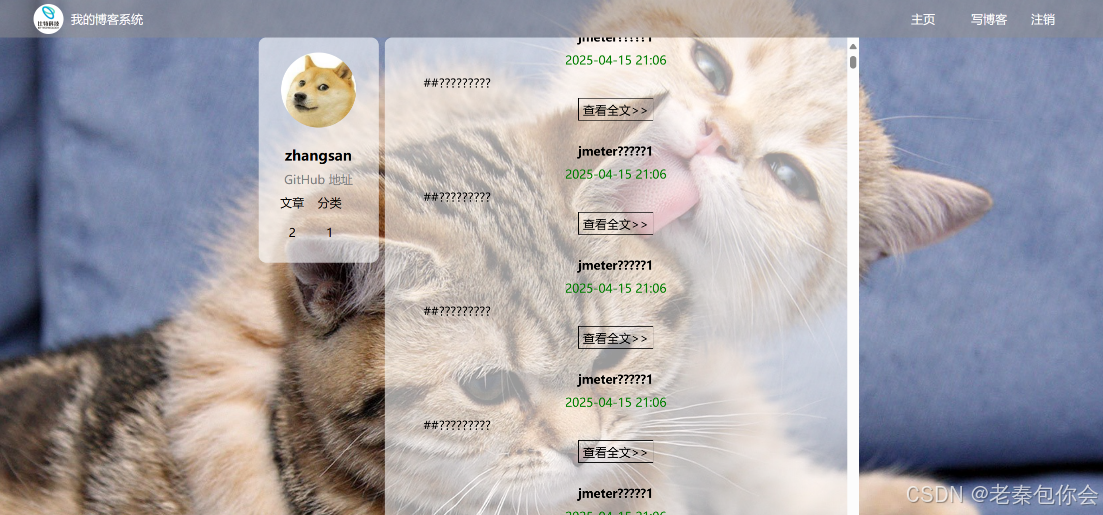
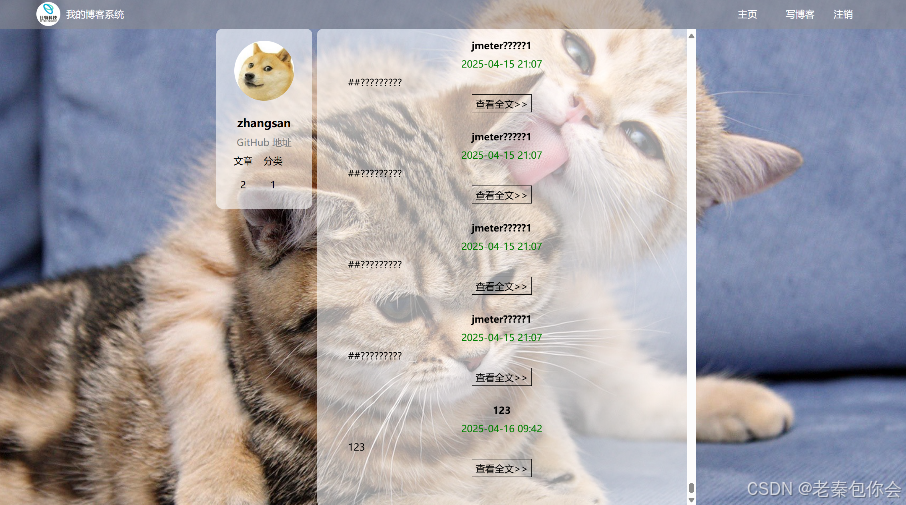
3.2.2 博客首页测试
界面展示:
步骤:
- 点击右上角的的主页、写博客,查看跳转功能
- 点击GitHub,查看跳转页面
- 查看博客列表
- 点击查看全文按钮,查看跳转功能
测试用例1:点击主页,跳转到主页,
预期结果:跳转到博客首页
实际结果:跳转到博客首页 ,如图:
测试用例2:点击写博客
预期结果:跳转到编辑博客页面
实际结果:跳转到编辑博客页面, 如图:
测试用例3:点击GitHub
预期结果:跳转到GitHub界面
实际结果:
测试用例4:点击查看全文
预期结果:跳转到博客详情页,查看对应的信息正确
预期结果:成功进入博客详情页,但是对应的用户名错误, 如图:

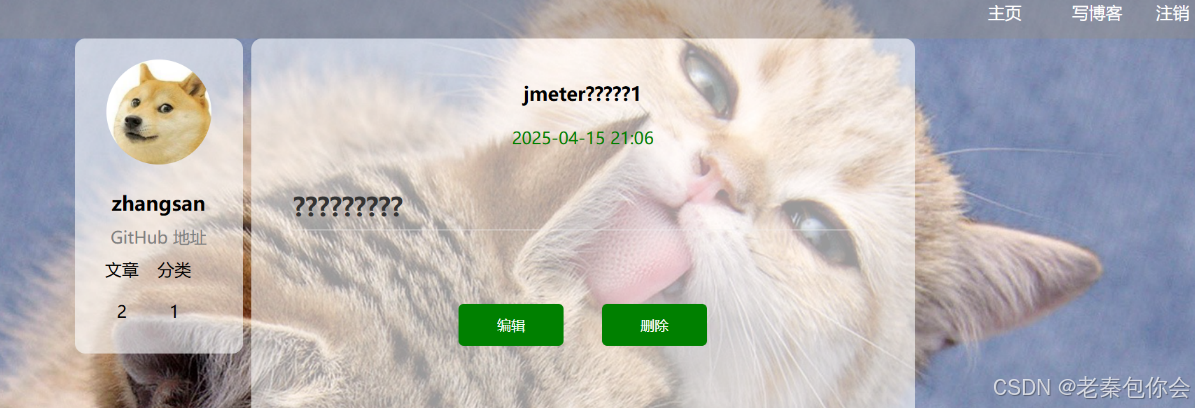
3.2.3博客详情页测试
界面介绍:
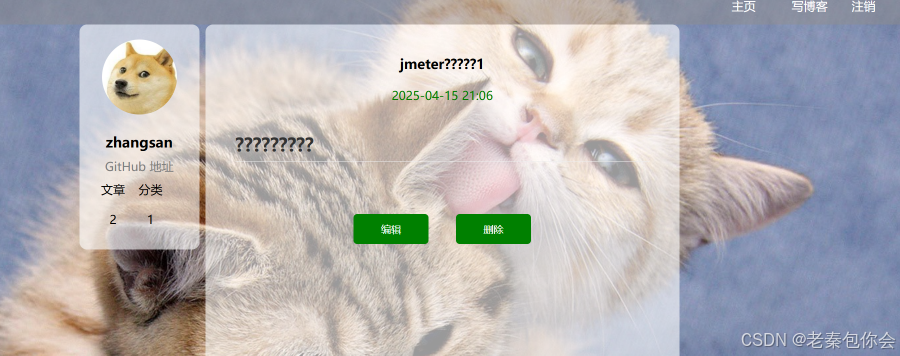
步骤:
1.查看对应博客详情页的用户名,标题、按钮
2.点击按钮、GitHub
3.查看跳页页面
测试用例1:点击第一篇博客详情页, 查看对应功能是否正常
预期结果:拥有对应的编辑、删除按钮,用户名正确
实际结果:未拥有对应的编辑、删除按钮,用户名正确 如图:
测试用例2:点击非第一篇博客详情页, 查看对应功能是否正常
预期结果:拥有对应的编辑、删除按钮,用户名正确
实际结果:拥有对应的编辑、删除按钮,用户名正确 如图:
测试用例3:页面正常情况下,点击编辑按钮, 查看对应功能是否正常
预期结果:跳转到编辑博客页面,标题、内容正确
实际结果:
测试用例4:页面正常情况下,点击删除按钮, 查看对应功能是否正常
预期结果:跳转到博客首页页面,文章数量改变
实际结果:跳转到博客首页页面,文章数量未改变
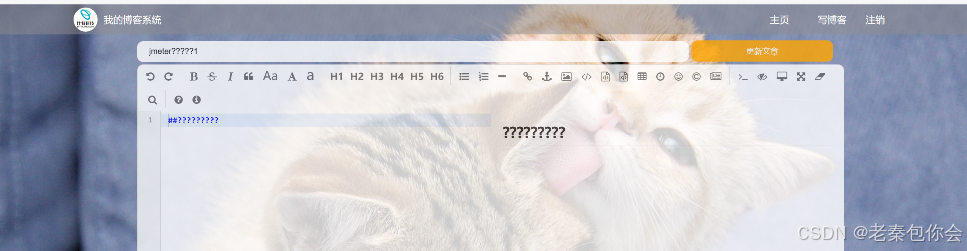
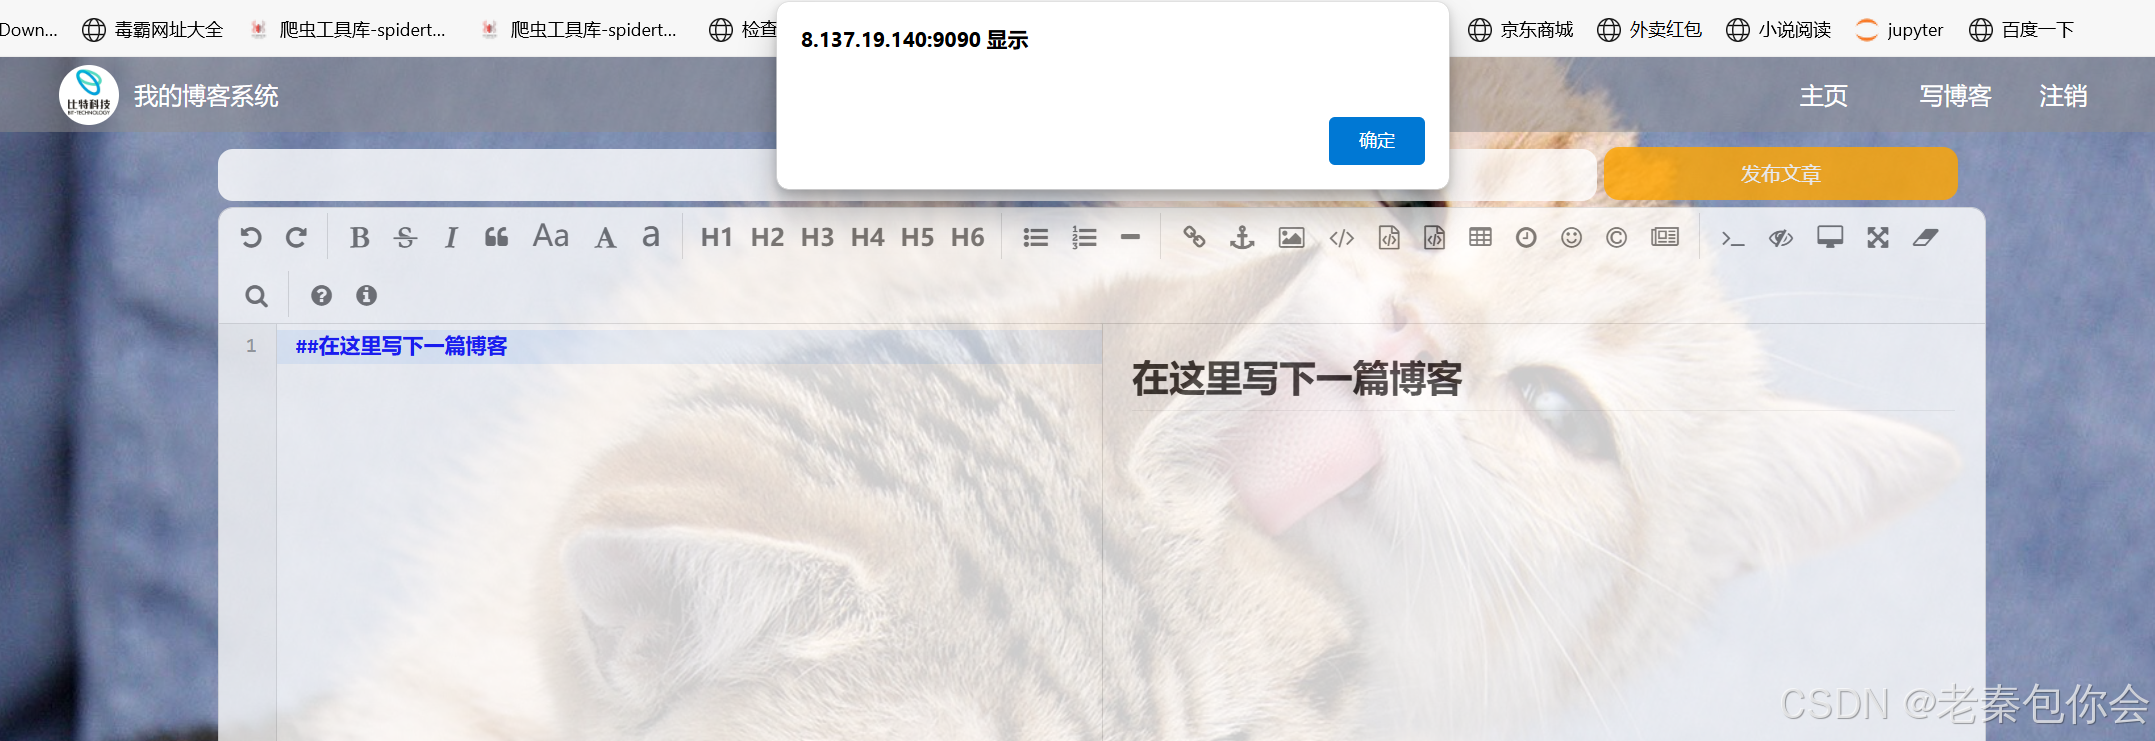
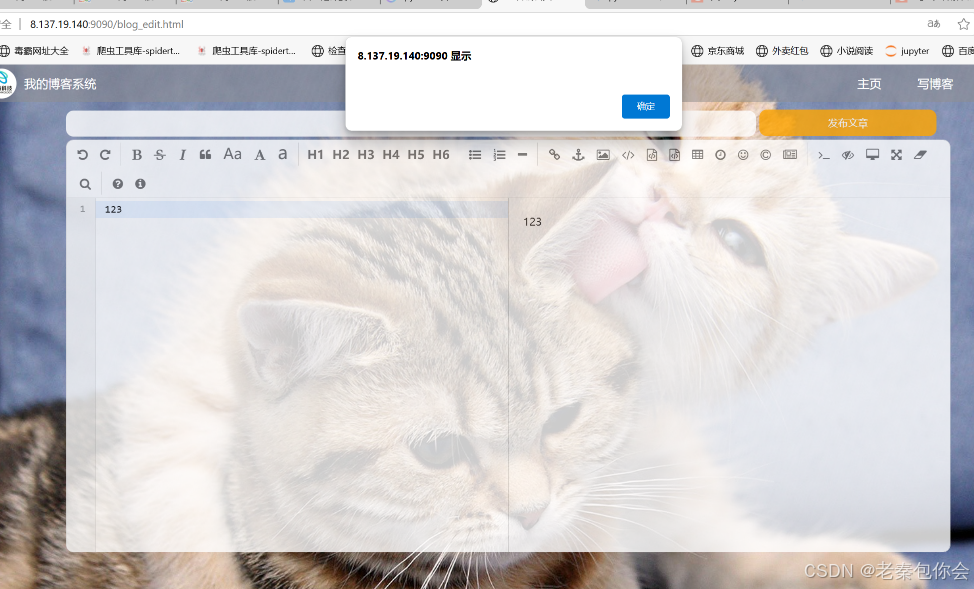
3.2.4发布博客测试
界面:
步骤:
1.输入标题
2.输入内容
3. 点击发布按钮
测试用例1:输入标题(123)、内容(123),点击发布
预期结果:发布成功,文章数量改变,页面跳转到博客首页
实际结果:发布成功,文章数量改变,页面跳转到博客首页
测试用例2:未写标题、内容(123),点击发布
预期结果:发布失败,文章数量不改变
实际结果:发布失败,文章数量不改变
测试用例3:输入标题(123)、没有内容,点击发布
预期结果:发布失败,文章数量不改变
实际结果:
4. 自动化测试
4.1测试工具
系统: windows10
浏览器  Chrome 135.0.7049.95(正式版本) (64 位)
语言:python
模块:selenium4.0
软件: pyCharm2024.3.5
4.2测试脚本
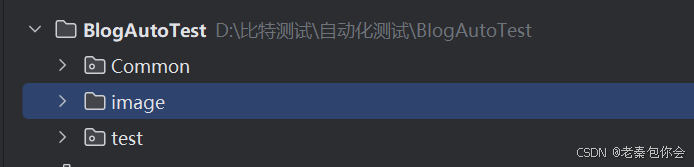
本脚本的文件分Blog为AutoTest为根目录,Common文件做为驱动对象包, Test文件夹里面存储脚本,image文件夹作为截图保存
如图:
4.2.1 登入测试脚本
AutoTest _Login.py
import timefrom selenium.webdriver.common.by import By
from selenium.webdriver.support import expected_conditions
from selenium.webdriver.support.wait import WebDriverWait
from Common.Util import Driver,BlogLogclass AutoTestLog():driver = ''def __init__(self):self.driver = BlogLog.driverself.url = BlogLog.urldef BloginSuccess(self,user, password):time.sleep(2)#清空self.driver.find_element(By.CSS_SELECTOR, "#username").clear()self.driver.find_element(By.CSS_SELECTOR, "#password").clear()#定位输入self.driver.find_element(By.CSS_SELECTOR,"#username").send_keys(user)self.driver.find_element(By.CSS_SELECTOR, "#password").send_keys(password)# 登入self.driver.find_element(By.CSS_SELECTOR, "#submit").click()#显示等待,判断是否登入WebDriverWait(self.driver,5).until(expected_conditions.invisibility_of_element((By.CSS_SELECTOR,"body > div.container > div.left > div")))time.sleep(3)txt = self.driver.find_element(By.CSS_SELECTOR, "body > div.container > div.left > div > img").get_attribute("src")print(txt)if(txt!=None):print("登入成功")else:print("失败")#保存截图BlogLog.imageSave()def BloginFail(self,user,password):# self.driver.back()time.sleep(2)# 清空self.driver.find_element(By.CSS_SELECTOR, "#username").clear()self.driver.find_element(By.CSS_SELECTOR, "#password").clear()# 定位输入self.driver.find_element(By.CSS_SELECTOR, "#username").send_keys(user)self.driver.find_element(By.CSS_SELECTOR, "#password").send_keys(password)# 登入self.driver.find_element(By.CSS_SELECTOR, "#submit").click()# 保存截图,没有弹窗使用# BlogLog.imageSave()time.sleep(1)# 获取弹窗内容,进行print(self.driver.switch_to.alert.text)assert self.driver.switch_to.alert.text == "用户不存在"# 弹窗点击self.driver.switch_to.alert.accept()login = AutoTestLog()
4.2.1 博客首页测试脚本
AutoTest _List.py
import time
from itertools import zip_longest
from time import sleepfrom selenium.webdriver.common.by import Byfrom Common.Util import BlogLog
from test.AutoTest_Log import loginclass AutoTest_list():driver = ""url = ""def __init__(self):self.driver = BlogLog.driverself.url = BlogLog.url#点击主页def clickBlogPase(self):self.driver.find_element(By.CSS_SELECTOR,"body > div.nav > a:nth-child(4)").click()#获取当签页面的链接try:assert self.driver.current_url == self.urlexcept:print("主页点击失败")# self.driver.back()print("主页点击执行完")# 截图BlogLog.imageSave()#点击写博客def clickWriteBlogLogin(self):self.driver.find_element(By.CSS_SELECTOR, "body > div.nav > a:nth-child(5)").click()# 获取当签页面的链接try:assert self.driver.current_url == "http://8.137.19.140:9090/blog_edit.html"except:print("写博客点击失败")print("写博客点击执行完")#截图BlogLog.imageSave()self.driver.back()#点击注销def clickBLogOff(self):time.sleep(2)self.driver.find_element(By.CSS_SELECTOR, "body > div.nav > a:nth-child(6)").click()# 获取当签页面的链接try:assert self.driver.current_url == "http://8.137.19.140:9090/blog_login.html"except:print("注销点击失败")print("注销点击执行完")# 截图BlogLog.imageSave()login.BloginSuccess("zhangsan", "123456")#查看对应的博客列表数量def BlogList(self):paseNum = 0#列表是否存在文章以及文章的blogNum =int(self.driver.find_element(By.CSS_SELECTOR,"body > div.container > div.left > div > div:nth-child(5) > span:nth-child(1)").text)#文章数量定位,使用标题数量list_1= self.driver.find_elements(By.XPATH,"/html/body/div[2]/div[2]/div[@class='blog']/div[@class='title']")list_2 = self.driver.find_elements(By.XPATH,"/html/body/div[2]/div[2]/div[@class='blog']/div[@class='desc']")list_3 = self.driver.find_elements(By.XPATH,"/html/body/div[2]/div[2]/div[@class='blog']/a")for i in list_1:# print(i.text)txt = ""txt = str(i.text)paseNum+=1if( txt==None):#print("标题有错误")BlogLog.imageSave()return Nonetxt = str(list_2[paseNum-1].text)if( txt == None):print("内容有错误")BlogLog.imageSave()return Noneif(str(list_3[paseNum-1].text)== None):print("文件查看有错误")BlogLog.imageSave()return Noneif(paseNum!=blogNum):print("文章数量不对")BlogLog.imageSave()#点击GitHubdef clickBlogGitHub(self):self.driver.find_element(By.CSS_SELECTOR,"body > div.container > div.left > div > a").click()if self.driver.current_url == "https://gitee.com/bubble-fish666/class-java45":print("GitHub成功")BlogLog.imageSave()self.driver.back()else:print("GitHub失败")BlogLog.imageSave()print("GitHub运行成功")# 点击全文def clickPaseButton(self):list_3 = self.driver.find_elements(By.XPATH, "/html/body/div[2]/div[2]/div[@class='blog']/a")for i in list_3:i.click()self.driver.back()blogList = AutoTest_list()
4.2.1 博客详情页脚本
AutoTest _Detail.py
import timefrom selenium.webdriver.common.by import Byfrom Common.Util import BlogLog
from test.AutoTest_list import blogListclass BlogDetail:driver= ''url = ""title= ""content = ""def __init__(self):self.driver = BlogLog.driverself.url = BlogLog.url#查看博客详情界面def detailPase(self):list_3 = self.driver.find_elements(By.XPATH, "/html/body/div[2]/div[2]/div[@class='blog']/a")for i in list_3:#运行不成功可能师页面加载不出来,可以添加一下强制等待i.click()# 查看对应的文章标题、内容、发布时间、用户信息if(self.blogInformation()):# 点击编辑按钮self.clickEditButton()else:self.driver.back()print("返回")# 点击删除按钮# self.deteleButton()def blogInformation(self):blogList.clickBlogGitHub()time.sleep(1)if(BlogLog.user != self.driver.find_element(By.CSS_SELECTOR,"body > div.container > div.left > div > h3").text):print("用户名错误")BlogLog.imageSave()return Falseif(None!= self.driver.find_element(By.CSS_SELECTOR,"body > div.container > div.right > div > div.title").text):print("无标题")BlogLog.imageSave()return Falseelse:self.title = self.driver.find_element(By.CSS_SELECTOR,"body > div.container > div.right > div > div.title").textif (None != self.driver.find_element(By.CSS_SELECTOR,"body > div.container > div.right > div > div.date").text):print("无发布时间")BlogLog.imageSave()return Falseif (None != self.driver.find_element(By.CSS_SELECTOR,"#h2-- > a").get_attribute("name")):print("无内容")BlogLog.imageSave()return Falseelse:self.content =self.driver.find_element(By.CSS_SELECTOR,'#h2-- > a').get_attribute("name")if (None != self.driver.find_element(By.CSS_SELECTOR,"body > div.container > div.right > div > div.operating > button:nth-child(1)").text):print("无编辑按钮")BlogLog.imageSave()return Falseif (None != self.driver.find_element(By.CSS_SELECTOR,"body > div.container > div.right > div > div.operating > button:nth-child(2)").text):print("无删除按钮")BlogLog.imageSave()return FalseBlogLog.imageSave()return Truedef clickEditButton(self):time.sleep(1)self.driver.find_element(By.CSS_SELECTOR,"body > div.container > div.right > div > div.operating > button:nth-child(1)").click()# 查看对应的内容是否正确if(self.content != self.driver.find_element(By.CSS_SELECTOR,"#editor > div.CodeMirror.cm-s-default.CodeMirror-wrap > div.CodeMirror-scroll > div.CodeMirror-sizer > div > div > div > div.CodeMirror-code > div > pre > span > span").text):print("内容有误")BlogLog.imageSave()self.driver.back()def deteleButton(self):#获取当前文章数量num = self.driver.find_element(By.CSS_SELECTOR,"body > div.container > div.left > div > div:nth-child(5) > span:nth-child(1)").text#点击删除self.driver.find_element(By.CSS_SELECTOR,"body > div.container > div.right > div > div.operating > button:nth-child(2)").click()# 弹窗确定self.driver.switch_to.alert.accept()# 页面跳转,判断文章数量是否改变if(num == self.driver.find_element(By.CSS_SELECTOR,"body > div.container > div.left > div > div:nth-child(5) > span:nth-child(1)").text):print("文章数量不变,实际上文章删除")
4.2.1 发布博客测试脚本
AutoTest _Edit.py
import timefrom selenium.webdriver.common.by import Byfrom Common.Util import BlogLog
from test.AutoTest_list import blogList
class BlogEditPase():url = ""driver =""def __init__(self):self.driver = BlogLog.driverself.url = BlogLog.url# 点击写博客self.driver.find_element(By.CSS_SELECTOR, "body > div.nav > a:nth-child(5)").click()# 获取当签页面的链接try:assert self.driver.current_url == "http://8.137.19.140:9090/blog_edit.html"except:print("写博客点击失败")print("写博客点击执行完")def BlogSuccess(self):# 输入标题self.driver.find_element(By.CSS_SELECTOR,"#title").send_keys("11111")#发布self.driver.find_element(By.CSS_SELECTOR, "#submit").click()#获取最新发布的文章print("成功发布")def BloginFail(self):time.sleep(1)# 发布self.driver.find_element(By.CSS_SELECTOR, "#submit").click()time.sleep(1)self.driver.switch_to.alert.accept()
Bug简述
bug1:
版本 135.0.7049.96(正式版本) (64 位)
环境:Windons10
步骤:删除或者添加文章
预期结果:文章数量显示值改变
实际结果:文章数量显示值未改变
bug2:
版本 135.0.7049.96(正式版本) (64 位)
环境:Windons10
步骤:进入博客首页.点击第一篇文章查看全文按钮,跳转页面
预期结果:用户信息正常,拥有文章编辑按钮和删除按钮
实际结果:发现对应的用户名以及文章的编辑按钮和删除按钮错误
测试结论
本测试采用手动测试+自动化测试进行测试,主要测试个人博客的登入界面、博客首页、博客详情页以及编辑博客等,其中自动化测试采用的Selenium为测试工具,脚本具备相关界面的功能测试,其中每个类进行独立封装,提供有截图等功能, 提高了测试效率和覆盖率。
gitee
gitee个人博客测试


 "安全防御(防火墙)")

