
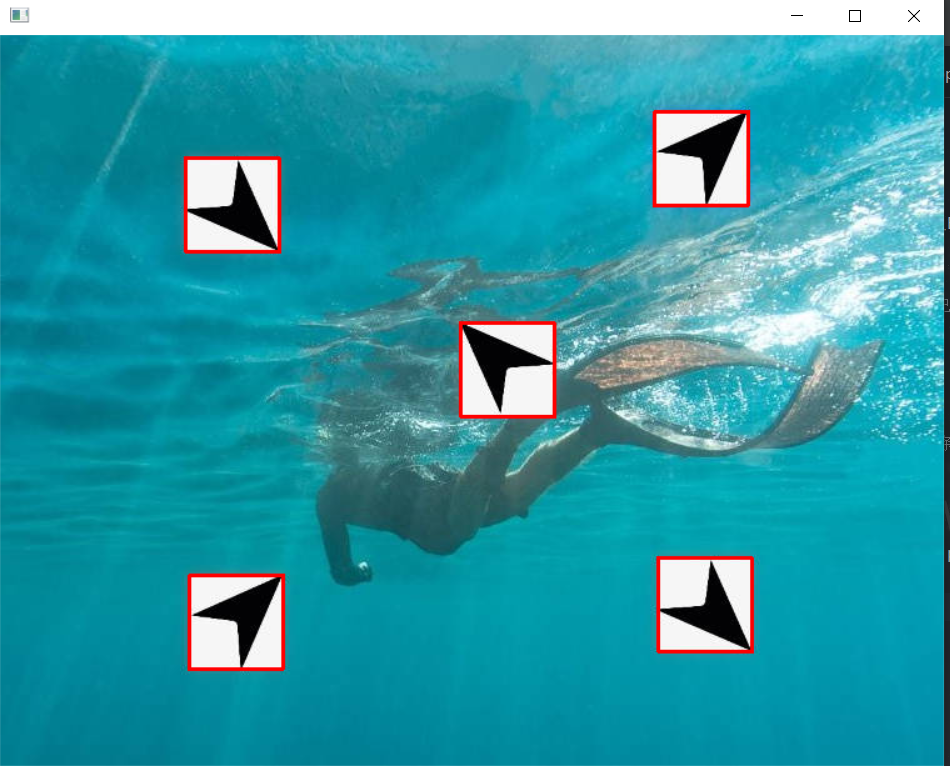
一、模板与多个对象匹配
import cv2
import numpy as np
#
img_rgb = cv2.imread('image.jpg')
img_gray = cv2.cvtColor(img_rgb, cv2.COLOR_BGR2GRAY)
template = cv2.imread('tem.jpg',0)
h,w = template.shape[:2]
# 使用模板匹配方法 cv2.matchTemplate 进行模板匹配
res = cv2.matchTemplate(img_gray, template, cv2.TM_CCOEFF_NORMED)
# 设定匹配阈值
threshold = 0.9
# 获取匹配结果中所有符合阈值的点的坐标
loc = np.where(res >= threshold)    # (符合条件的行,符合条件的列)
# 遍历所有匹配点
for pt in zip(*loc[::-1]):# 在原图上绘制匹配区域的矩形框cv2.rectangle(img_rgb, pt, (pt[0] + w, pt[1] + h), (0, 0, 255), 1)# a = np.array([2,4,6,8,10])
# c=np.where(a > 5)
# print(c)
运行结果
二、 图像透视变换
图像透视变换(Perspective Transformation)是计算机视觉中一种重要的几何变换技术,它可以将图像从一种视角投影到另一种视角,常用于矫正倾斜、改变观察角度等应用场景。下面列举一个简单的发票例子,下面是图片发票原图
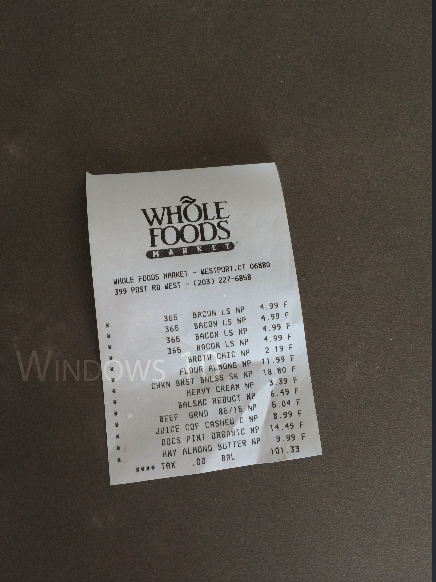
代码实现:
import numpy as np
import cv2
def cv_show(name, img):cv2.imshow(name, img)cv2.waitKey(0)
def order_points(pts):# 一共4个坐标点rect = np.zeros((4, 2), dtype="float32") # 用来存储排序之后的坐标位置# 按顺序找到对应坐标0123分别是 左上,右上,右下,左下s = pts.sum(axis=1) #对pts矩阵的每一行进行求和操作。(x+y)rect[0] = pts[np.argmin(s)]rect[2] = pts[np.argmax(s)]diff = np.diff(pts, axis=1) #对pts矩阵的每一行进行求差操作。(y-x)rect[1] = pts[np.argmin(diff)]rect[3] = pts[np.argmax(diff)]return rect
def four_point_transform(image, pts):# 获取输入坐标点rect = order_points(pts)(tl, tr, br, bl) = rect# 计算输入的w和h值widthA = np.sqrt(((br[0] - bl[0]) ** 2) + ((br[1] - bl[1]) ** 2))widthB = np.sqrt(((tr[0] - tl[0]) ** 2) + ((tr[1] - tl[1]) ** 2))maxWidth = max(int(widthA), int(widthB))heightA = np.sqrt(((tr[0] - br[0]) ** 2) + ((tr[1] - br[1]) ** 2))heightB = np.sqrt(((tl[0] - bl[0]) ** 2) + ((tl[1] - bl[1]) ** 2))maxHeight = max(int(heightA), int(heightB))# 变换后对应坐标位置dst = np.array([[0, 0], [maxWidth - 1, 0],[maxWidth - 1, maxHeight - 1], [0, maxHeight - 1]], dtype="float32")# 图像透视变换 cv2.getPerspectiveTransform(src, dst[, solveMethod]) → MP获得转换之间的关系# src:变换前图像四边形顶点坐标# cv2.warpPerspective(src, MP, dsize[, dst[, flags[, borderMode[, borderValue]]]]) → dst# 参数说明:# src:原图# MP:透视变换矩阵,3行3列# dsize: 输出图像的大小,二元元组(width, height)M = cv2.getPerspectiveTransform(rect, dst)warped = cv2.warpPerspective(image, M, (maxWidth, maxHeight))# 返回变换后结果return warped
def resize(image, width=None, height=None, inter=cv2.INTER_AREA):dim = None(h, w) = image.shape[:2]if width is None and height is None:return imageif width is None:r = height / float(h)dim = (int(w * r), height)else:r = width / float(w)dim = (width, int(h * r))resized = cv2.resize(image, dim, interpolation=inter)#参数interpolation指定了在图像大小调整过程中如何处理像素插值的方法。cv2.INTER_AREA具体意味着使用面积插值方法。return resized# 读取输入
image = cv2.imread('fapiao.jpg')
cv_show('image', image)# 图片过大,进行缩小处理
ratio = image.shape[0] / 500.0 # 计算缩小比率
orig = image.copy()
image = resize(orig, height=500)
cv_show('1',image)# 轮廓检测
print("STEP 1: 轮廓检测")
gray = cv2.cvtColor(image, cv2.COLOR_BGR2GRAY) # 读取灰度图edged = cv2.threshold(gray, 0, 255, cv2.THRESH_BINARY | cv2.THRESH_OTSU)[1] # 自动寻找阈值二值化
cnts = cv2.findContours(edged.copy(), cv2.RETR_LIST, cv2.CHAIN_APPROX_SIMPLE)[-2]
image_contours = cv2.drawContours(image.copy(), cnts, -1, (0, 0, 255), 1)
cv_show('image_contours', image_contours)print("STEP 2: 获取最大轮廓")
screenCnt = sorted(cnts, key=cv2.contourArea, reverse=True)[0] # 获取面积最大的轮廓peri = cv2.arcLength(screenCnt, True) # 计算轮廓周长
screenCnt = cv2.approxPolyDP(screenCnt, 0.05 * peri, True) # 轮廓近似
print(screenCnt.shape)
image_contour = cv2.drawContours(image.copy(), [screenCnt], -1, (0, 255, 0), 2)cv2.imshow("image_contour", image_contour)
cv2.waitKey(0)# 透视变换
warped = four_point_transform(orig, screenCnt.reshape(4, 2) * ratio)
cv2.imwrite('invoice_new.jpg', warped)
cv2.namedWindow('xx',cv2.WINDOW_NORMAL)
cv2.imshow("xx", warped)
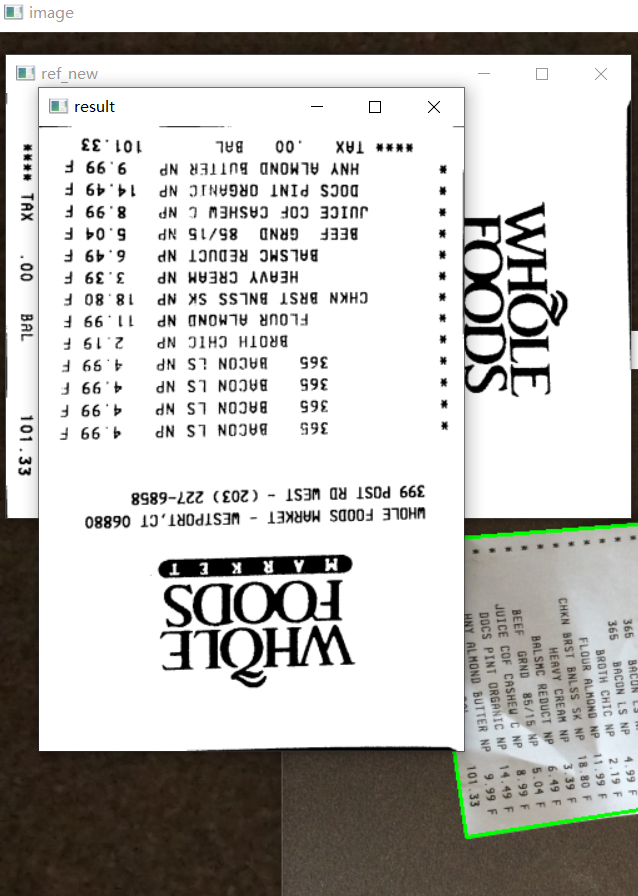
cv2.waitKey(0)# 二值处理
warped = cv2.cvtColor(warped, cv2.COLOR_BGR2GRAY)
ref = cv2.threshold(warped, 0, 255, cv2.THRESH_BINARY | cv2.THRESH_OTSU)[1]
cv_show('ref',ref)kernel = np.ones((2, 2), np.uint8) # 设置kenenel大小
ref_new = cv2.morphologyEx(ref, cv2.MORPH_CLOSE, kernel) # 闭运算,先膨胀再腐蚀
ref_new=resize(ref_new.copy(),width=500)
cv_show('ref_new',ref_new)
rotated_image = cv2.rotate(ref_new, cv2.ROTATE_90_COUNTERCLOCKWISE)
cv2.imshow("result", rotated_image)
cv2.waitKey(0)运行结果
以上就是本文的主要内容,后续还会更新更多有关opencv的知识,欢迎大家关注


