猫狗识别—视频识别
- 1. 导入所需的库:
- 2. 创建Tkinter主窗口并设置标题:
- 3. 设置窗口的宽度和高度:
- 4. 创建一个Canvas,它将用于显示视频帧:
- 5. 初始化一个视频流变量cap,用于存储OpenCV的视频捕获对象:
- 6. 定义一个函数update_frame,用于更新Canvas上的视频帧。函数实现将在后面解释:
- 7. 定义一个函数update_frame,用于更新Canvas上的视频帧。函数实现将在后面解释:
- 8. 定义一个函数close,用于退出程序并关闭视频流。函数实现将在后面解释:
- 9. 创建两个按钮,一个用于选择视频文件,另一个用于退出程序。按钮的图片和位置在这里设置:
- 10. 启动Tkinter的事件循环,这将显示窗口并开始处理用户事件:
- 11. 完整代码+运行结果:
- 完整代码:
- 运行结果:
1. 导入所需的库:
cv2用于视频捕获和图像处理,tkinter用于创建GUI,filedialog用于打开文件对话框,Image和ImageTk用于处理图像,threading用于创建新线程以更新视频帧,subprocess用于启动其他Python脚本。
import cv2
import tkinter as tk
from tkinter import filedialog
from PIL import Image, ImageTk
import threading
import subprocess
2. 创建Tkinter主窗口并设置标题:
# 初始化窗口
root = tk.Tk()
root.title("视频识别猫狗")
3. 设置窗口的宽度和高度:
# 设置窗口大小
window_width = 800
window_height = 600
root.geometry(f"{window_width}x{window_height}")
4. 创建一个Canvas,它将用于显示视频帧:
# 创建一个Canvas用于显示视频
canvas = tk.Canvas(root, width=window_width, height=window_height, bg="white")
canvas.pack()
5. 初始化一个视频流变量cap,用于存储OpenCV的视频捕获对象:
# 初始化视频流
cap = None
6. 定义一个函数update_frame,用于更新Canvas上的视频帧。函数实现将在后面解释:
# 更新视频帧的函数
def update_frame():global capwhile cap is not None and cap.isOpened():ret, frame = cap.read()if ret:# 转换为灰度图像gray = cv2.cvtColor(frame, cv2.COLOR_BGR2GRAY)# 加载Haar cascade文件cat_cascade = cv2.CascadeClassifier('haarcascade_frontalcatface.xml')dog_cascade = cv2.CascadeClassifier('haarcascade_frontalface_alt.xml')# 检测猫和狗cats = cat_cascade.detectMultiScale(gray, scaleFactor=1.1, minNeighbors=5, minSize=(30, 30))dogs = dog_cascade.detectMultiScale(gray, scaleFactor=1.1, minNeighbors=5, minSize=(30, 30))# 在检测到的猫和狗周围画矩形框for (x, y, w, h) in cats:cv2.rectangle(frame, (x, y), (x+w, y+h), (0, 255, 0), 2)for (x, y, w, h) in dogs:cv2.rectangle(frame, (x, y), (x+w, y+h), (0, 255, 0), 2)# 转换为Tkinter兼容的格式并显示frame = cv2.cvtColor(frame, cv2.COLOR_BGR2RGB)image = Image.fromarray(frame)image = ImageTk.PhotoImage(image)# 自动调整Canvas大小以适应视频帧canvas.config(width=image.width(), height=image.height())canvas.create_image(0, 0, anchor=tk.NW, image=image)root.update_idletasks()root.after(10, update_frame)  # 每10毫秒更新一次帧else:cap.release()break
7. 定义一个函数update_frame,用于更新Canvas上的视频帧。函数实现将在后面解释:
# 选择视频的函数
def select_video():global capfile_path = filedialog.askopenfilename(initialdir="data/视频识别数据")if file_path:cap = cv2.VideoCapture(file_path)threading.Thread(target=update_frame).start()
8. 定义一个函数close,用于退出程序并关闭视频流。函数实现将在后面解释:
# 退出程序的函数
def close():# 停止视频流subprocess.Popen(["python", "主页面.py"])if cap is not None and cap.isOpened():cap.release()# 销毁窗口root.destroy()# 启动主页面程序
9. 创建两个按钮,一个用于选择视频文件,另一个用于退出程序。按钮的图片和位置在这里设置:
# 创建按钮
image = Image.open("选择视频.gif")  # 加载一张图片
photo2 = ImageTk.PhotoImage(image)
bt1 = tk.Button(root, image=photo2, width=162, height=100, command=select_video)
bt1.place(x=150, y=470)image = Image.open("退出.gif")  # 加载一张图片
photo3 = ImageTk.PhotoImage(image)
bt1 = tk.Button(root, image=photo3, width=162, height=100, command=close)
bt1.place(x=500, y=470)
10. 启动Tkinter的事件循环,这将显示窗口并开始处理用户事件:
root.mainloop()
11. 完整代码+运行结果:
完整代码:
import cv2
import tkinter as tk
from tkinter import filedialog
from PIL import Image, ImageTk
import threading
import subprocess# 初始化窗口
root = tk.Tk()
root.title("视频识别猫狗")# 设置窗口大小
window_width = 800
window_height = 600
root.geometry(f"{window_width}x{window_height}")# 创建一个Canvas用于显示视频
canvas = tk.Canvas(root, width=window_width, height=window_height, bg="white")
canvas.pack()# 初始化视频流
cap = None# 更新视频帧的函数
def update_frame():global capwhile cap is not None and cap.isOpened():ret, frame = cap.read()if ret:# 转换为灰度图像gray = cv2.cvtColor(frame, cv2.COLOR_BGR2GRAY)# 加载Haar cascade文件cat_cascade = cv2.CascadeClassifier('haarcascade_frontalcatface.xml')dog_cascade = cv2.CascadeClassifier('haarcascade_frontalface_alt.xml')# 检测猫和狗cats = cat_cascade.detectMultiScale(gray, scaleFactor=1.1, minNeighbors=5, minSize=(30, 30))dogs = dog_cascade.detectMultiScale(gray, scaleFactor=1.1, minNeighbors=5, minSize=(30, 30))# 在检测到的猫和狗周围画矩形框for (x, y, w, h) in cats:cv2.rectangle(frame, (x, y), (x+w, y+h), (0, 255, 0), 2)for (x, y, w, h) in dogs:cv2.rectangle(frame, (x, y), (x+w, y+h), (0, 255, 0), 2)# 转换为Tkinter兼容的格式并显示frame = cv2.cvtColor(frame, cv2.COLOR_BGR2RGB)image = Image.fromarray(frame)image = ImageTk.PhotoImage(image)# 自动调整Canvas大小以适应视频帧canvas.config(width=image.width(), height=image.height())canvas.create_image(0, 0, anchor=tk.NW, image=image)root.update_idletasks()root.after(10, update_frame)  # 每10毫秒更新一次帧else:cap.release()break# 选择视频的函数
def select_video():global capfile_path = filedialog.askopenfilename(initialdir="data/视频识别数据")if file_path:cap = cv2.VideoCapture(file_path)threading.Thread(target=update_frame).start()# 退出程序的函数
def close():# 停止视频流subprocess.Popen(["python", "主页面.py"])if cap is not None and cap.isOpened():cap.release()# 销毁窗口root.destroy()# 启动主页面程序# 创建按钮
image = Image.open("选择视频.gif")  # 加载一张图片
photo2 = ImageTk.PhotoImage(image)
bt1 = tk.Button(root, image=photo2, width=162, height=100, command=select_video)
bt1.place(x=150, y=470)image = Image.open("退出.gif")  # 加载一张图片
photo3 = ImageTk.PhotoImage(image)
bt1 = tk.Button(root, image=photo3, width=162, height=100, command=close)
bt1.place(x=500, y=470)root.mainloop()
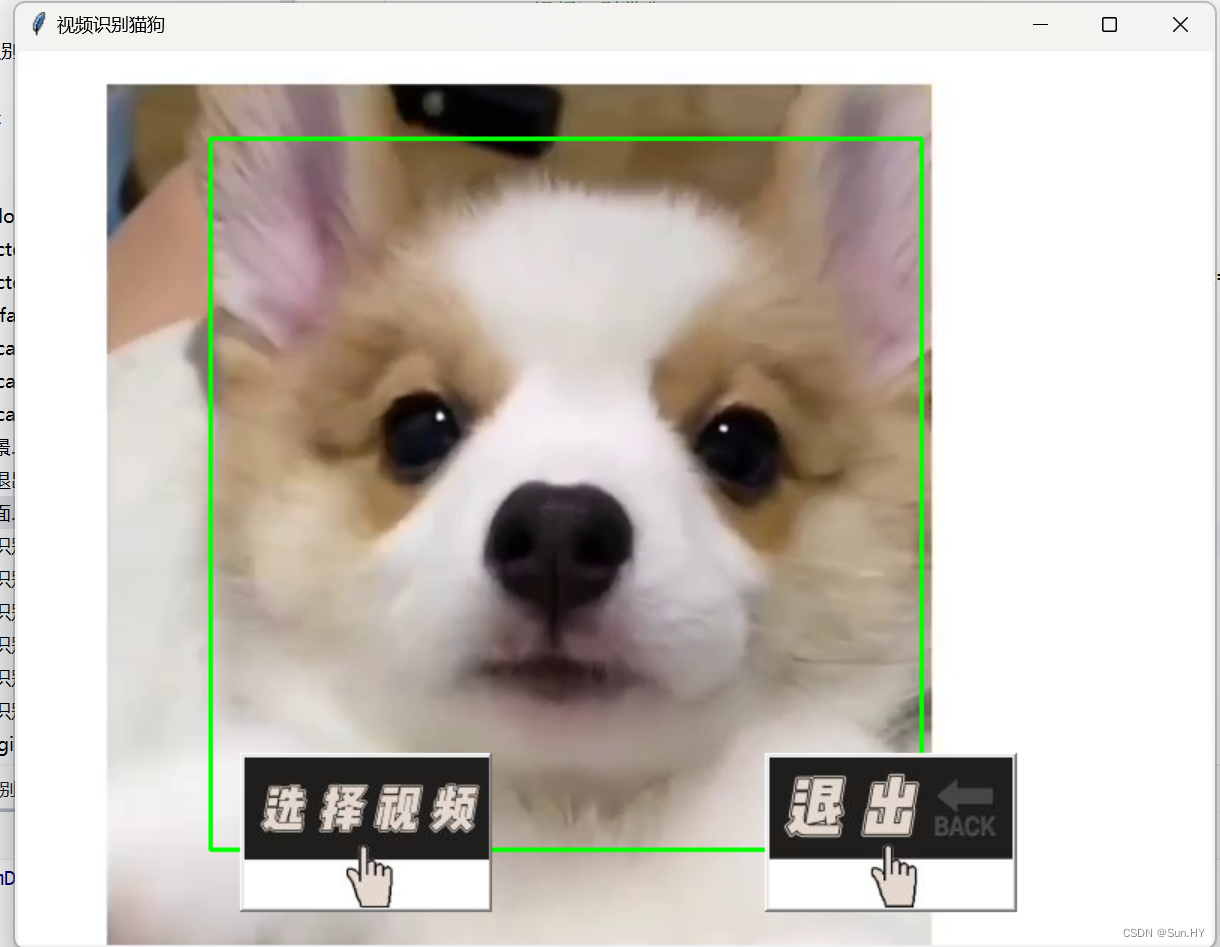
运行结果: