
书接上回,上一节我们使用了自研压测工具(pressure_util.py)对基于 transformers 驱动的 Qwen2.5 7B 模型进行压测。虽然最终并没有达到预期效果,但通过对基础参数和代码逻辑的调整,整体性能有所提升。最终在“5 队列 20 次循环”的压测条件下用时 718.13 秒完成压测,并发高峰时每秒最多能生成 7 个 tokens。
难道这就是我和 A6000 的极限了吗?No!
在这之后我继续对代码进行了一系列的优化尝试,本节将结合本人的最终优化结果给各位分享,至于中间过程的哪些吃瘪内容就不再细说了。
1. 优化思路
先说一下最终的优化思路。
在上一节中我们使用了 torch.multiprocessing 的 Process 函数将实时推理拆分成多个独立进程,这样做能够有效地解除 GIL 限制且让 CUDA 核心能“有效”地进行并行运算。
为什么要突出“有效”二字呢?是因为使用多线程(threading)操作时, Python 所有线程会共享相同的内存空间。这意味着所有线程都可以访问和修改程序中的全局变量和其他资源。这会极大几率触发 CUDA 共享上下文的错误,从而抛出以下错误:
Generation error: CUDA error: device-side assert triggered
CUDA kernel errors might be asynchronously reported at some other API call, so the stacktrace below might be incorrect.
For debugging consider passing CUDA_LAUNCH_BLOCKING=1
Compile with TORCH_USE_CUDA_DSA to enable device-side assertions.
遇到这个错误时,我尝试采用 threading.Lock() + torch.cuda.synchronize() 进行串行控制,但这样就浪费了 GPU 并发处理能力了,最后别无选择只能通过进程隔离的方式来实现并行处理。但上一节也提到过频繁的动态创建和销毁 Process 会极大地消耗系统性能。虽然压测结果相比原来的代码性能有所提升,但实际使用时会明显感觉到严重的滞后感。反观 threading 在实时推理方面表现出色,如此一来不禁让我怀疑难道在一开始我优化的方向就是错的。
好了,时至今日我们已经搞清楚了三件事:
- CUDA 是支持并行处理的,但要保证进程里上下文一致;
- threading 在实时推理表现出色;
- 借助 torch.multiprocessing 可以实现进程间独立;
是不是有点头绪了呢?对了,稍微将实现逻辑调整一下吧,如下图:
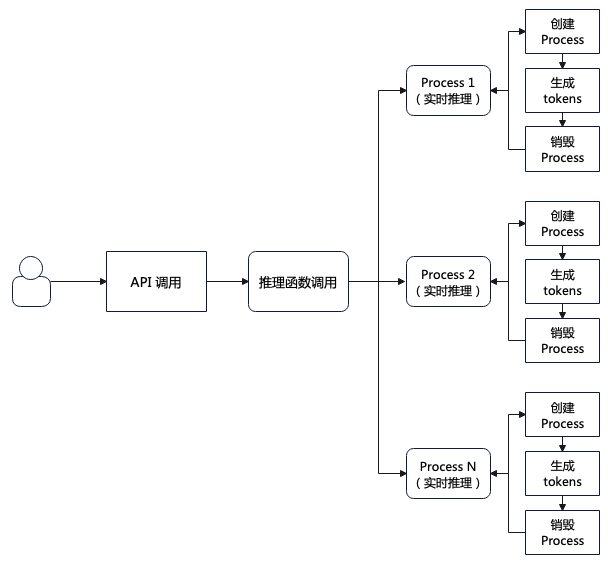
这个是当前的处理逻辑。用户调用 API,API 调用推理函数,推理函数就动态创建 Process 进程进行处理,虽然能够做到并发效果,但是每个 Process 都需要经历创建、执行推理、销毁三个环节,造成严重的资源浪费。那么有没有能够重复利用的独立进程呢?当然有,它就是 Pool(进程池)。
torch.multiprocessing 中的 Pool 函数提供了创建进程池的能力,它特别适用于需要在多个 CPU 核心或 GPU 上分配工作的场景。Pool 对象可以用来管理一个固定数量的工作进程,并将任务分发给这些进程以实现并行计算。那么我们的逻辑就可以改为:
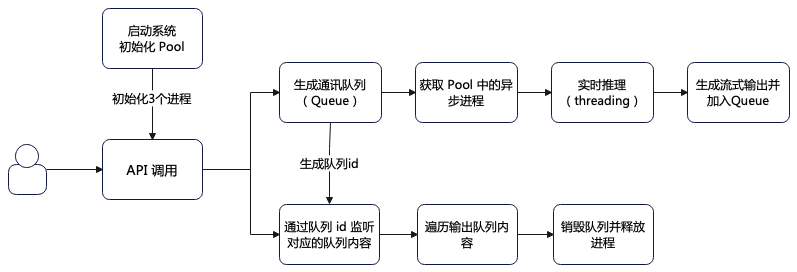
- 系统启动时先初始化进程池;
- 用户调用 API 接口时先创建一个通讯队列并同时生成队列 id;
- 调用 apply_async 函数启动一个异步进程调用实时推理函数;
- 实时推理函数取消 torch.multiprocessing 的 Process 多进程处理,重新改回 threading 多线程处理;
- 由于实时推理采用了流式输出,因此将流式输出内容加入到通讯队列中;
- 检测到队列 id 生成后立刻对对应的队列内容进行循环监听;
- 当队列内容发生变化时立刻获取并返回;
- 所有内容返回完成后调用 del 函数销毁队列并释放进程;
通过这种方式既能使用到 torch.multiprocessing 独立进程的优势,也能在实时推理中使用了 threading 来加速。此外,通过这种方式能够轻松实现模型量化推理(毕竟内存共享了嘛),而在 Process 中要实现模型量化推理就只能使用 shared_memory 来处理了。
2. 伪代码分享
下面将脱敏后的伪代码分享给大家,后续也会将这部分代码再进一步优化后同步到本人 Github 的 brain-mix 项目当中,敬请留意。
2.1 API 接口
...@app.before_request
def initialize_sys():"""在每个请求之前,检查系统实例是否已经初始化。如果没有初始化,则实例化 cuda_multi_processor 和 pytorch_llm。如果初始化失败,抛出一个 Exception。"""try:if not app.config.get('initialized'):...app.model_processor = cuda_multi_processor()app.torch = pytorch_llm()app.config['initialized'] = Truelogger.info("系统实例初始化成功")except Exception as e:logger.error(f"系统实例初始化失败: {str(e)}")raise...@app.route('xxx', methods=['POST'])
def generate_stream():"""处理文本生成的 API 请求(流式传输)。参数:request.json (dict): 包含文本生成请求数据的 JSON 对象。 返回:response (Response): 包含文本生成结果的 Flask 响应对象(流式传输)。"""...response_text = []def generate():# 启动模型生成任务queue_id = app.model_processor.start_generation(need_summary)for chunk in app.model_processor.get_results(queue_id):response_text.append(chunk["text"])  yield f"data: {json.dumps({'text': chunk['text'],'token_count': chunk['token_count'], 'total_token_count': chunk['total_token_count'], 'token_rate': chunk['token_rate']}, ensure_ascii=False)}\n\n"...yield f"data: [DONE]\n\n"return Response(generate(), content_type='text/event-stream')
使用 @app.before_request 注解让 initialize_sys 函数在首次调用 API 接口时懒加载 cuda_multi_processor 实例(创建进程池)和 pytorch_llm 实例(实时推理)。之后在 API 中将调用 cuda_multi_processor 实例中的 start_generation(调用 apply_async 启用异步进程) 和 get_results(监听并获取队列内容)函数来获取 tokens。
2.2 进程池类
...
def _process_generation_worker(need_summary, queue_id, response_queue):"""用于处理文本生成的Worker函数。此函数旨在在单独的进程中运行。它产生使用PyTorch LLM模型生成文本块,并将其放入响应队列以便进一步处理。如果在生成过程中发生任何错误,错误消息被放入响应队列。参数:need_summary(Any):生成摘要所需的输入数据。queue_id(str):处理队列的唯一标识符。response_queue(multiprocessing.queue):生成的队列,用于放置文本块或错误消息。"""...try:for chunk in pu.transfor_stream_msg(need_summary):response_queue.put(chunk)except Exception as e:response_queue.put({"error": str(e)})finally:response_queue.put(None)class cuda_multi_processor:def __init__(self):# 指定 spawn 作为 multiprocessing 的启动方式mp.set_start_method('spawn', force=True)...# 创建进程池self.pool = mp.Pool(processes=multi_core)# 创建 Manager 对象self.manager = Manager()# 创建通讯队列self.response_queues = {}# 创建线程锁self.lock = Lock()def start_generation(self, need_summary):"""使用单独的工作进程启动文本生成过程。此方法创建一个新的唯一队列ID并初始化响应队列以处理生成的文本块。然后,它启动一个worker进程使用异步方式根据提供的输入摘要生成文本PyTorch语言模型。工作进程将放置生成的文本响应队列中的块或任何错误消息。参数:need_summary(Any):生成摘要所需的输入数据。返回:str:处理队列的唯一标识符。"""# 创建队列idqueue_id = str(uuid.uuid4())# 创建新的队列response_queue = self.manager.Queue()with self.lock:self.response_queues[queue_id] = response_queue# 使用 apply_async 启动进程self.pool.apply_async(_process_generation_worker,args=(need_summary, queue_id, response_queue))return queue_iddef get_results(self, queue_id, timeout=0.1):"""生成器,用于从处理队列中获取文本响应块。该方法是一个生成器,用于从处理队列中获取文本响应块。它会一直等待直到生成完成。生成完成后,方法会 break 并 yield None。参数:queue_id(str):处理队列的唯一标识符。timeout(float):等待响应的超时时间,以秒为单位。Yields:Dict[str, Any]: 生成的文本响应块,包含 'text'、'token_count'、'total_token_count' 和 'token_rate' 四个键。"""try:while True:try:# 获取通讯队列内容并输出返回result = self.response_queues[queue_id].get(timeout=timeout)if result is None:breakyield resultexcept queue.Empty:continuefinally:with self.lock:if queue_id in self.response_queues:# 删除通讯队列del self.response_queues[queue_id]def __del__(self):"""析构函数,用于释放资源。该函数会等待所有子进程完成,然后关闭进程池。"""self.pool.close()self.pool.join()
这么清晰的注释了,应该不用逐个解释了吧。
2.3 实时推理
...
def transfor_stream_msg(self, msg) -> Iterator[Dict[str, Any]]:start_time = time.time()token_count = 0buffer = ""try:model_inputs = self._pytorch_model_input(msg,self.chat_tokenizer)# 创建 streamerstreamer = TextIteratorStreamer(self.chat_tokenizer,...)generation_thread = Thread(target=self._generate_tokens, args=(model_inputs, streamer))generation_thread.start()# 从streamer获取新的文本for new_text in streamer:if not new_text.strip():continuebuffer += new_textif len(buffer) >= 2 or new_text.endswith(('.', '!', '?', '\n')):chunk_token_count = len(self.chat_tokenizer.encode(buffer))token_count += chunk_token_countyield {'text': buffer,'token_count': chunk_token_count,'total_token_count': token_count,'token_rate': token_count / (time.time() - start_time)}buffer = ""if buffer:  yield {'text': buffer,'token_count': len(self.chat_tokenizer.encode(buffer)),'total_token_count': token_count,'token_rate': token_count / (time.time() - start_time)}except Exception as e:yield f"Error: {str(e)}"finally:if self.cuda_tools.check_and_clean_gpu_memory():torch.cuda.empty_cache()gc.collect()def _generate_tokens(self, model_inputs: Dict[str, Any], streamer) -> None:try:stop_tokens = [self.chat_tokenizer.eos_token_id]stop_tokens = [stop_on_tokens(stop_tokens)]# 设置生成参数generate_kwargs = self._setup_generate_kwargs(model_inputs)generate_kwargs.update({'streamer': streamer,'stopping_criteria': StoppingCriteriaList(stop_tokens),...})# 使用 torch.inference_mode 和 autocast 进行优化with torch.inference_mode(), torch.amp.autocast("cuda"):self.chat_model.generate(**generate_kwargs)except Exception as e:logger.error(f"Generation error: {e}")
关于这个实时推理函数,其实就是将 Process 的多进程处理改回 threading 多线程处理吧,其他的都可以不变。
2.4 压测程序
由于采用了torch.multiprocessing 的 apply_async 异步进程,因此压测程序代码也需要调整以配合当前代码模式(顺便给它优化一下)。如下图:
...
# 全局变量
question_array = []
# 线程停止事件
stop_event = threading.Event()
start_time = None
...
def sse_totally(queue_id, task, user_id):"""通过SSE实现压力测试的post请求该函数会将所需的数据post到SSE Server,并将SSE Server返回的事件数据通过日志打印出来。参数:queue_id (int):  任务队列的IDtask (str):  任务的名称user_id (int):  用户的ID返回:None"""if stop_event.is_set():returnurl = yu.get_value_from_yaml(test_config, 'pressure.target-url')request_body = {"recommend": 0,"user_id": user_id,"us_id": '',"messages": [{"role": 'user', "content": random.choice(question_array)}]}try:for event_data in sse_ask(url, request_body):# 若检测到 stop 信号就退出循环if stop_event.is_set():breaklogger.info(f"{task}接收到事件数据:{event_data}")logger.info(f"{task}数据传输已完成")except Exception as e:logger.error(f"任务执行异常: {str(e)}")class TaskHandler(threading.Thread):...def run(self):"""任务处理器的主循环。在count模式下,每个线程执行指定次数的任务。在duration模式下,每个线程在指定的持续时间内执行任务。任务处理器在执行任务时,会检查stop_event变量,如果stop_event被设置为True,任务处理器将停止执行任务。任务处理器在执行任务时,会对completion_counter进行加1操作,以记录已经完成的任务数量。如果任务处理器在执行任务时出现了异常,将记录日志并继续执行下一个任务。"""try:if self.mode == 'count':# 按任务数量模式,每个线程执行指定次数的任务num_tasks = int(yu.get_value_from_yaml(test_config, 'pressure.num-tasks'))for i in range(num_tasks):if self.stop_event.is_set():breaktask_id = f"Queue-{self.queue_id}-Task-{i+1}"self.process_task(task_id)with self.completion_counter.get_lock():self.completion_counter.value += 1else:# 按持续时间模式duration = int(yu.get_value_from_yaml(test_config, 'pressure.duration'))task_counter = 0while (time.time() - start_time) < duration and not self.stop_event.is_set():task_counter += 1task_id = f"Thread-{self.queue_id}-Task-{task_counter}"self.process_task(task_id)with self.completion_counter.get_lock():self.completion_counter.value += 1except Exception as e:logger.error(f"线程{self.queue_id}执行异常: {str(e)}")def process_task(self, task):"""任务处理器处理任务的具体实现。该方法首先检查stop_event变量,如果stop_event被设置为True,任务处理器将不执行任务。然后,任务处理器将记录日志,记录当前线程和任务信息,以及开始时间。接着,任务处理器将生成一个随机的user_id,并将其与task和queue_id传递给sse_totally函数,以执行实际的压测任务。最后,任务处理器将记录日志,记录当前线程和任务信息,以及结束时间。"""if self.stop_event.is_set():returnlogger.info(f"Thread {self.queue_id} processing {task}, start time: {time.strftime('%Y-%m-%d %H:%M:%S', time.localtime())}")user_id = int(yu.get_value_from_yaml(test_config, 'pressure.num-users'))ran_user_id = random.randint(1, user_id)sse_totally(self.queue_id, task, ran_user_id)logger.info(f"Thread {self.queue_id} completed {task}, end time: {time.strftime('%Y-%m-%d %H:%M:%S', time.localtime())}")def signal_handler(signum, frame):"""信号处理器函数,用于捕捉SIGTERM信号,并设置stop_event变量以使得所有线程优雅退出。"""logger.info("接收到终止信号,正在优雅退出...")stop_event.set()def cleanup():"""优雅退出前清理资源的函数。该函数将设置stop_event变量,以使得所有线程优雅退出。然后,它将等待1秒,以给线程一些时间来清理。最后,它将记录日志,记录清理完成信息。"""stop_event.set()time.sleep(1)  # 给线程一些时间来清理logger.info("清理完成")def main():global start_time# 注册信号处理器signal.signal(signal.SIGINT, signal_handler)signal.signal(signal.SIGTERM, signal_handler)try:# 加载测试数据load_data_for_test()# 获取压测模式mode = yu.get_value_from_yaml(test_config, 'pressure.mode')# 创建完成计数器completion_counter = mp.Value('i', 0)# 配置参数num_threads = int(yu.get_value_from_yaml(test_config, 'pressure.num-threads'))# 记录开始时间start_time = time.time()# 创建并启动线程threads = []for i in range(num_threads):handler = TaskHandler(stop_event, i + 1, completion_counter, mode)handler.daemon = Truehandler.start()threads.append(handler)# 等待所有线程完成for thread in threads:thread.join()# 计算运行时间total_time = time.time() - start_timelogger.info(f"压测完成,运行时间: {total_time:.2f}秒")logger.info(f"共完成 {completion_counter.value} 个任务")logger.info(f"平均QPS: {completion_counter.value/total_time:.2f}")except Exception as e:logger.error(f"主程序异常: {str(e)}")finally:cleanup()if __name__ == "__main__":main()
本次代码加入信号处理器,通过检测 stop 信号来终止压测程序的。
最终压测结果如下:

通过 nvtop 可以看到 GPU 算力和显存基本上都已经拉满。本次压测也采用相同的压测参数进行(5 队列 20 次循环),结果如下:
...
- 压测完成,运行时间: 456.81秒
- 共完成 100 个任务
- 平均QPS: 0.22
总耗时为 456.81 秒,又一次刷新优化纪录。相比最后一次优化后的结果缩短了 261.32 秒,性能提升了 36.38 %,在并发高峰下 tokens 生成能够达到 12 tokens 每秒。
至此,RAG 应用调优正式结束。
(未完待续…)
PS:最新的压测代码我稍后会同步到 brain-mix 项目中,有需要的可以自取。


