
一、安装nginx及常见命令
1.1 安装nginx
# 更新apt-get源
sudo apt-get update
# 安装
sudo apt-get install nginx
# 安装后将自动开启nginx服务,打开浏览器输入ip即可查看初始页面
# 查看安装版本
nginx -v
# 输出:nginx version: nginx/1.18.0 (Ubuntu)
# systemctl命令
# 查看状态
sudo systemctl status nginx
# 启动
sudo systemctl start nginx
# 停止
sudo systemctl stop nginx
# 重启
sudo systemctl restart nginx
# 开启自动启动
sudo systemctl enable nginx
1.2 nginx常见命令
# 检查 Nginx 配置文件地址
sudo nginx -t
sudo nginx -s reload            # 重新载入配置文件
sudo nginx -s reopen            # 重启 Nginx
sudo nginx -s stop              # 停止 Nginx
# 当然使用上文中的 sudo systemctl 也是可以的
二、Nginx 配置
2.1 修改nginx主配置文件
cd /etc/nginx
sudo nano nginx.conf
可以修改配置内容如下:
user www-data;
worker_processes auto;
pid /run/nginx.pid;
include /etc/nginx/modules-enabled/*.conf;events {worker_connections 768;# multi_accept on;
}http {### Basic Settings##sendfile on;tcp_nopush on;types_hash_max_size 2048;keepalive_timeout 65;# server_tokens off;# server_names_hash_bucket_size 64;# server_name_in_redirect off;include /etc/nginx/mime.types;default_type application/octet-stream;### SSL Settings##ssl_protocols TLSv1 TLSv1.1 TLSv1.2 TLSv1.3; # Dropping SSLv3, ref: POODLEssl_prefer_server_ciphers on;### Logging Settings##access_log /var/log/nginx/access.log;error_log /var/log/nginx/error.log;### Gzip Settings##gzip on;# gzip_vary on;# gzip_proxied any;# gzip_comp_level 6;# gzip_buffers 16 8k;# gzip_http_version 1.1;# gzip_types text/plain text/css application/json application/javascript text/xml application/xml application/xml+rss text/javascript;### Virtual Host Configs##include /etc/nginx/conf.d/*.conf;include /etc/nginx/sites-enabled/*;
}#mail {
#       # See sample authentication script at:
#       # http://wiki.nginx.org/ImapAuthenticateWithApachePhpScript
#
#       # auth_http localhost/auth.php;
#       # pop3_capabilities "TOP" "USER";
#       # imap_capabilities "IMAP4rev1" "UIDPLUS";
#
#       server {
#               listen     localhost:110;
#               protocol   pop3;
#               proxy      on;
#       }
#
#       server {
#               listen     localhost:143;
#               protocol   imap;
#               proxy      on;
#       }
#}
2.2 新增nginx子配置文件
通常子配置文件夹位于/etc/nginx/conf.d,也可以通过nginx -t查看当前加载的配置文件路径
- 添加子配置文件
static.conf
路由/的html文件路径通常有两个,一个是/usr/share/nginx/html, 一个是/var/www/html, 两者均可,需要注意的是/var/www/html的index默认叫index.nginx-debian.html,需将其重命名为index.html,本文使用/usr/share/nginx/html路径下的index.html用于演示
log_format  main  '$remote_addr - $remote_user [$time_local] "$request" ''$status $body_bytes_sent "$http_referer" ''"$http_user_agent" "$http_x_forwarded_for"';server {listen 80;server_name 你的公网ip 域名;    # 公网ip,域名,localhost,127.0.0.1等,可以写公网ip或域名,也可以两者皆写charset utf-8;            # 防止中文显示出现乱码access_log /var/log/nginx/nginx_http.log main;error_log /var/log/nginx/nginx_http.log warn;# 对 XXX 路由的请求进行反向代理location / {root   /usr/share/nginx/html;    # 静态资源路径index  index.html;               # 访问的文件}
}
- 重载nginx配置文件令其生效
sudo nginx -s reload# 查看日志
tail -n 500 -f /var/log/nginx/error.log
- 验证
curl 公网ip/域名
# 或者浏览器输入 公网ip/域名
- 修改
/usr/share/nginx/html下的index.html内容,使其展示我们自定义显示
cd /usr/share/nginx/html
vim index.html
修改为以下内容:
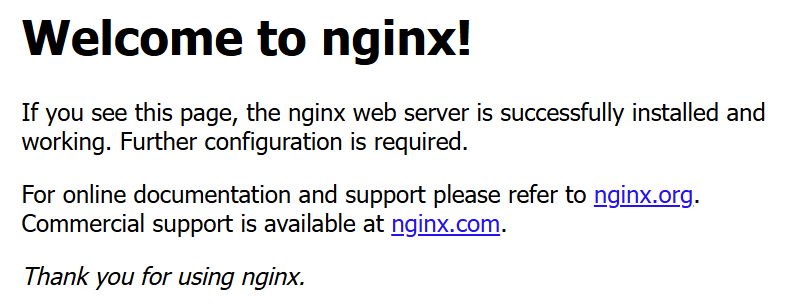
<!DOCTYPE html>
<html>
<head>
<title>Welcome to nginx!</title>
<style>body {width: 35em;margin: 0 auto;font-family: Tahoma, Verdana, Arial, sans-serif;}
</style>
</head>
<body>
<h1>欢迎来到 nginx!</h1>
<p>If you see this page, the nginx web server is successfully installed and
working. Further configuration is required.</p><p>For online documentation and support please refer to
<a href="http://nginx.org/">nginx.org</a>.<br/>
Commercial support is available at
<a href="http://nginx.com/">nginx.com</a>.</p><p><em>Thank you for using nginx.</em></p>
</body>
</html>
- 重载nginx配置文件令其生效
sudo nginx -s reload# 查看日志
tail -n 500 -f /var/log/nginx/error.log
- 验证
curl http://公网ip/域名
浏览器输入公网ip/域名

到此nginx基础配置成功
三、获取https SSL证书(使用Certbot获取证书+自动更新)
- 安装 Certbot
sudo apt-get update
sudo apt-get install certbot
- 创建certbot用于验证的
.well-known/acme-challenge目录
# 为了方便管理,可以在 /usr/share/nginx/html 目录下创建
cd /usr/share/nginx/html
mkdir -p .well-known/acme-challenge
ll

3. 在上文子配置文件static.conf中 加入/.well-known/acme-challenge/的路由代理
cd /etc/nginx/conf.d
sudo nano static.conf
将配置文件更改为以下内容:
log_format  main  '$remote_addr - $remote_user [$time_local] "$request" ''$status $body_bytes_sent "$http_referer" ''"$http_user_agent" "$http_x_forwarded_for"';server {listen 80;server_name 你的公网ip 域名;    # 本机ip,域名,localhost,127.0.0.1等charset utf-8;            # 防止中文显示出现乱码access_log /var/log/nginx/nginx_http.log main;error_log /var/log/nginx/nginx_http.log warn;# 对 XXX 路由的请求进行反向代理location / {root   /usr/share/nginx/html;    # 静态资源路径index  index.html;               # 访问的文件}# 新增:配置 SSL Certbot 的验证文件存放路径,进行临时存储location /.well-known/acme-challenge/ {root /usr/share/nginx/html;            # 指定上文创建的临时目录,存放 Certbot 创建的验证文件allow all;}
}
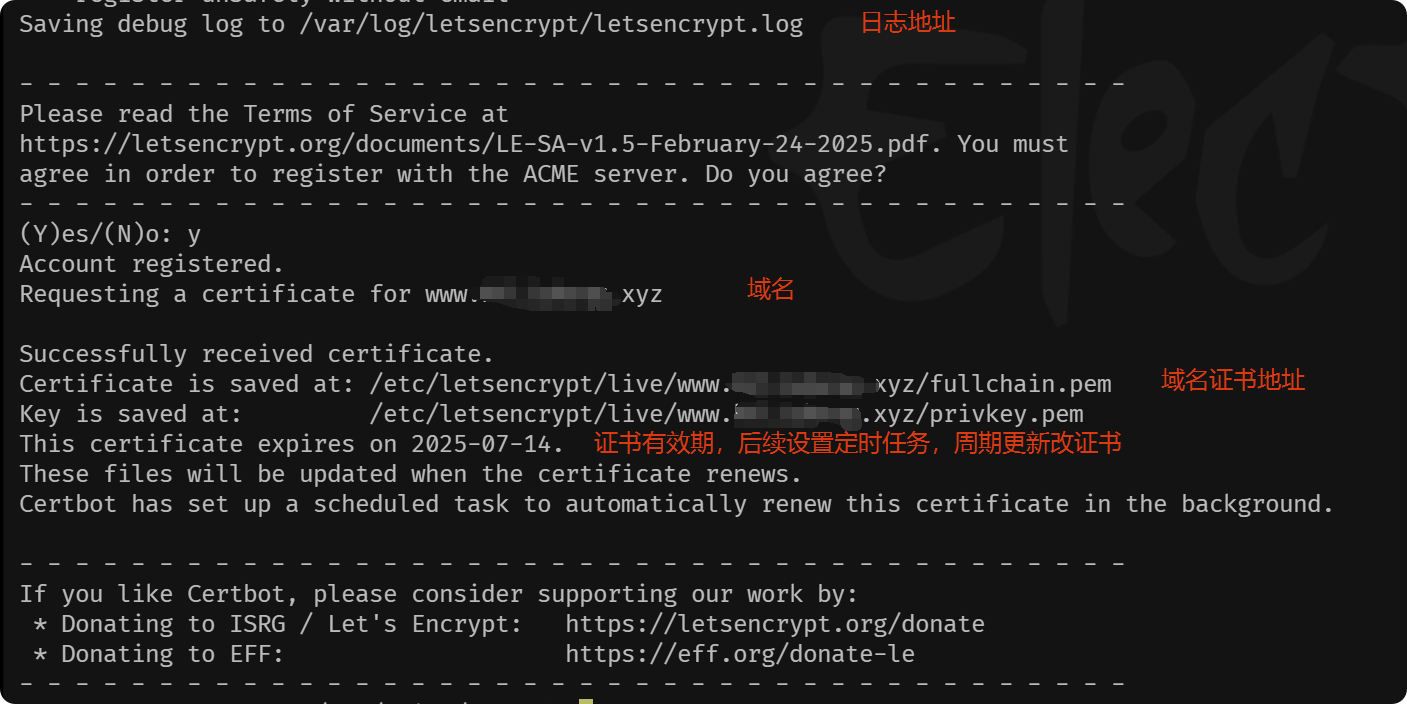
- 申请证书
#-w certbot 验证 .well-known/acme-challenge 的路径
#-d 域名
#--register-unsafely-without-email 不需要邮箱提醒
sudo certbot certonly \--webroot \-w /usr/share/nginx/html \-d xxxxxxx.com \--register-unsafely-without-email
结果如下表示申请成功:
- corn 定时任务,周期更新证书
# Certbot 更新证书的命令为
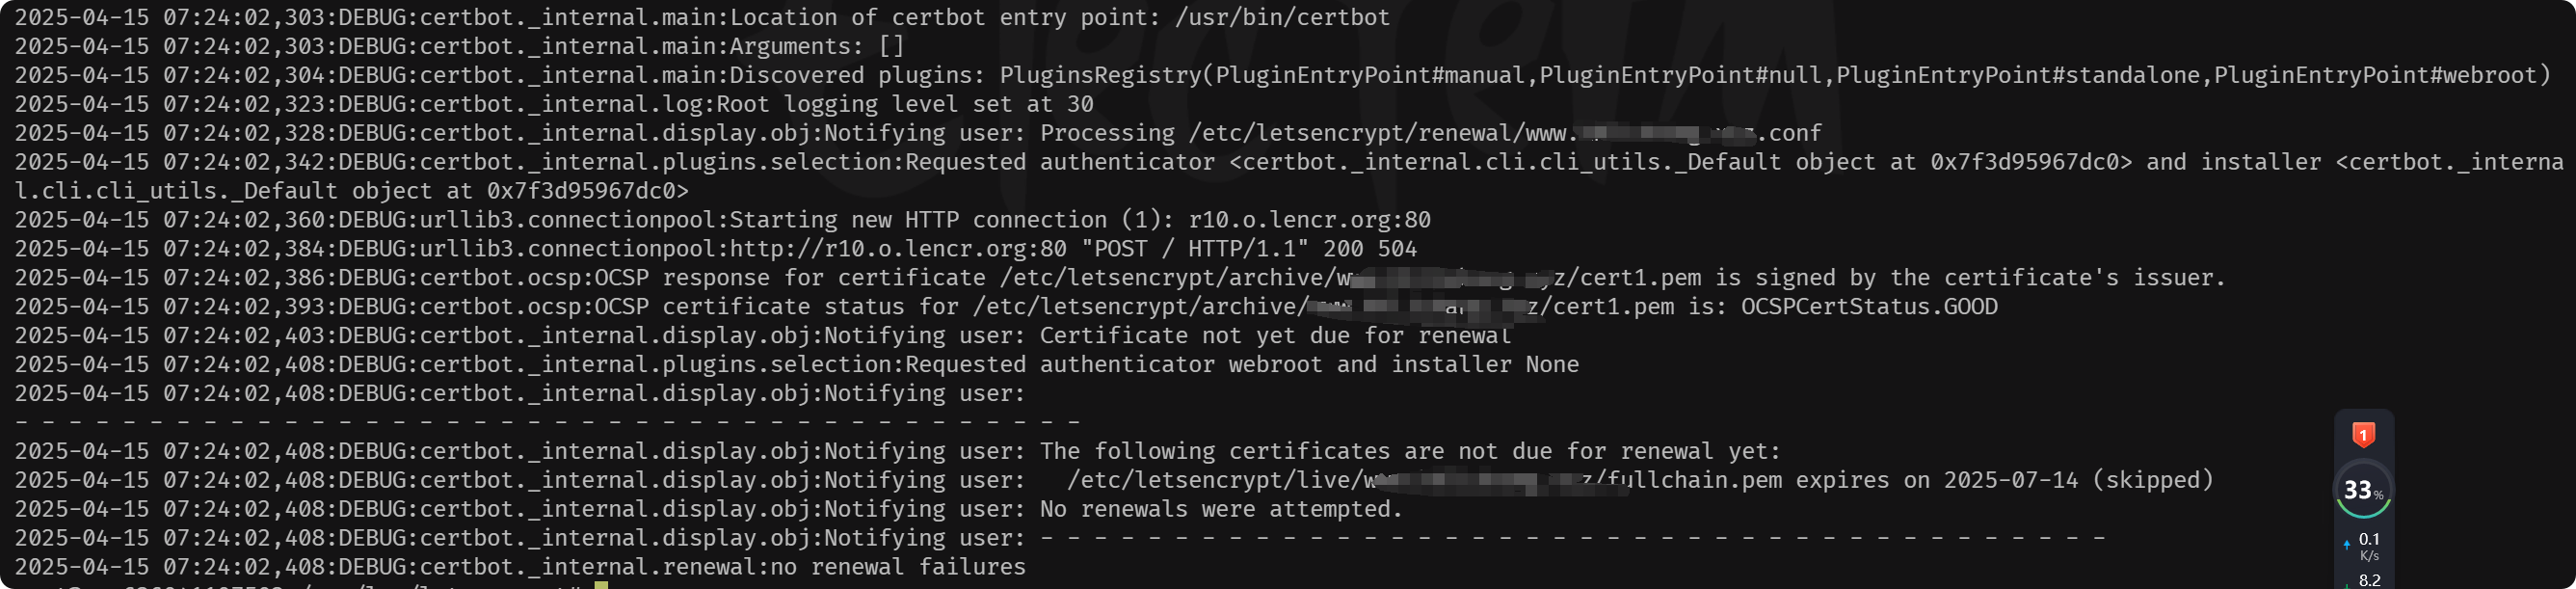
certbot renew
执行结果如下:
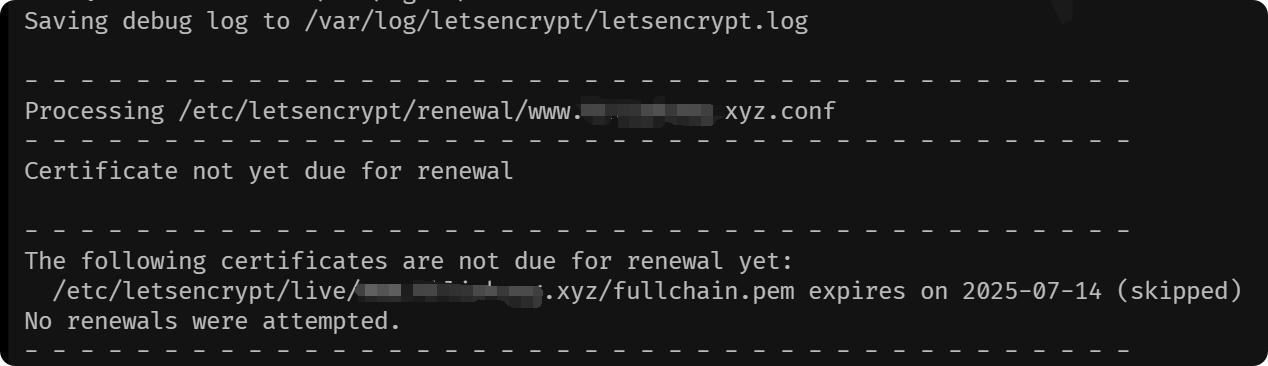
由于我的证书是刚申请的,还没有到需要更换的时间
下面设置一个定时任务,每周检测更新一次该证书
上面的证书有时间限制,需要定期更新,所以需要配置定时任务
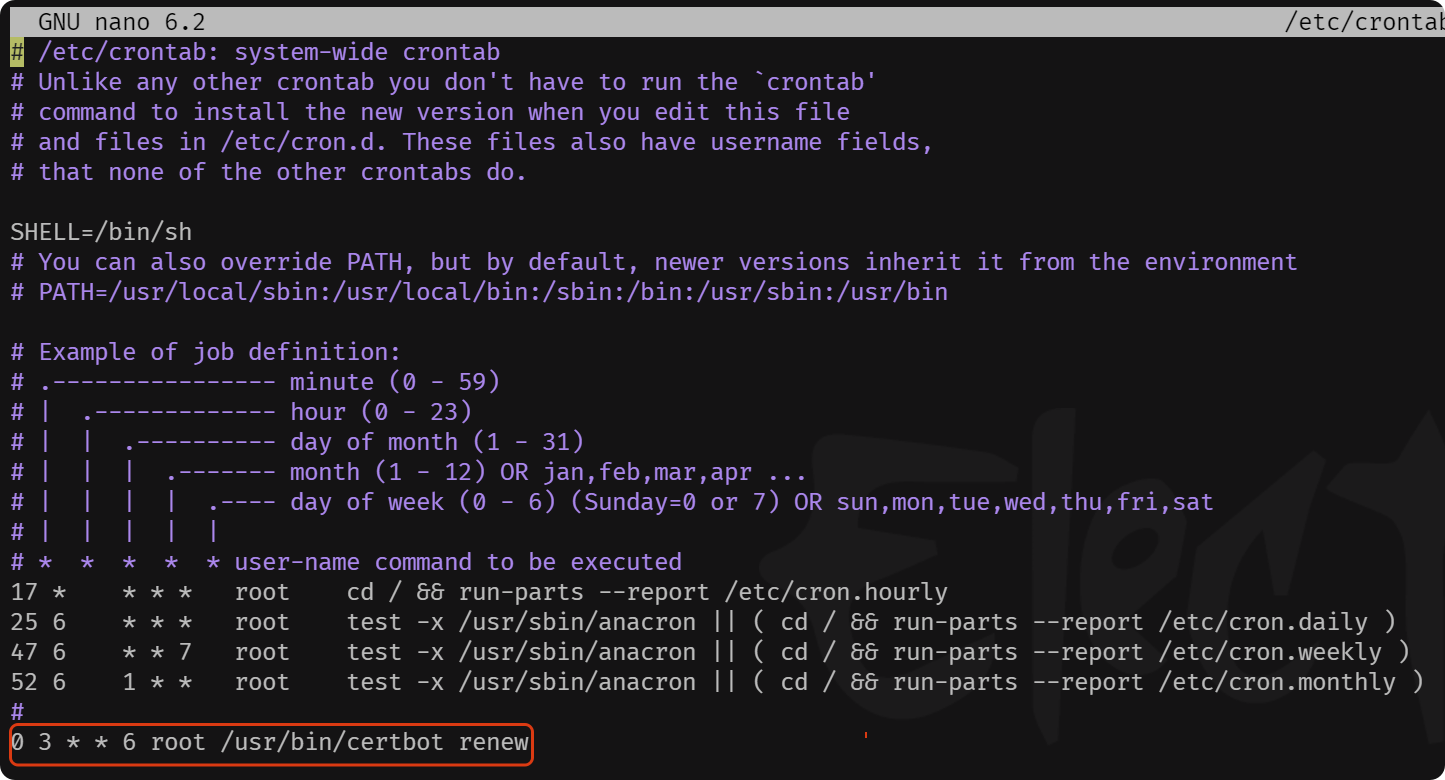
a. 查看是否存在 /etc/crontab 文件
ls -l /etc/crontab
b. 如果不存在需要安装cron用于定时任务
sudo apt update
sudo apt install cron
c. 添加定时任务
cd /etc
vim crontab
加入下面内容
# 每周六凌晨3点执行证书更新脚本
0 3 * * 6 root /usr/bin/certbot renew
d. 重新启动 corn 定时服务
sudo systemctl restart cron  # 重启cron服务
sudo systemctl enable cron   # 开机启动cron服务# 查看日志是否可以自动更新
tail -n 500 -f /var/log/letsencrypt/letsencrypt.log# 验证
sudo systemctl status cron
# sudo crontab -l
更新证书过程中产生的日志
e. (选做)为了保证设置的日志文件不会无限制增长,我们需要通过 Logrotate 工具来配置日志轮转
# 1. 多数 Linux 系统默认已安装 logrotate,可以通过以下命令验证:
logrotate --version# 2. 如果未安装,请根据你的系统安装它(例如在 Ubuntu/Debian 系统中安装 Logrotate):
sudo apt update
sudo apt install logrotate# 3. 创建一个 Logrotate 配置文件
# logrotate 的配置文件通常位于 /etc/logrotate.d/ 目录下。为 Certbot 创建一个独立的配置文件:
sudo vim /etc/logrotate.d/certbot
## 在打开的文件中,添加以下内容:
/var/log/nginx/*.log {weekly          rotate 4          compress        missingok         notifempty         copytruncate        create 640 root root
}
## 选项说明:
###  /var/log/nginx/*.log:指定目标日志文件。
###  weekly:日志轮转的周期(可以换成 daily 或 monthly)。
###  rotate 4:指定最多保留多少个旧日志文件,超过的旧日志将被删除。
###  compress:启用压缩旧日志功能,减少磁盘使用(默认生成 .gz 文件)。
###  missingok:当日志文件不存在时,不报错,也不会影响其他日志文件。
###  notifempty:如果日志文件为空,不轮转。
###  copytruncate:轮转日志后清空原始文件,而不关闭日志文件句柄(适合 Certbot)。
###  create 640 root root:为轮转后的新日志文件设置权限和所属用户/组。# 4. 测试 Logrotate 配置文件
## 为了确保 Logrotate 的配置没有问题,你可以手动测试日志轮转:
sudo logrotate --force /etc/logrotate.d/certbot
## 如果配置正常,执行后会轮转 /var/log/nginx/*.log,并创建:/var/log/nginx/*.log.1(最近的旧日志文件,可能被压缩为 /var/log/nginx/*.log.1.gz)。新的 /var/log/nginx/*.log 文件,其内容被清空。
四、nginx 使用ssl证书代理https
由上文可知,证书的地址位于/etc/letsencrypt/live/www.XXXXXXXX.xyz下,在nginx子配置目录/etc/nginx/conf.d创建一个https_static.conf 文件,内容如下:
log_format  main_https  '$remote_addr - $remote_user [$time_local] "$request" ''$status $body_bytes_sent "$http_referer" ''"$http_user_agent" "$http_x_forwarded_for"';server {listen 443 ssl;server_name 你的域名;charset utf-8;            # 防止中文显示出现乱码 access_log /var/log/nginx/nginx_https.log main_https;error_log /var/log/nginx/nginx_https.log warn;# error_page 429 /limit_exceeded.html; # location = /limit_exceeded.html {#    root /usr/share/nginx/html;#    internal;  # }ssl_certificate /etc/letsencrypt/live/www.XXXXXXXXXXXXXX.xyz/fullchain.pem;          # 证书地址ssl_certificate_key /etc/letsencrypt/live/www.XXXXXXXXXXXXXX.xyz/privkey.pem;ssl_session_timeout 5m;ssl_protocols TLSv1 TLSv1.1 TLSv1.2;ssl_ciphers ALL:!DH:!EXPORT:!RC4:+HIGH:+MEDIUM:-LOW:!aNULL:!eNULL;ssl_prefer_server_ciphers on;# 对 XXXX 路由的请求进行反向代理location / {root  /usr/share/nginx/html;    # 静态资源路径index  index.html;               # 访问的文件}
}
重载:
sudo nginx -s reload# 查看nginx log
tail -n 500 -f /var/log/nginx/error.log
验证:
curl https://域名


