
7. 项目开发
7.1 项目初始化
7.1.1 数据库初始化
-
创建数据库
在MySQL中创建一个
lease数据库,建库语句如下CREATE DATABASE lease CHARACTER SET utf8mb4 COLLATE utf8mb4_general_ci; -
导入数据库脚本
将资料中的
lease.sql脚本导入lease数据库,其中包含了建表语句和少量的原始数据。
7.1.2 创建工程
按照如下目录结构创建一个多模块的Maven工程。
lease
├── common(公共模块——工具类、公用配置等)
│   ├── pom.xml
│   └── src
├── model(数据模型——与数据库相对应地实体类)
│   ├── pom.xml
│   └── src
├── web(Web模块)
│   ├── pom.xml
│   ├── web-admin(后台管理系统Web模块——包含mapper、service、controller)
│   │   ├── pom.xml
│   │   └── src
│   └── web-app(移动端Web模块——包含mapper、service、controller)
│       ├── pom.xml
│       └── src
└── pom.xml
各模块的pom.xml文件内容如下:
1. 根模块
<?xml version="1.0" encoding="UTF-8"?>
<project xmlns="http://maven.apache.org/POM/4.0.0"xmlns:xsi="http://www.w3.org/2001/XMLSchema-instance"xsi:schemaLocation="http://maven.apache.org/POM/4.0.0 http://maven.apache.org/xsd/maven-4.0.0.xsd"><modelVersion>4.0.0</modelVersion><groupId>com.atguigu</groupId><artifactId>lease</artifactId><version>1.0-SNAPSHOT</version><packaging>pom</packaging><modules><module>common</module><module>model</module><module>web</module></modules><name>lease</name>
</project>
2. common模块
<?xml version="1.0" encoding="UTF-8"?>
<project xmlns="http://maven.apache.org/POM/4.0.0"xmlns:xsi="http://www.w3.org/2001/XMLSchema-instance"xsi:schemaLocation="http://maven.apache.org/POM/4.0.0 http://maven.apache.org/xsd/maven-4.0.0.xsd"><modelVersion>4.0.0</modelVersion><parent><groupId>com.atguigu</groupId><artifactId>lease</artifactId><version>1.0-SNAPSHOT</version></parent><artifactId>common</artifactId><properties><maven.compiler.source>17</maven.compiler.source><maven.compiler.target>17</maven.compiler.target><project.build.sourceEncoding>UTF-8</project.build.sourceEncoding></properties></project>
3. model模块
<?xml version="1.0" encoding="UTF-8"?>
<project xmlns="http://maven.apache.org/POM/4.0.0"xmlns:xsi="http://www.w3.org/2001/XMLSchema-instance"xsi:schemaLocation="http://maven.apache.org/POM/4.0.0 http://maven.apache.org/xsd/maven-4.0.0.xsd"><modelVersion>4.0.0</modelVersion><parent><groupId>com.atguigu</groupId><artifactId>lease</artifactId><version>1.0-SNAPSHOT</version></parent><artifactId>model</artifactId><properties><maven.compiler.source>17</maven.compiler.source><maven.compiler.target>17</maven.compiler.target><project.build.sourceEncoding>UTF-8</project.build.sourceEncoding></properties></project>
4. web模块
<?xml version="1.0" encoding="UTF-8"?>
<project xmlns="http://maven.apache.org/POM/4.0.0"xmlns:xsi="http://www.w3.org/2001/XMLSchema-instance"xsi:schemaLocation="http://maven.apache.org/POM/4.0.0 http://maven.apache.org/xsd/maven-4.0.0.xsd"><modelVersion>4.0.0</modelVersion><parent><groupId>com.atguigu</groupId><artifactId>lease</artifactId><version>1.0-SNAPSHOT</version></parent><artifactId>web</artifactId><packaging>pom</packaging><modules><module>web-admin</module><module>web-app</module></modules><properties><maven.compiler.source>17</maven.compiler.source><maven.compiler.target>17</maven.compiler.target><project.build.sourceEncoding>UTF-8</project.build.sourceEncoding></properties><dependencies><dependency><groupId>com.atguigu</groupId><artifactId>common</artifactId><version>1.0-SNAPSHOT</version></dependency><dependency><groupId>com.atguigu</groupId><artifactId>model</artifactId><version>1.0-SNAPSHOT</version></dependency></dependencies></project>
5. web-admin模块
<?xml version="1.0" encoding="UTF-8"?>
<project xmlns="http://maven.apache.org/POM/4.0.0"xmlns:xsi="http://www.w3.org/2001/XMLSchema-instance"xsi:schemaLocation="http://maven.apache.org/POM/4.0.0 http://maven.apache.org/xsd/maven-4.0.0.xsd"><modelVersion>4.0.0</modelVersion><parent><groupId>com.atguigu</groupId><artifactId>web</artifactId><version>1.0-SNAPSHOT</version></parent><artifactId>web-admin</artifactId><properties><maven.compiler.source>17</maven.compiler.source><maven.compiler.target>17</maven.compiler.target><project.build.sourceEncoding>UTF-8</project.build.sourceEncoding></properties></project>
6. web-app模块
<?xml version="1.0" encoding="UTF-8"?>
<project xmlns="http://maven.apache.org/POM/4.0.0"xmlns:xsi="http://www.w3.org/2001/XMLSchema-instance"xsi:schemaLocation="http://maven.apache.org/POM/4.0.0 http://maven.apache.org/xsd/maven-4.0.0.xsd"><modelVersion>4.0.0</modelVersion><parent><groupId>com.atguigu</groupId><artifactId>web</artifactId><version>1.0-SNAPSHOT</version></parent><artifactId>web-app</artifactId><properties><maven.compiler.source>17</maven.compiler.source><maven.compiler.target>17</maven.compiler.target><project.build.sourceEncoding>UTF-8</project.build.sourceEncoding></properties></project>
7.2 后台管理系统后端开发
7.2.1 项目初始配置
7.2.1.1 SpringBoot配置
1. pom文件配置
在父工程的pom.xml文件中增加如下内容
<!-- 继承Spring Boot父项目 -->
<parent><groupId>org.springframework.boot</groupId><artifactId>spring-boot-starter-parent</artifactId><version>3.0.5</version>
</parent><!-- 注意:直接替换pom文件中原有的properties -->
<properties><maven.compiler.source>17</maven.compiler.source><maven.compiler.target>17</maven.compiler.target><project.build.sourceEncoding>UTF-8</project.build.sourceEncoding><mybatis-plus.version>3.5.3.1</mybatis-plus.version><swagger.version>2.9.2</swagger.version><jwt.version>0.11.2</jwt.version><easycaptcha.version>1.6.2</easycaptcha.version><minio.version>8.2.0</minio.version><knife4j.version>4.1.0</knife4j.version><aliyun.sms.version>2.0.23</aliyun.sms.version>
</properties><!--配置dependencyManagement统一管理依赖版本-->
<dependencyManagement><dependencies><!--mybatis-plus--><!--官方文档:https://baomidou.com/pages/bab2db/ --><dependency><groupId>com.baomidou</groupId><artifactId>mybatis-plus-boot-starter</artifactId><version>${mybatis-plus.version}</version></dependency><!--knife4j文档--><!--官方文档:https://doc.xiaominfo.com/docs/quick-start --><dependency><groupId>com.github.xiaoymin</groupId><artifactId>knife4j-openapi3-jakarta-spring-boot-starter</artifactId><version>${knife4j.version}</version></dependency><!--JWT登录认证相关--><!--官方文档:https://github.com/jwtk/jjwt#install-jdk-maven --><dependency><groupId>io.jsonwebtoken</groupId><artifactId>jjwt-api</artifactId><version>${jwt.version}</version></dependency><dependency><groupId>io.jsonwebtoken</groupId><artifactId>jjwt-impl</artifactId><scope>runtime</scope><version>${jwt.version}</version></dependency><dependency><groupId>io.jsonwebtoken</groupId><artifactId>jjwt-jackson</artifactId><scope>runtime</scope><version>${jwt.version}</version></dependency><!--图形验证码--><!--官方文档:https://gitee.com/ele-admin/EasyCaptcha --><dependency><groupId>com.github.whvcse</groupId><artifactId>easy-captcha</artifactId><version>${easycaptcha.version}</version></dependency><!--对象存储,用于存储图像等非结构化数据--><!--官方文档:https://min.io/docs/minio/linux/developers/minio-drivers.html?ref=docs#java-sdk --><dependency><groupId>io.minio</groupId><artifactId>minio</artifactId><version>${minio.version}</version></dependency><!--阿里云短信客户端,用于发送短信验证码--><!--官方文档:https://help.aliyun.com/document_detail/215759.html?spm=a2c4g.215759.0.0.49f32807f4Yc0y --><dependency><groupId>com.aliyun</groupId><artifactId>dysmsapi20170525</artifactId><version>${aliyun.sms.version}</version></dependency></dependencies>
</dependencyManagement>
在web模块的pom.xml文件中增加如下内容
- 依赖
<!--包含spring web相关依赖-->
<dependency><groupId>org.springframework.boot</groupId><artifactId>spring-boot-starter-web</artifactId>
</dependency><!--包含spring test相关依赖-->
<dependency><groupId>org.springframework.boot</groupId><artifactId>spring-boot-starter-test</artifactId><scope>test</scope>
</dependency>
- 插件
<!-- Spring Boot Maven插件,用于打包可执行的JAR文件 -->
<build><plugins><plugin><groupId>org.springframework.boot</groupId><artifactId>spring-boot-maven-plugin</artifactId></plugin></plugins>
</build>
2. 创建application.yml文件
在web-admin模块的src/main/resources目录下创建application.yml配置文件,内容如下:
server:port: 8080
3. 创建SpringBoot启动类
在web-admin模块下创建com.atguigu.lease.AdminWebApplication类,内容如下:
@SpringBootApplication
public class AdminWebApplication {public static void main(String[] args) {SpringApplication.run(AdminWebApplication.class, args);}
}
7.2.1.2 Mybatis-Plus配置
Mybatis-Plus为公用工具,故将其配置于common模块。具体配置可参考其官方文档。
1. pom文件配置
在common模块的pom.xml文件中增加如下内容:
<!--mybatis-plus-->
<dependency><groupId>com.baomidou</groupId><artifactId>mybatis-plus-boot-starter</artifactId>
</dependency><!--mysql驱动-->
<dependency><groupId>com.mysql</groupId><artifactId>mysql-connector-j</artifactId>
</dependency>
在model模块的pom.xml文件中增加如下内容:
因为model模块下的实体类中需要配置Mybatis-Plus相关注解,故也需引入Mybatis-Plus依赖
<!--mybatis-plus-->
<dependency><groupId>com.baomidou</groupId><artifactId>mybatis-plus-boot-starter</artifactId>
</dependency>
2. application.yml配置
在web-admin模块的application.yml文件增加如下内容:
spring:datasource:type: com.zaxxer.hikari.HikariDataSourceurl: jdbc:mysql://<hostname>:<port>/<database>?useUnicode=true&characterEncoding=utf-8&useSSL=false&allowPublicKeyRetrieval=true&serverTimezone=GMT%2b8username: <username>password: <password>hikari:connection-test-query: SELECT 1 # 自动检测连接connection-timeout: 60000 #数据库连接超时时间,默认30秒idle-timeout: 500000 #空闲连接存活最大时间,默认600000(10分钟)max-lifetime: 540000 #此属性控制池中连接的最长生命周期,值0表示无限生命周期,默认1800000即30分钟maximum-pool-size: 12 #连接池最大连接数,默认是10minimum-idle: 10 #最小空闲连接数量pool-name: SPHHikariPool # 连接池名称#用于打印框架生成的sql语句,便于调试
mybatis-plus:configuration:log-impl: org.apache.ibatis.logging.stdout.StdOutImpl
注意:需根据实际情况修改hostname、port、database、username、password。
3. 配置类
在common模块下创建com.atguigu.lease.common.mybatisplus.MybatisPlusConfiguration类,内容如下:
@Configuration
@MapperScan("com.atguigu.lease.web.*.mapper")
public class MybatisPlusConfiguration {}
注意:@MapperScan()的包路径需要根据实际情况进行修改。
7.2.1.3 Knife4j配置
1. pom文件配置
在web模块的pom.xml文件添加如下内容
因为web-app模块同样需要Knife4j依赖,故在两个的父工程引入依赖即可
<dependency><groupId>com.github.xiaoymin</groupId><artifactId>knife4j-openapi3-jakarta-spring-boot-starter</artifactId>
</dependency>
在model模块的pom.xml文件添加上述内容
因为model模块下的实体类需要配置Knife4j相关注解,故也需引入Knife4j依赖
<dependency><groupId>com.github.xiaoymin</groupId><artifactId>knife4j-openapi3-jakarta-spring-boot-starter</artifactId>
</dependency>
2. 配置类
后台管理系统和移动端的接口配置并不相同,所以需各自编写一个配置类。在web-admin模块下创建com.atguigu.lease.web.admin.custom.config.Knife4jConfiguration类,内容如下:
@Configuration
public class Knife4jConfiguration {@Beanpublic OpenAPI customOpenAPI() {return new OpenAPI().info(new Info().title("后台管理系统API").version("1.0").description("后台管理系统API"));}@Beanpublic GroupedOpenApi systemAPI() {return GroupedOpenApi.builder().group("系统信息管理").pathsToMatch("/admin/system/**").build();}@Beanpublic GroupedOpenApi loginAPI() {return GroupedOpenApi.builder().group("后台登录管理").pathsToMatch("/admin/login/**","/admin/info").build();}@Beanpublic GroupedOpenApi apartmentAPI() {return GroupedOpenApi.builder().group("公寓信息管理").pathsToMatch("/admin/apartment/**","/admin/room/**","/admin/label/**","/admin/facility/**","/admin/fee/**","/admin/attr/**","/admin/payment/**","/admin/region/**","/admin/term/**","/admin/file/**").build();}@Beanpublic GroupedOpenApi leaseAPI() {return GroupedOpenApi.builder().group("租赁信息管理").pathsToMatch("/admin/appointment/**","/admin/agreement/**").build();}@Beanpublic GroupedOpenApi userAPI() {return GroupedOpenApi.builder().group("平台用户管理").pathsToMatch("/admin/user/**").build();}
}
注意:pathsToMatch参数需要根据实际情况进行配置。
7.2.1.3 生成或导入基础代码
在完成上述配置后,便可使用一些逆向工具自动生成基础代码了(例如实体类、mapper、service等),在使用Mybatis-Plus作为存储层框架时,推荐使用IDEA中的Mybatis X插件。除了可自动生成这些代码,也可直接导入资料中提供的代码。推荐大家直接导入。
导入的代码和目标位置如下:
| 导入代码 | 模块 | 包名/路径 | 说明 |
|---|---|---|---|
| 实体类 | model | com.atguigu.lease.model.entity | 与数据库表一一对应 |
| 枚举类 | model | com.atguigu.lease.model.enums | 实体类中的某些状态类字段,使用枚举类型 |
| mapper接口 | web-admin | com.atguigu.lease.web.admin.mapper | 略 |
| mapper xml | web-admin | src/main/resources/mapper | 略 |
| service | web-admin | com.atguigu.lease.web.admin.service | 略 |
| serviceImpl | web-admin | com.atguigu.lease.web.admin.service.impl | 略 |
知识点:
-
实体类中的公共字段(例如
id、create_time、update_time、is_deleted)抽取到一个基类,进行统一管理,然后让各实体类继承该基类。 -
实体类中的状态字段(例如
status)或类型字段(例如type),全部使用枚举类型。状态(类型)字段,在数据库中通常用一个数字表示一个状态(类型)。例如:订单状态(1:待支付,2:待发货,3:待收货,4:已收货,5:已完结)。若实体类中对应的字段也用数字类型,例如
int,那么程序中就会有大量的如下代码:order.setStatus(1);if (order.getStatus() == 1) {order.setStatus(2); }这些代码后期维护起来会十分麻烦,所以本项目中所有的此类字段均使用枚举类型。例如上述订单状态可定义为以下枚举:
public enum Status {CANCEL(0, "已取消"),WAIT_PAY(1, "待支付"),WAIT_TRANSFER(2, "待发货"),WAIT_RECEIPT(3, "待收货"),RECEIVE(4, "已收货"),COMPLETE(5, "已完结");private final Integer value;private final String desc;public Integer value() {return value;}public String desc() {return desc;}
}
订单实体类中的状态字段定义为
Status类型:@Data public class Order{private Integer id;private Integer userId;private Status status;... }这样上述代码便可调整为如下效果,后期维护起来会容易许多。
order.setStatus(Status.WAIT_PAY); -
所有的实体类均实现了
Serializable接口,方便对实体对象进行缓存。 -
所有的
Mapper接口均没有使用@Mapper注解,而是使用@MapperScan注解统一扫描。
7.2.1.4 导入接口定义代码
资料中提供了所有的Controller代码,并且Controller中定义好了每个接口(只有定义,没有实现),大家可直接导入接口定义相关的代码,然后只专注于接口逻辑的实现。
导入的代码和目标位置如下:
| 导入代码 | 模块 | 包名/路径 | 说明 |
|---|---|---|---|
| controller | web-admin | com.atguigu.lease.web.admin.controller | 略 |
| vo | web-admin | com.atguigu.lease.web.admin.vo | View Object,用于封装或定义接口接受及返回的数据结构 |
| result | common | com.atguigu.lease.common.result | 统一定义接口返回的数据结构 |
导入完成后,便可启动SpringBoot项目,并访问接口文档了,Knife4j文档的url为:http://localhost:8080/doc.html。
知识点:
-
vo(View Object):用于封装或定义接口接收及返回的数据的结构。
-
统一接口返回数据结构:为方便前端对接口数据进行处理,统一接口返回数据结构是一个良好的习惯。
以下是所有接口统一返回的数据结构
{"code": 200,"message": "正常","data": {"id": "1","name": "zhangsan","age": 10}
}
以下是与上述结构相对应的Java类
-
Result
@Data public class Result<T> {//返回码private Integer code;//返回消息private String message;//返回数据private T data;public Result() {}private static <T> Result<T> build(T data) {Result<T> result = new Result<>();if (data != null)result.setData(data);return result;}public static <T> Result<T> build(T body, ResultCodeEnum resultCodeEnum) {Result<T> result = build(body);result.setCode(resultCodeEnum.getCode());result.setMessage(resultCodeEnum.getMessage());return result;}public static <T> Result<T> ok(T data) {return build(data, ResultCodeEnum.SUCCESS);}public static <T> Result<T> ok() {return Result.ok(null);}public static <T> Result<T> fail() {return build(null, ResultCodeEnum.FAIL);}public static <T> Result<T> fail(Integer code, String message) {Result<T> result = build(null);result.setCode(code);result.setMessage(message);return result;} } -
ResultCodeEnum
为方便管理,可将返回码
code和返回消息message封装到枚举类。@Getter public enum ResultCodeEnum {SUCCESS(200, "成功"),FAIL(201, "失败"),PARAM_ERROR(202, "参数不正确"),SERVICE_ERROR(203, "服务异常"),DATA_ERROR(204, "数据异常"),ILLEGAL_REQUEST(205, "非法请求"),REPEAT_SUBMIT(206, "重复提交"),DELETE_ERROR(207, "请先删除子集"),ADMIN_ACCOUNT_EXIST_ERROR(301, "账号已存在"),ADMIN_CAPTCHA_CODE_ERROR(302, "验证码错误"),ADMIN_CAPTCHA_CODE_EXPIRED(303, "验证码已过期"),ADMIN_CAPTCHA_CODE_NOT_FOUND(304, "未输入验证码"),ADMIN_LOGIN_AUTH(305, "未登陆"),ADMIN_ACCOUNT_NOT_EXIST_ERROR(306, "账号不存在"),ADMIN_ACCOUNT_ERROR(307, "用户名或密码错误"),ADMIN_ACCOUNT_DISABLED_ERROR(308, "该用户已被禁用"),ADMIN_ACCESS_FORBIDDEN(309, "无访问权限"),APP_LOGIN_AUTH(501, "未登陆"),APP_LOGIN_PHONE_EMPTY(502, "手机号码为空"),APP_LOGIN_CODE_EMPTY(503, "验证码为空"),APP_SEND_SMS_TOO_OFTEN(504, "验证法发送过于频繁"),APP_LOGIN_CODE_EXPIRED(505, "验证码已过期"),APP_LOGIN_CODE_ERROR(506, "验证码错误"),APP_ACCOUNT_DISABLED_ERROR(507, "该用户已被禁用"),TOKEN_EXPIRED(601, "token过期"),TOKEN_INVALID(602, "token非法");private final Integer code;private final String message;ResultCodeEnum(Integer code, String message) {this.code = code;this.message = message;} }
注意:
由于
Result和ResultCodeEnum中使用@Data、@Getter注解,因此需要再common模块中引入lombok依赖。<dependency><groupId>org.projectlombok</groupId><artifactId>lombok</artifactId> </dependency> -
7.2.2 公寓信息管理
7.2.2.1 房间支付方式管理
房间支付方式管理共有三个接口,分别是查询全部支付方式列表、保存或更新支付方式和根据ID删除支付方式,下面逐一实现。
首先在PaymentTypeController中注入PaymentTypeService依赖,如下
@Tag(name = "支付方式管理")
@RequestMapping("/admin/payment")
@RestController
public class PaymentTypeController {@Autowiredprivate PaymentTypeService service;
}
1. 查询全部支付方式列表
在PaymentTypeController中增加如下内容
@Operation(summary = "查询全部支付方式列表")
@GetMapping("list")
public Result<List<PaymentType>> listPaymentType() {List<PaymentType> list = service.list();return Result.ok(list);
}
知识点:
-
逻辑删除功能
由于数据库中所有表均采用逻辑删除策略,所以查询数据时均需要增加过滤条件
is_deleted=0。上述操作虽不难实现,但是每个查询接口都要考虑到,也显得有些繁琐。为简化上述操作,可以使用Mybatis-Plus提供的逻辑删除功能,它可以自动为查询操作增加
is_deleted=0过滤条件,并将删除操作转为更新语句。具体配置如下,详细信息可参考官方文档。-
步骤一:在
application.yml中增加如下内容mybatis-plus:global-config:db-config:logic-delete-field: flag # 全局逻辑删除的实体字段名(配置后可以忽略不配置步骤二)logic-delete-value: 1 # 逻辑已删除值(默认为 1)logic-not-delete-value: 0 # 逻辑未删除值(默认为 0) -
步骤二:在实体类中的删除标识字段上增加
@TableLogic注解@Data public class BaseEntity {@Schema(description = "主键")@TableId(value = "id", type = IdType.AUTO)private Long id;@Schema(description = "创建时间")@JsonIgnoreprivate Date createTime;@Schema(description = "更新时间")@JsonIgnoreprivate Date updateTime;@Schema(description = "逻辑删除")@JsonIgnore@TableLogic@TableField("is_deleted")private Byte isDeleted;}注意:
逻辑删除功能只对Mybatis-Plus自动注入的sql起效,也就是说,对于手动在
Mapper.xml文件配置的sql不会生效,需要单独考虑。
-
-
忽略特定字段
通常情况下接口响应的Json对象中并不需要
create_time、update_time、is_deleted等字段,这时只需在实体类中的相应字段添加@JsonIgnore注解,该字段就会在序列化时被忽略。具体配置如下,详细信息可参考Jackson官方文档。
@Data
public class BaseEntity {@Schema(description = "主键")@TableId(value = "id", type = IdType.AUTO)private Long id;@Schema(description = "创建时间")@JsonIgnore@TableField(value = "create_time")private Date createTime;@Schema(description = "更新时间")@JsonIgnore@TableField(value = "update_time")private Date updateTime;@Schema(description = "逻辑删除")@JsonIgnore@TableField("is_deleted")private Byte isDeleted;}
2. 保存或更新支付方式
在PaymentTypeController中增加如下内容
@Operation(summary = "保存或更新支付方式")
@PostMapping("saveOrUpdate")
public Result saveOrUpdatePaymentType(@RequestBody PaymentType paymentType) {service.saveOrUpdate(paymentType);return Result.ok();
}
知识点:
保存或更新数据时,前端通常不会传入isDeleted、createTime、updateTime这三个字段,因此我们需要手动赋值。但是数据库中几乎每张表都有上述字段,所以手动去赋值就显得有些繁琐。为简化上述操作,我们可采取以下措施。
-
is_deleted字段:可将数据库中该字段的默认值设置为0。 -
create_time和update_time:可使用mybatis-plus的自动填充功能,所谓自动填充,就是通过统一配置,在插入或更新数据时,自动为某些字段赋值,具体配置如下,详细信息可参考官方文档。-
为相关字段配置触发填充的时机,例如
create_time需要在插入数据时填充,而update_time需要在更新数据时填充。具体配置如下,观察@TableField注解中的fill属性。@Data public class BaseEntity {@Schema(description = "主键")@TableId(value = "id", type = IdType.AUTO)private Long id;@Schema(description = "创建时间")@JsonIgnore@TableField(value = "create_time", fill = FieldFill.INSERT)private Date createTime;@Schema(description = "更新时间")@JsonIgnore@TableField(value = "update_time", fill = FieldFill.UPDATE)private Date updateTime;@Schema(description = "逻辑删除")@JsonIgnore@TableLogic@TableField("is_deleted")private Byte isDeleted;} -
配置自动填充的内容,具体配置如下
在common模块下创建
com.atguigu.lease.common.mybatisplus.MybatisMetaObjectHandler类,内容如下:@Component public class MybatisMetaObjectHandler implements MetaObjectHandler {@Overridepublic void insertFill(MetaObject metaObject) {this.strictInsertFill(metaObject, "createTime", Date.class, new Date());}@Overridepublic void updateFill(MetaObject metaObject) {this.strictUpdateFill(metaObject, "updateTime", Date.class, new Date());} }
在做完上述配置后,当写入数据时,Mybatis-Plus会自动将实体对象的
create_time字段填充为当前时间,当更新数据时,则会自动将实体对象的update_time字段填充为当前时间。 -
3. 根据ID删除支付方式
在PaymentTypeController中增加如下内容
@Operation(summary = "根据ID删除支付方式")
@DeleteMapping("deleteById")
public Result deletePaymentById(@RequestParam Long id) {service.removeById(id);return Result.ok();
}
知识点:
MybatisPlus逻辑删除功能的使用。
7.2.2.2 房间租期管理
房间租期管理共有三个接口,分别是查询全部租期列表、保存或更新租期信息和根据ID删除租期,具体实现如下。
在LeaseTermController中增加如下内容
@Tag(name = "租期管理")
@RequestMapping("/admin/term")
@RestController
public class LeaseTermController {@Autowiredprivate LeaseTermService service;@GetMapping("list")@Operation(summary = "查询全部租期列表")public Result<List<LeaseTerm>> listLeaseTerm() {List<LeaseTerm> list = service.list();return Result.ok(list);}@PostMapping("saveOrUpdate")@Operation(summary = "保存或更新租期信息")public Result saveOrUpdate(@RequestBody LeaseTerm leaseTerm) {service.saveOrUpdate(leaseTerm);return Result.ok();}@DeleteMapping("deleteById")@Operation(summary = "根据ID删除租期")public Result deleteLeaseTermById(@RequestParam Long id) {service.removeById(id);return Result.ok();}
}
7.2.2.3 标签管理
标签管理共有三个接口,分别是**[根据类型]查询标签列表**、保存或更新标签信息和根据ID删除标签,下面逐一实现。
首先在LabelController中注入LabelInfoService依赖,如下
@Tag(name = "标签管理")
@RestController
@RequestMapping("/admin/label")
public class LabelController {@Autowiredprivate LabelInfoService service;
}
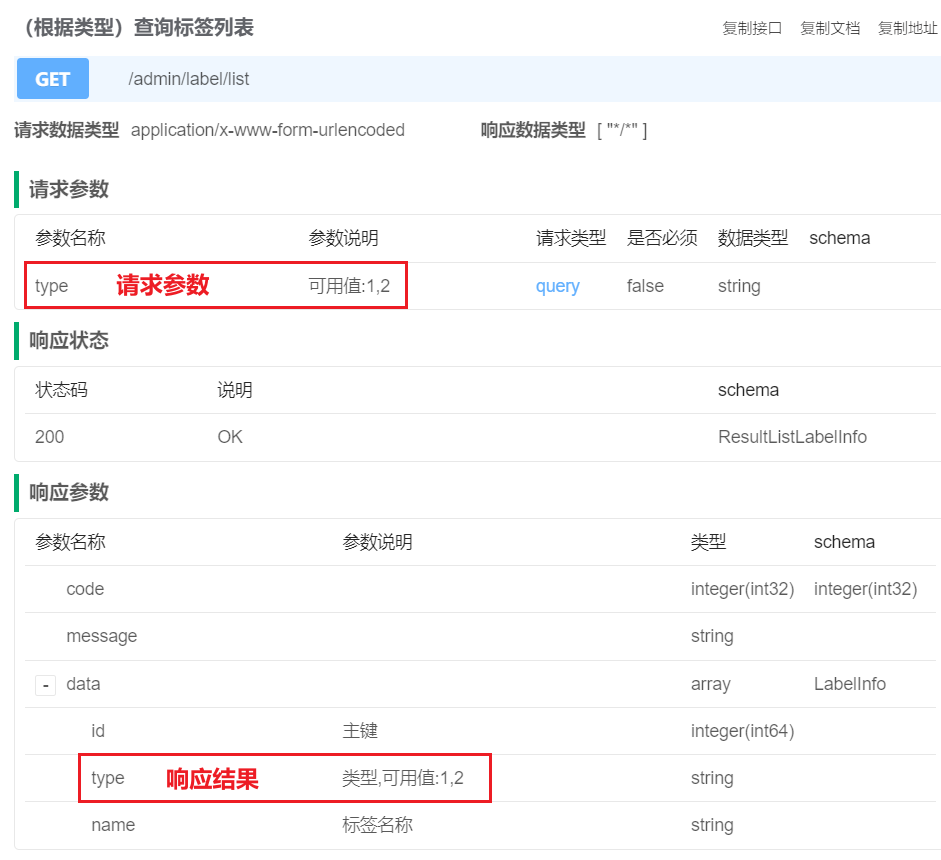
1. [根据类型]查询标签列表
在LabelController中增加如下内容
@Operation(summary = "(根据类型)查询标签列表")
@GetMapping("list")
public Result<List<LabelInfo>> labelList(@RequestParam(required = false) ItemType type) {LambdaQueryWrapper<LabelInfo> queryWrapper = new LambdaQueryWrapper<>();queryWrapper.eq(type != null, LabelInfo::getType, type);List<LabelInfo> list = service.list(queryWrapper);return Result.ok(list);
}
知识点:
上述接口的功能是根据type(公寓/房间),查询标签列表。由于这个type字段在数据库、实体类、前后端交互的过程中有多种不同的形式,因此在请求和响应的过程中,type字段会涉及到多次类型转换。
首先明确一下type字段的各种形式:
-
数据库中
数据库中的type字段为
tinyint类型+-------------+--------------+ | Field | Type | +-------------+--------------+ | id | bigint | | type | tinyint | | name | varchar(255) | | create_time | timestamp | | update_time | timestamp | | is_deleted | tinyint | +-------------+--------------+ -
实体类
实体类中的type字段为
ItemType枚举类型LabelInfo实体类如下@Schema(description = "标签信息表") @TableName(value = "label_info") @Data public class LabelInfo extends BaseEntity {private static final long serialVersionUID = 1L;@Schema(description = "类型")@TableField(value = "type")private ItemType type;@Schema(description = "标签名称")@TableField(value = "name")private String name; }ItemType枚举类如下public enum ItemType {APARTMENT(1, "公寓"),ROOM(2, "房间");private Integer code;private String name;ItemType(Integer code, String name) {this.code = code;this.name = name;} } -
前后端交互中
前后端交互所传递的数据中type字段为数字(1/2)。
具体转换过程如下图所示:
-
请求流程

说明
- SpringMVC中的
WebDataBinder组件负责将HTTP的请求参数绑定到Controller方法的参数,并实现参数类型的转换。 - Mybatis中的
TypeHandler用于处理Java中的实体对象与数据库之间的数据类型转换。
- SpringMVC中的
-
响应流程
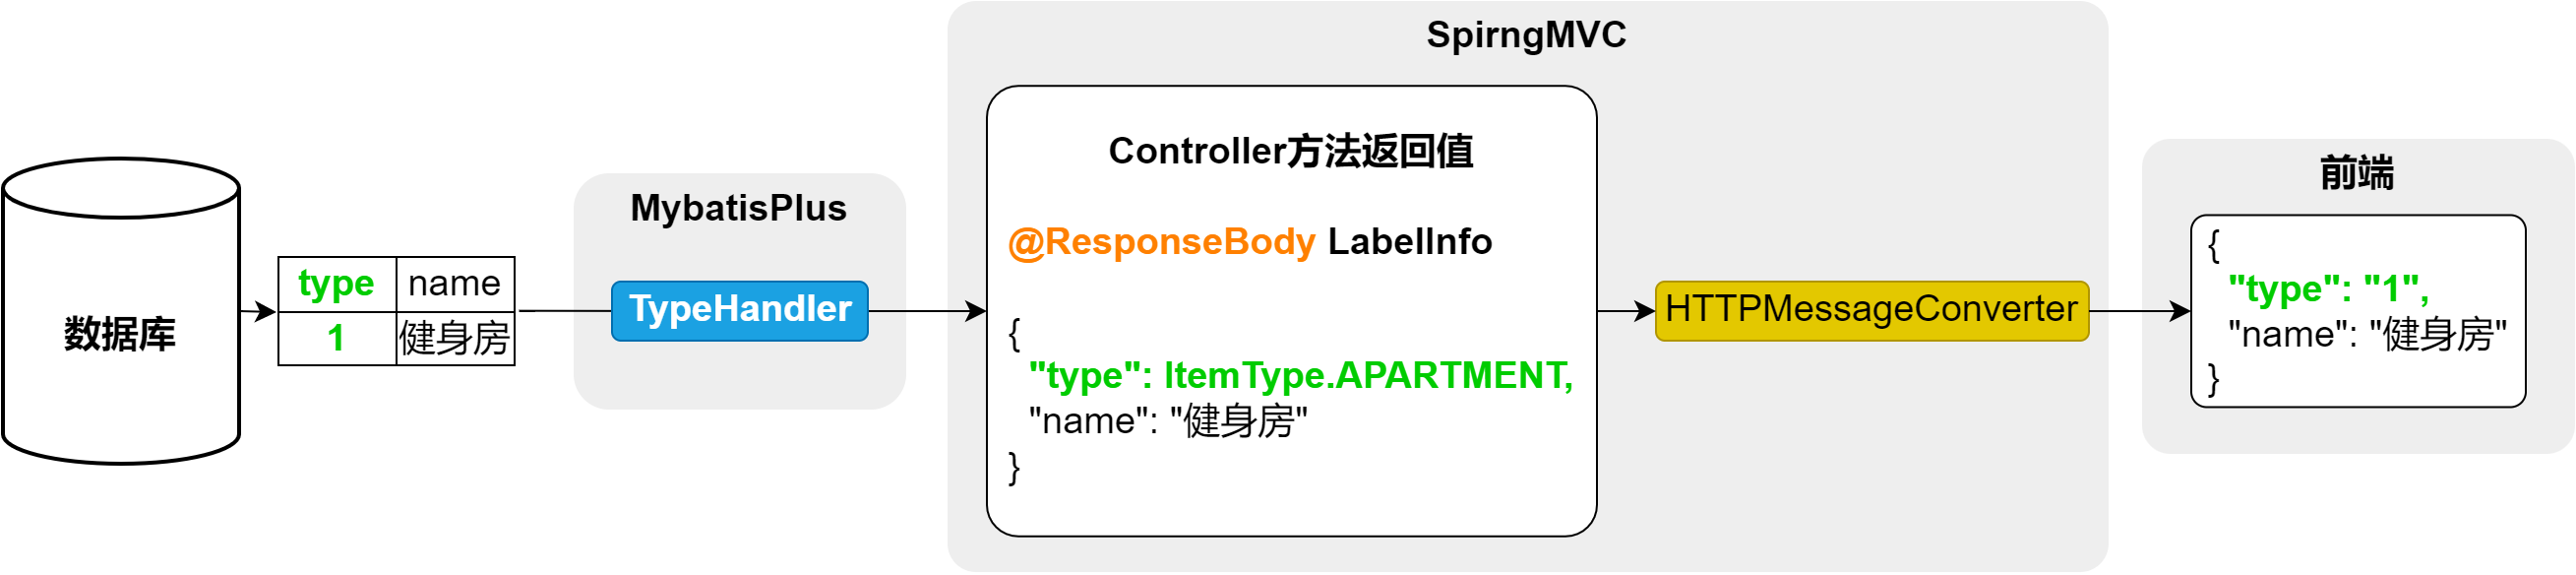
说明
- SpringMVC中的
HTTPMessageConverter组件负责将Controller方法的返回值(Java对象)转换为HTTP响应体中的JSON字符串,或者将请求体中的JSON字符串转换为Controller方法中的参数(Java对象),例如下一个接口保存或更新标签信息

- SpringMVC中的
下面介绍一下每个环节的类型转换原理
-
WebDataBinder枚举类型转换
WebDataBinder依赖于Converter实现类型转换,若Controller方法声明的@RequestParam参数的类型不是String,WebDataBinder就会自动进行数据类型转换。SpringMVC提供了常用类型的转换器,例如String到Integer、String到Date,String到Boolean等等,其中也包括String到枚举类型,但是String到枚举类型的默认转换规则是根据实例名称(“APARTMENT”)转换为枚举对象实例(ItemType.APARTMENT)。若想实现code属性到枚举对象实例的转换,需要自定义Converter,代码如下,具体内容可参考官方文档。-
在web-admin模块自定义
com.atguigu.lease.web.admin.custom.converter.StringToItemTypeConverter@Component public class StringToItemTypeConverter implements Converter<String, ItemType> {@Overridepublic ItemType convert(String code) {for (ItemType value : ItemType.values()) {if (value.getCode().equals(Integer.valueOf(code))) {return value;}}throw new IllegalArgumentException("code非法");} } -
注册上述的
StringToItemTypeConverter,在web-admin模块创建com.atguigu.lease.web.admin.custom.config.WebMvcConfiguration,内容如下:@Configuration public class WebMvcConfiguration implements WebMvcConfigurer {@Autowiredprivate StringToItemTypeConverter stringToItemTypeConverter;@Overridepublic void addFormatters(FormatterRegistry registry) {registry.addConverter(this.stringToItemTypeConverter);} }
但是我们有很多的枚举类型都需要考虑类型转换这个问题,按照上述思路,我们需要为每个枚举类型都定义一个Converter,并且每个Converter的转换逻辑都完全相同,针对这种情况,我们使用
ConverterFactory接口更为合适,这个接口可以将同一个转换逻辑应用到一个接口的所有实现类,因此我们可以定义一个BaseEnum接口,然后另所有的枚举类都实现该接口,然后就可以自定义ConverterFactory,集中编写各枚举类的转换逻辑了。具体实现如下:-
在model模块定义
com.atguigu.lease.model.enums.BaseEnum接口public interface BaseEnum {Integer getCode();String getName(); } -
令所有
com.atguigu.lease.model.enums包下的枚举类都实现BaseEnun接口 -
在web-admin模块自定义
com.atguigu.lease.web.admin.custom.converter.StringToBaseEnumConverterFactory@Component public class StringToBaseEnumConverterFactory implements ConverterFactory<String, BaseEnum> {@Overridepublic <T extends BaseEnum> Converter<String, T> getConverter(Class<T> targetType) {return new Converter<String, T>() {@Overridepublic T convert(String source) {for (T enumConstant : targetType.getEnumConstants()) {if (enumConstant.getCode().equals(Integer.valueOf(source))) {return enumConstant;}}throw new IllegalArgumentException("非法的枚举值:" + source);}};} } -
注册上述的
ConverterFactory,在web-admin模块创建com.atguigu.lease.web.admin.custom.config.WebMvcConfiguration,内容如下:@Configuration public class WebMvcConfiguration implements WebMvcConfigurer {@Autowiredprivate StringToBaseEnumConverterFactory stringToBaseEnumConverterFactory;@Overridepublic void addFormatters(FormatterRegistry registry) {registry.addConverterFactory(this.stringToBaseEnumConverterFactory);} }注意:
最终采用的是
ConverterFactory方案,因此StringToItemTypeConverter相关代码可以直接删除。
-
-
TypeHandler枚举类型转换
Mybatis预置的
TypeHandler可以处理常用的数据类型转换,例如String、Integer、Date等等,其中也包含枚举类型,但是枚举类型的默认转换规则是枚举对象实例(ItemType.APARTMENT)和实例名称(“APARTMENT”)相互映射。若想实现code属性到枚举对象实例的相互映射,需要自定义TypeHandler。不过MybatisPlus提供了一个通用的处理枚举类型的TypeHandler。其使用十分简单,只需在
ItemType枚举类的code属性上增加一个注解@EnumValue,Mybatis-Plus便可完成从ItemType对象到code属性之间的相互映射,具体配置如下。public enum ItemType {APARTMENT(1, "公寓"),ROOM(2, "房间");@EnumValueprivate Integer code;private String name;ItemType(Integer code, String name) {this.code = code;this.name = name;} } -
HTTPMessageConverter枚举类型转换
HttpMessageConverter依赖于Json序列化框架(默认使用Jackson)。其对枚举类型的默认处理规则也是枚举对象实例(ItemType.APARTMENT)和实例名称(“APARTMENT”)相互映射。不过其提供了一个注解@JsonValue,同样只需在ItemType枚举类的code属性上增加一个注解@JsonValue,Jackson便可完成从ItemType对象到code属性之间的互相映射。具体配置如下,详细信息可参考Jackson官方文档。@Getter public enum ItemType {APARTMENT(1, "公寓"),ROOM(2, "房间");@EnumValue@JsonValueprivate Integer code;private String name;ItemType(Integer code, String name) {this.code = code;this.name = name;} }
2.保存或更新标签信息
在LabelController中增加如下内容
@Operation(summary = "保存或更新标签信息")
@PostMapping("saveOrUpdate")
public Result saveOrUpdateFacility(@RequestBody LabelInfo labelInfo) {service.saveOrUpdate(labelInfo);return Result.ok();
}
3. 根据ID删除标签
在LabelController中增加如下内容
@Operation(summary = "根据id删除标签信息")
@DeleteMapping("deleteById")
public Result deleteLabelById(@RequestParam Long id) {service.removeById(id);return Result.ok();
}
7.2.2.4 配套管理
配套管理共有三个接口,分别是**[根据类型]查询配套列表**、保存或更新配套信息和根据ID删除配套,具体实现如下。
在FacilityController中增加如下内容
@Tag(name = "配套管理")
@RestController
@RequestMapping("/admin/facility")
public class FacilityController {@Autowiredprivate FacilityInfoService service;@Operation(summary = "[根据类型]查询配套信息列表")@GetMapping("list")public Result<List<FacilityInfo>> listFacility(@RequestParam(required = false) ItemType type) {LambdaQueryWrapper<FacilityInfo> queryWrapper = new LambdaQueryWrapper<>();queryWrapper.eq(type != null, FacilityInfo::getType, type);List<FacilityInfo> list = service.list(queryWrapper);return Result.ok(list);}@Operation(summary = "新增或修改配套信息")@PostMapping("saveOrUpdate")public Result saveOrUpdate(@RequestBody FacilityInfo facilityInfo) {service.saveOrUpdate(facilityInfo);return Result.ok();}@Operation(summary = "根据id删除配套信息")@DeleteMapping("deleteById")public Result removeFacilityById(@RequestParam Long id) {service.removeById(id);return Result.ok();}}
7.2.2.5 基本属性管理
房间基本属性管理共有五个接口,分别是保存或更新属性名称、保存或更新属性值、查询全部属性名称和属性值列表、根据ID删除属性名称、根据ID删除属性值。下面逐一是实现。
首先在AttrController中注入AttrKeyService和AttrValueService,如下:
@Tag(name = "房间属性管理")
@RestController
@RequestMapping("/admin/attr")
public class AttrController {@Autowiredprivate AttrKeyService attrKeyService;@Autowiredprivate AttrValueService attrValueService;
}
1. 保存或更新属性名称
在AttrController增加如下内容
@Operation(summary = "保存或更新属性名称")
@PostMapping("key/saveOrUpdate")
public Result saveOrUpdateAttrKey(@RequestBody AttrKey attrKey) {attrKeyService.saveOrUpdate(attrKey);return Result.ok();
}
2. 保存或更新属性值
在AttrController中增加如下内容
@Operation(summary = "保存或更新属性值")
@PostMapping("value/saveOrUpdate")
public Result saveOrUpdateAttrValue(@RequestBody AttrValue attrValue) {attrValueService.saveOrUpdate(attrValue);return Result.ok();
}
3. 查询全部属性名称和属性值列表
-
查看响应的数据结构
查看web-admin模块下的
com.atguigu.lease.web.admin.vo.attr.AttrKeyVo,内容如下:@Data public class AttrKeyVo extends AttrKey {@Schema(description = "属性值列表")private List<AttrValue> attrValueList; } -
编写Controller层逻辑
在
AttrController中添加如下内容@Operation(summary = "查询全部属性名称和属性值列表") @GetMapping("list") public Result<List<AttrKeyVo>> listAttrInfo() {List<AttrKeyVo> list = attrKeyService.listAttrInfo();return Result.ok(list); } -
编写Service层逻辑
在
AttrKeyService中增加如下内容List<AttrKeyVo> listAttrInfo();在
AttrKeyServiceImpl中增加如下内容@Autowired private AttrKeyMapper mapper;@Override public List<AttrKeyVo> listAttrInfo() {return mapper.listAttrInfo(); } -
编写Mapper层逻辑
在
AttrKeyMapper中增加如下内容List<AttrKeyVo> listAttrInfo();对应的在
AttrKeyMapper.xml中增加如下内容<resultMap id="BaseResultMap" type="com.atguigu.lease.web.admin.vo.attr.AttrKeyVo"><id property="id" column="id"/><result property="name" column="key_name"/><collection property="attrValueList" ofType="com.atguigu.lease.model.entity.AttrValue"><id column="value_id" property="id"/><result column="value_name" property="name"/><result column="key_id" property="attrKeyId"/></collection> </resultMap> <select id="listAttrInfo" resultMap="BaseResultMap">select k.id,k.name key_name,v.id value_id,v.name value_name,v.attr_key_id key_idfrom attr_key kleft join attr_value v on k.id = v.attr_key_id and v.is_deleted = 0where k.is_deleted = 0 </select>
4. 根据ID删除属性名称
在AttrController中增加如下内容,注意删除属性名称时,会一并删除其下的所有属性值
@Operation(summary = "根据id删除属性名称")
@DeleteMapping("key/deleteById")
public Result removeAttrKeyById(@RequestParam Long attrKeyId) {//删除attrKeyattrKeyService.removeById(attrKeyId);//删除attrValueLambdaQueryWrapper<AttrValue> queryWrapper = new LambdaQueryWrapper<>();queryWrapper.eq(AttrValue::getAttrKeyId, attrKeyId);attrValueService.remove(queryWrapper);return Result.ok();
}
5. 根据ID删除属性值
在AttrController中增加如下内容
@Operation(summary = "根据id删除属性值")
@DeleteMapping("value/deleteById")
public Result removeAttrValueById(@RequestParam Long id) {attrValueService.removeById(id);return Result.ok();
}
7.2.2.6 公寓杂费管理
房间基本属性管理共有五个接口,分别是保存或更新杂费名称、保存或更新杂费值、查询全部杂费名称和杂费值列表、根据ID删除杂费名称、根据ID删除杂费值。下面逐一实现
首先在FeeController中注入FeeKeyService和FeeValueService,如下
@Tag(name = "房间杂费管理")
@RestController
@RequestMapping("/admin/fee")
public class FeeController {@Autowiredprivate FeeKeyService feeKeyService;@Autowiredprivate FeeValueService feeValueService;
}
1. 保存或更新杂费名称
在FeeController中增加如下内容
@Operation(summary = "保存或更新杂费名称")
@PostMapping("key/saveOrUpdate")
public Result saveOrUpdateFeeKey(@RequestBody FeeKey feeKey) {feeKeyService.saveOrUpdate(feeKey);return Result.ok();
}
2. 保存或更新杂费值
在FeeController中增加如下内容
@Operation(summary = "保存或更新杂费值")
@PostMapping("value/saveOrUpdate")
public Result saveOrUpdateFeeValue(@RequestBody FeeValue feeValue) {feeValueService.saveOrUpdate(feeValue);return Result.ok();
}
3. 查询全部杂费名称和杂费值列表
-
查看响应的数据结构
查看web-admin模块下创的
com.atguigu.lease.web.admin.vo.fee.FeeKeyVo,内容如下@Data public class FeeKeyVo extends FeeKey {@Schema(description = "杂费value列表")private List<FeeValue> feeValueList; } -
编写Controller层逻辑
在
FeeController中增加如下内容@Operation(summary = "查询全部杂费名称和杂费值列表") @GetMapping("list") public Result<List<FeeKeyVo>> feeInfoList() {List<FeeKeyVo> list = feeKeyService.listFeeInfo();return Result.ok(list); } -
编写Service层逻辑
-
在
FeeKeyService中增加如下内容List<FeeKeyVo> listFeeInfo(); -
在
FeeKeyServiceImpl中增加如下内容@Autowired private FeeKeyMapper mapper;@Override public List<FeeKeyVo> listFeeInfo() {return mapper.listFeeInfo(); }
-
-
编写Mapper层逻辑
-
在
FeeKeyMapper中增加如下内容List<FeeKeyVo> listFeeInfo(); -
在
FeeKeyMapper.xml中增加如下内容<resultMap id="FeeInfoList" type="com.atguigu.lease.web.admin.vo.fee.FeeKeyVo"><id property="id" column="id"/><result property="name" column="key_name"/><collection property="feeValueList" ofType="com.atguigu.lease.model.entity.FeeValue"><id column="value_id" property="id"/><result column="value_name" property="name"/><result column="value_unit" property="unit"/><result column="key_id" property="feeKeyId"/></collection> </resultMap><select id="listFeeInfo" resultMap="FeeInfoList">select k.id,k.name key_name,v.id value_id,v.name value_name,v.unit value_unit,v.fee_key_id key_idfrom fee_key kleft join fee_value v on k.id = v.fee_key_id and v.is_deleted = 0where k.is_deleted = 0 </select>
-
4. 根据ID删除杂费名称
在FeeController中增加如下内容
@Operation(summary = "根据id删除杂费名称")
@DeleteMapping("key/deleteById")
public Result deleteFeeKeyById(@RequestParam Long feeKeyId) {//删除杂费名称feeKeyService.removeById(feeKeyId);//删除杂费名称下的杂费值LambdaQueryWrapper<FeeValue> queryWrapper = new LambdaQueryWrapper<>();queryWrapper.eq(FeeValue::getFeeKeyId, feeKeyId);feeValueService.remove(queryWrapper);return Result.ok();
}
5. 根据ID删除杂费值
在FeeController中增加如下内容
@Operation(summary = "根据id删除杂费值")
@DeleteMapping("value/deleteById")
public Result deleteFeeValueById(@RequestParam Long id) {feeValueService.removeById(id);return Result.ok();
}
7.2.2.7 地区信息管理
地区信息管理共有三个接口,分别是查询省份信息列表,根据省份ID查询城市信息列表和根据城市ID查询区县信息列表,具体实现如下
在RegionInfoController中增加如下内容
@Tag(name = "地区信息管理")
@RestController
@RequestMapping("/admin/region")
public class RegionInfoController {@Autowiredprivate ProvinceInfoService provinceInfoService;@Autowiredprivate CityInfoService cityInfoService;@Autowiredprivate DistrictInfoService districtInfoService;@Operation(summary = "查询省份信息列表")@GetMapping("province/list")public Result<List<ProvinceInfo>> listProvince() {List<ProvinceInfo> list = provinceInfoService.list();return Result.ok(list);}@Operation(summary = "根据省份id查询城市信息列表")@GetMapping("city/listByProvinceId")public Result<List<CityInfo>> listCityInfoByProvinceId(@RequestParam Long id) {LambdaQueryWrapper<CityInfo> queryWrapper = new LambdaQueryWrapper<>();queryWrapper.eq(CityInfo::getProvinceId, id);List<CityInfo> list = cityInfoService.list(queryWrapper);return Result.ok(list);}@GetMapping("district/listByCityId")@Operation(summary = "根据城市id查询区县信息")public Result<List<DistrictInfo>> listDistrictInfoByCityId(@RequestParam Long id) {LambdaQueryWrapper<DistrictInfo> queryWrapper = new LambdaQueryWrapper<>();queryWrapper.eq(DistrictInfo::getCityId, id);List<DistrictInfo> list = districtInfoService.list(queryWrapper);return Result.ok(list);}
}
7.2.2.8 图片上传管理
由于公寓、房间等实体均包含图片信息,所以在新增或修改公寓、房间信息时,需要上传图片,因此我们需要实现一个上传图片的接口。
1. 图片上传流程
下图展示了新增房间或公寓时,上传图片的流程。
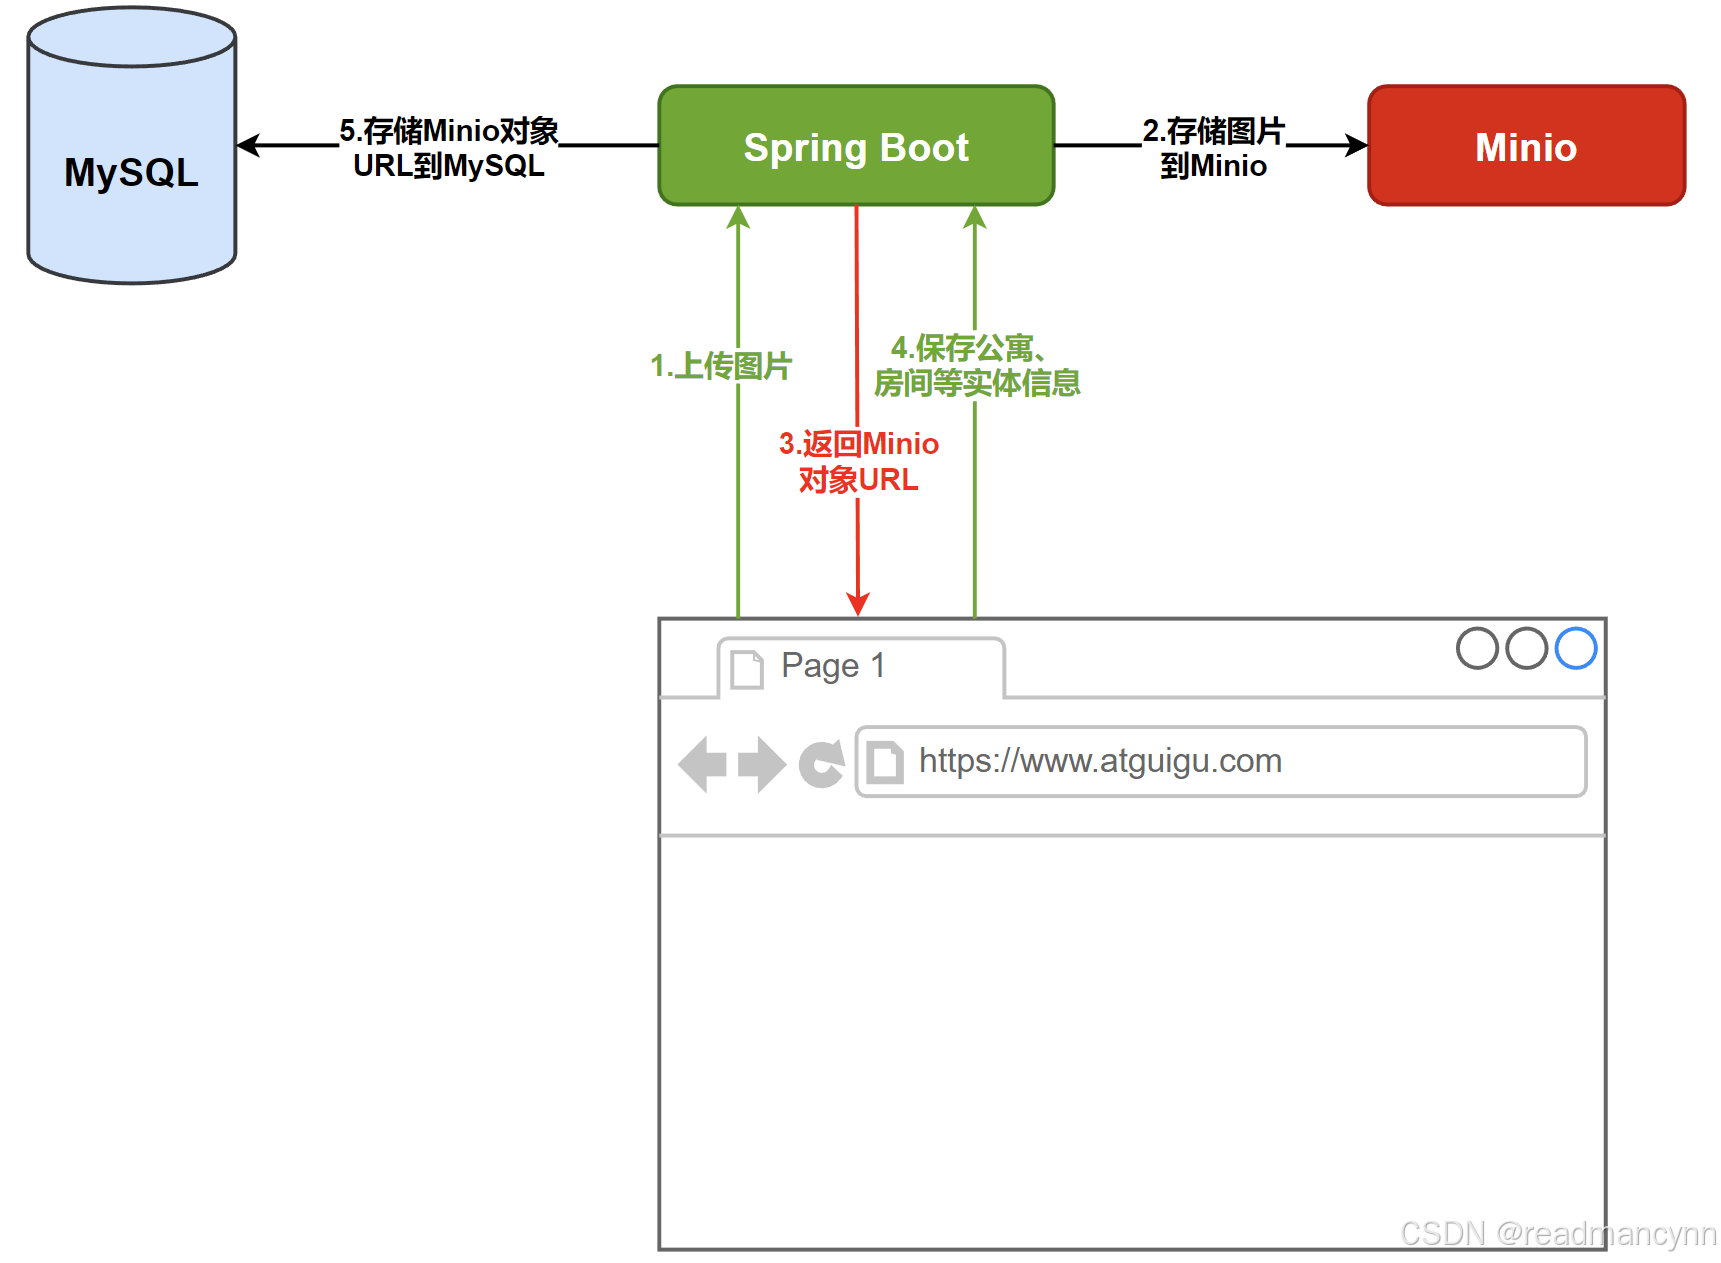
可以看出图片上传接口接收的是图片文件,返回的Minio对象的URL。
2. 图片上传接口开发
下面为该接口的具体实现
-
配置Minio Client
-
引入Minio Maven依赖
在common模块的
pom.xml文件增加如下内容:<dependency><groupId>io.minio</groupId><artifactId>minio</artifactId> </dependency> -
配置Minio相关参数
在
application.yml中配置Minio的endpoint、accessKey、secretKey、bucketName等参数minio:endpoint: http://<hostname>:<port>access-key: <access-key>secret-key: <secret-key>bucket-name: <bucket-name>注意:上述
<hostname>、<port>等信息需根据实际情况进行修改。 -
在common模块中创建
com.atguigu.lease.common.minio.MinioProperties,内容如下@ConfigurationProperties(prefix = "minio") @Data public class MinioProperties {private String endpoint;private String accessKey;private String secretKey;private String bucketName; } -
在common模块中创建
com.atguigu.lease.common.minio.MinioConfiguration,内容如下@Configuration @EnableConfigurationProperties(MinioProperties.class) public class MinioConfiguration {@Autowiredprivate MinioProperties properties;@Beanpublic MinioClient minioClient() {return MinioClient.builder().endpoint(properties.getEndpoint()).credentials(properties.getAccessKey(), properties.getSecretKey()).build();} }
-
-
开发图片上传接口
-
编写Controller层逻辑
在
FileUploadController中增加如下内容@Tag(name = "文件管理") @RequestMapping("/admin/file") @RestController public class FileUploadController {@Autowiredprivate FileService service;@Operation(summary = "上传文件")@PostMapping("upload")public Result<String> upload(@RequestParam MultipartFile file) {String url = service.upload(file);return Result.ok(url);} }说明:
MultipartFile是Spring框架中用于处理文件上传的类,它包含了上传文件的信息(如文件名、文件内容等)。 -
编写Service层逻辑
-
在
FileService中增加如下内容String upload(MultipartFile file); -
在
FileServiceImpl中增加如下内容@Autowired private MinioProperties properties;@Autowired private MinioClient client;@Override public String upload(MultipartFile file) {try {boolean bucketExists = client.bucketExists(BucketExistsArgs.builder().bucket(properties.getBucketName()).build());if (!bucketExists) {client.makeBucket(MakeBucketArgs.builder().bucket(properties.getBucketName()).build());client.setBucketPolicy(SetBucketPolicyArgs.builder().bucket(properties.getBucketName()).config(createBucketPolicyConfig(properties.getBucketName())).build());}String filename = new SimpleDateFormat("yyyyMMdd").format(new Date()) + "/" + UUID.randomUUID() + "-" + file.getOriginalFilename();client.putObject(PutObjectArgs.builder().bucket(properties.getBucketName()).object(filename).stream(file.getInputStream(), file.getSize(), -1).contentType(file.getContentType()).build());return String.join("/", properties.getEndpoint(), properties.getBucketName(), filename);} catch (Exception e) {e.printStackTrace();}return null; }private String createBucketPolicyConfig(String bucketName) {return """{"Statement" : [ {"Action" : "s3:GetObject","Effect" : "Allow","Principal" : "*","Resource" : "arn:aws:s3:::%s/*"} ],"Version" : "2012-10-17"}""".formatted(bucketName); }注意:
上述
createBucketPolicyConfig方法的作用是生成用于描述指定bucket访问权限的JSON字符串。最终生成的字符串格式如下,其表示,允许(Allow)所有人(*)获取(s3:GetObject)指定桶(<bucket-name>)的内容。{"Statement" : [ {"Action" : "s3:GetObject","Effect" : "Allow","Principal" : "*","Resource" : "arn:aws:s3:::<bucket-name>/*"} ],"Version" : "2012-10-17" }由于公寓、房间的图片为公开信息,所以将其设置为所有人可访问。
-
异常处理
-
问题说明
上述代码只是对
MinioClient方法抛出的各种异常进行了捕获,然后打印了异常信息,目前这种处理逻辑,无论Minio是否发生异常,前端在上传文件时,总是会受到成功的响应信息。可按照以下步骤进行操作,查看具体现象关闭虚拟机中的Minio服务
systemctl stop minio启动项目,并上传文件,观察接收的响应信息
-
问题解决思路
为保证前端能够接收到正常的错误提示信息,应该将Service方法的异常抛出到Controller方法中,然后在Controller方法中对异常进行捕获并处理。具体操作如下
Service层代码
@Override
public String upload(MultipartFile file) throws ServerException, InsufficientDataException, ErrorResponseException, IOException, NoSuchAlgorithmException, InvalidKeyException, InvalidResponseException, XmlParserException, InternalException{boolean bucketExists = minioClient.bucketExists(BucketExistsArgs.builder().bucket(properties.getBucketName()).build());if (!bucketExists) {minioClient.makeBucket(MakeBucketArgs.builder().bucket(properties.getBucketName()).build());minioClient.setBucketPolicy(SetBucketPolicyArgs.builder().bucket(properties.getBucketName()).config(createBucketPolicyConfig(properties.getBucketName())).build());}String filename = new SimpleDateFormat("yyyyMMdd").format(new Date()) +"/" + UUID.randomUUID() + "-" + file.getOriginalFilename();minioClient.putObject(PutObjectArgs.builder().bucket(properties.getBucketName()).stream(file.getInputStream(), file.getSize(), -1).object(filename).contentType(file.getContentType()).build());return String.join("/",properties.getEndpoint(),properties.getBucketName(),filename);
}
Controller层代码
public Result<String> upload(@RequestParam MultipartFile file) {try {String url = service.upload(file);return Result.ok(url);} catch (Exception e) {e.printStackTrace();return Result.fail();} } -
全局异常处理
按照上述写法,所有的Controller层方法均需要增加
try-catch逻辑,使用Spring MVC提供的全局异常处理功能,可以将所有处理异常的逻辑集中起来,进而统一处理所有异常,使代码更容易维护。具体用法如下,详细信息可参考官方文档:
在common模块中创建
com.atguigu.lease.common.exception.GlobalExceptionHandler类,内容如下@ControllerAdvice public class GlobalExceptionHandler {@ExceptionHandler(Exception.class)@ResponseBodypublic Result error(Exception e){e.printStackTrace();return Result.fail();} }上述代码中的关键注解的作用如下
@ControllerAdvice用于声明处理全局Controller方法异常的类@ExceptionHandler用于声明处理异常的方法,value属性用于声明该方法处理的异常类型@ResponseBody表示将方法的返回值作为HTTP的响应体注意:
全局异常处理功能由SpringMVC提供,因此需要在common模块的
pom.xml中引入如下依赖<!--spring-web--> <dependency><groupId>org.springframework.boot</groupId><artifactId>spring-boot-starter-web</artifactId> </dependency> -
修改Controller层代码
由于前文的
GlobalExceptionHandler会处理所有Controller方法抛出的异常,因此Controller层就无序关注异常的处理逻辑了,因此Controller层代码可做出如下调整。public Result<String> upload(@RequestParam MultipartFile file) throws ServerException, InsufficientDataException, ErrorResponseException, IOException, NoSuchAlgorithmException, InvalidKeyException, InvalidResponseException, XmlParserException, InternalException {String url = service.upload(file);return Result.ok(url); }
-
-
-
7.2.2.9 公寓管理
公寓管理共有六个接口,下面逐一实现。
首先在ApartmentController中注入ApartmentInfoService,如下
@Tag(name = "公寓信息管理")
@RestController
@RequestMapping("/admin/apartment")
public class ApartmentController {@Autowiredprivate ApartmentInfoService service;
}
1. 保存或更新公寓信息
-
查看请求的数据结构
查看web-admin模块中的
com.atguigu.lease.web.admin.vo.apartment.ApartmentSubmitVo类,内容如下:@Schema(description = "公寓信息") @Data public class ApartmentSubmitVo extends ApartmentInfo {@Schema(description="公寓配套id")private List<Long> facilityInfoIds;@Schema(description="公寓标签id")private List<Long> labelIds;@Schema(description="公寓杂费值id")private List<Long> feeValueIds;@Schema(description="公寓图片id")private List<GraphVo> graphVoList;} -
编写Controller层逻辑
在
ApartmentController中增加如下内容@Operation(summary = "保存或更新公寓信息") @PostMapping("saveOrUpdate") public Result saveOrUpdate(@RequestBody ApartmentSubmitVo apartmentSubmitVo) {service.saveOrUpdateApartment(apartmentSubmitVo);return Result.ok(); } -
编写Service层逻辑
-
在
ApartmentInfoService中增加如下内容void saveOrUpdateApartment(ApartmentSubmitVo apartmentSubmitVo); -
在
ApartmentInfoServiceImpl中增加如下内容注意:所需
Service和Mapper的注入语句省略未写。@Override public void saveOrUpdateApartment(ApartmentSubmitVo apartmentSubmitVo) {boolean isUpdate = apartmentSubmitVo.getId()!=null;super.saveOrUpdate(apartmentSubmitVo);if (isUpdate){//1.删除图片列表LambdaQueryWrapper<GraphInfo> graphQueryWrapper = new LambdaQueryWrapper<>();graphQueryWrapper.eq(GraphInfo::getItemType, ItemType.APARTMENT);graphQueryWrapper.eq(GraphInfo::getItemId,apartmentSubmitVo.getId());graphInfoService.remove(graphQueryWrapper);//2.删除配套列表LambdaQueryWrapper<ApartmentFacility> facilityQueryWrapper = new LambdaQueryWrapper<>();facilityQueryWrapper.eq(ApartmentFacility::getApartmentId,apartmentSubmitVo.getId());apartmentFacilityService.remove(facilityQueryWrapper);//3.删除标签列表LambdaQueryWrapper<ApartmentLabel> labelQueryWrapper = new LambdaQueryWrapper<>();labelQueryWrapper.eq(ApartmentLabel::getApartmentId,apartmentSubmitVo.getId());apartmentLabelService.remove(labelQueryWrapper);//4.删除杂费列表LambdaQueryWrapper<ApartmentFeeValue> feeQueryWrapper = new LambdaQueryWrapper<>();feeQueryWrapper.eq(ApartmentFeeValue::getApartmentId,apartmentSubmitVo.getId());apartmentFeeValueService.remove(feeQueryWrapper);}//1.插入图片列表List<GraphVo> graphVoList = apartmentSubmitVo.getGraphVoList();if (!CollectionUtils.isEmpty(graphVoList)){ArrayList<GraphInfo> graphInfoList = new ArrayList<>();for (GraphVo graphVo : graphVoList) {GraphInfo graphInfo = new GraphInfo();graphInfo.setItemType(ItemType.APARTMENT);graphInfo.setItemId(apartmentSubmitVo.getId());graphInfo.setName(graphVo.getName());graphInfo.setUrl(graphVo.getUrl());graphInfoList.add(graphInfo);}graphInfoService.saveBatch(graphInfoList);}//2.插入配套列表List<Long> facilityInfoIdList = apartmentSubmitVo.getFacilityInfoIds();if (!CollectionUtils.isEmpty(facilityInfoIdList)){ArrayList<ApartmentFacility> facilityList = new ArrayList<>();for (Long facilityId : facilityInfoIdList) {ApartmentFacility apartmentFacility = new ApartmentFacility();apartmentFacility.setApartmentId(apartmentSubmitVo.getId());apartmentFacility.setFacilityId(facilityId);facilityList.add(apartmentFacility);}apartmentFacilityService.saveBatch(facilityList);}//3.插入标签列表List<Long> labelIds = apartmentSubmitVo.getLabelIds();if (!CollectionUtils.isEmpty(labelIds)) {List<ApartmentLabel> apartmentLabelList = new ArrayList<>();for (Long labelId : labelIds) {ApartmentLabel apartmentLabel = new ApartmentLabel();apartmentLabel.setApartmentId(apartmentSubmitVo.getId());apartmentLabel.setLabelId(labelId);apartmentLabelList.add(apartmentLabel);}apartmentLabelService.saveBatch(apartmentLabelList);}//4.插入杂费列表List<Long> feeValueIds = apartmentSubmitVo.getFeeValueIds();if (!CollectionUtils.isEmpty(feeValueIds)) {ArrayList<ApartmentFeeValue> apartmentFeeValueList = new ArrayList<>();for (Long feeValueId : feeValueIds) {ApartmentFeeValue apartmentFeeValue = new ApartmentFeeValue();apartmentFeeValue.setApartmentId(apartmentSubmitVo.getId());apartmentFeeValue.setFeeValueId(feeValueId);apartmentFeeValueList.add(apartmentFeeValue);}apartmentFeeValueService.saveBatch(apartmentFeeValueList);} }
-
2. 根据条件分页查询公寓列表
-
查看请求和响应的数据结构
-
请求数据结构
-
current和size为分页相关参数,分别表示当前所处页面和每个页面的记录数。 -
ApartmentQueryVo为公寓的查询条件,详细结构如下:@Data @Schema(description = "公寓查询实体") public class ApartmentQueryVo {@Schema(description = "省份id")private Long provinceId;@Schema(description = "城市id")private Long cityId;@Schema(description = "区域id")private Long districtId; }
-
-
响应数据结构
单个公寓信息记录可查看
com.atguigu.lease.web.admin.vo.apartment.ApartmentItemVo,内容如下:@Data @Schema(description = "后台管理系统公寓列表实体") public class ApartmentItemVo extends ApartmentInfo {@Schema(description = "房间总数")private Long totalRoomCount;@Schema(description = "空闲房间数")private Long freeRoomCount;}
-
-
配置Mybatis-Plus分页插件
在common模块中的
com.atguigu.lease.common.mybatisplus.MybatisPlusConfiguration中增加如下内容:@Bean public MybatisPlusInterceptor mybatisPlusInterceptor() {MybatisPlusInterceptor interceptor = new MybatisPlusInterceptor();interceptor.addInnerInterceptor(new PaginationInnerInterceptor(DbType.MYSQL));return interceptor; } -
接口实现
-
编写Controller层逻辑
在
ApartmentController中增加如下内容:@Operation(summary = "根据条件分页查询公寓列表") @GetMapping("pageItem") public Result<IPage<ApartmentItemVo>> pageItem(@RequestParam long current, @RequestParam long size, ApartmentQueryVo queryVo) {IPage<ApartmentItemVo> page = new Page<>(current, size);IPage<ApartmentItemVo> list = service.pageApartmentItemByQuery(page, queryVo);return Result.ok(list); } -
编写Service层逻辑
-
在
ApartmentInfoService中增加如下内容IPage<ApartmentItemVo> pageApartmentItemByQuery(IPage<ApartmentItemVo> page, ApartmentQueryVo queryVo); -
在
ApartmentInfoServiceImpl中增加如下内容@Override public IPage<ApartmentItemVo> pageApartmentItemByQuery(IPage<ApartmentItemVo> page, ApartmentQueryVo queryVo) {return apartmentInfoMapper.pageApartmentItemByQuery(page, queryVo); }
-
-
编写Mapper层逻辑
-
在
ApartmentInfoMapper中增加如下内容IPage<ApartmentItemVo> pageApartmentItemByQuery(IPage<ApartmentItemVo> page, ApartmentQueryVo queryVo); -
在
ApartmentInfoMapper.xml中增加如下内容<select id="pageItem" resultType="com.atguigu.lease.web.admin.vo.apartment.ApartmentItemVo">select ai.id,ai.name,ai.introduction,ai.district_id,ai.district_name,ai.city_id,ai.city_name,ai.province_id,ai.province_name,ai.address_detail,ai.latitude,ai.longitude,ai.phone,ai.is_release,ifnull(tc.cnt,0) total_room_count,ifnull(tc.cnt,0) - ifnull(cc.cnt,0) free_room_countfrom (select id,name,introduction,district_id,district_name,city_id,city_name,province_id,province_name,address_detail,latitude,longitude,phone,is_releasefrom apartment_info<where>is_deleted=0<if test="queryVo.provinceId != null">and province_id=#{queryVo.provinceId}</if><if test="queryVo.cityId != null">and city_id=#{queryVo.cityId}</if><if test="queryVo.districtId != null">and district_id=#{queryVo.districtId}</if></where>) aileft join(select apartment_id,count(*) cntfrom room_infowhere is_deleted = 0and is_release = 1group by apartment_id) tcon ai.id = tc.apartment_idleft join(select apartment_id,count(*) cntfrom lease_agreementwhere is_deleted = 0and status in (2, 5)group by apartment_id) ccon ai.id = cc.apartment_id</select>
-
注意:
默认情况下Knife4j为该接口生成的接口文档如下图所示,其中的queryVo参数不方便调试
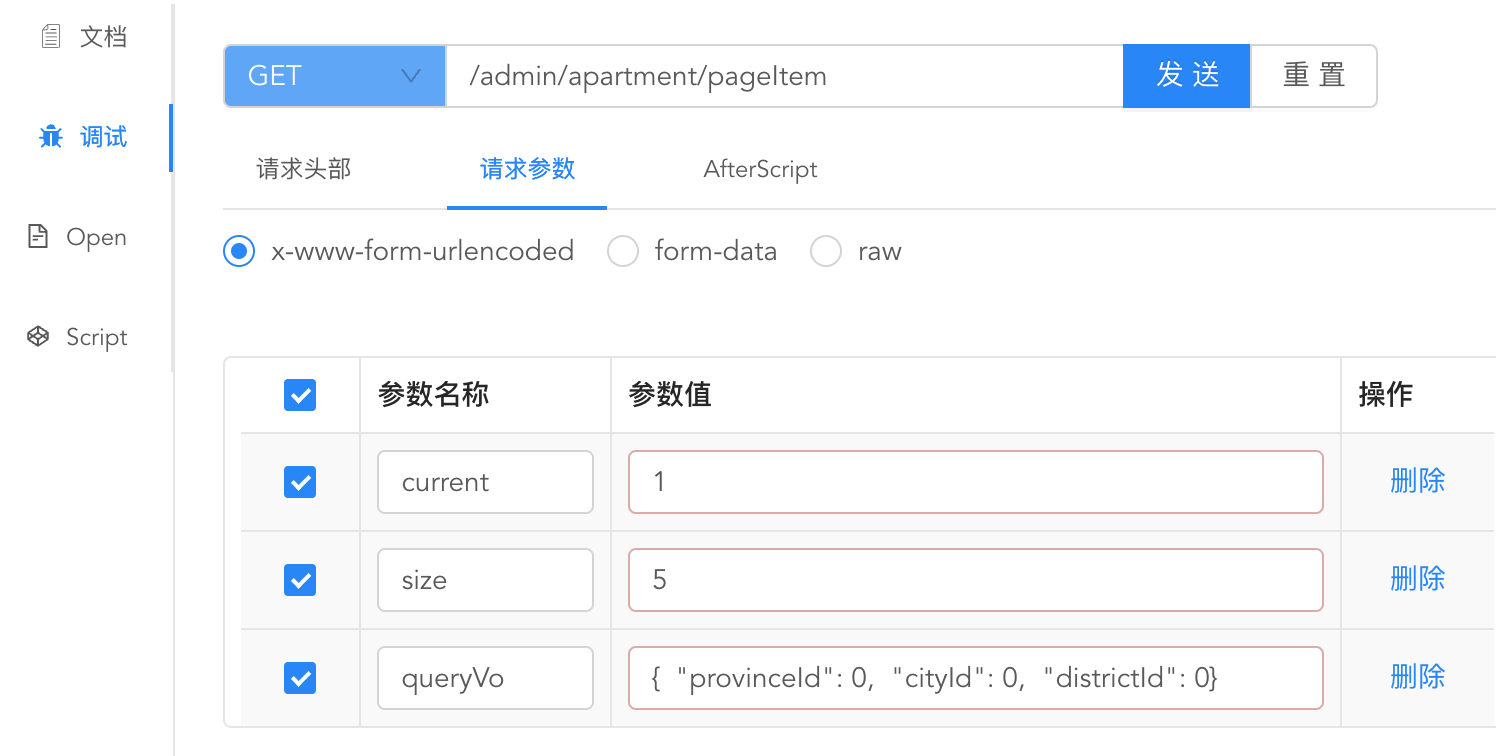
可在application.yml文件中增加如下配置,将queryVo做打平处理
springdoc:default-flat-param-object: true将
spring.default-flat-param-object参数设置为true后,效果如下。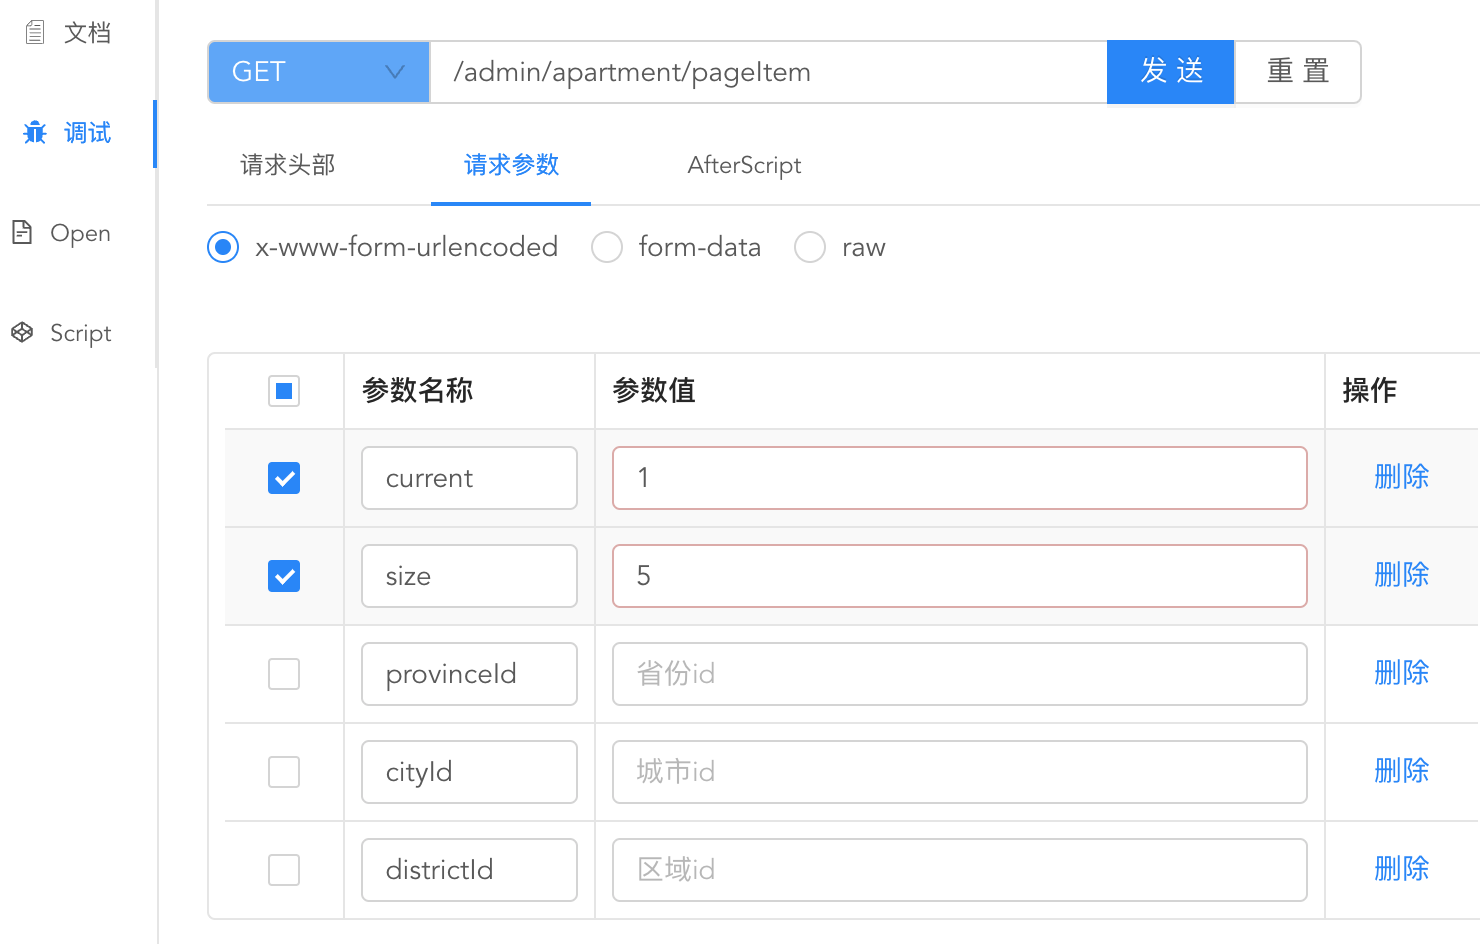
-
3. 根据ID获取公寓详细信息
-
查看响应数据结构
查看web-admin下的
com.atguigu.lease.web.admin.vo.apartment.ApartmentDetailVo,内容如下@Schema(description = "公寓信息") @Data public class ApartmentDetailVo extends ApartmentInfo {@Schema(description = "图片列表")private List<GraphVo> graphVoList;@Schema(description = "标签列表")private List<LabelInfo> labelInfoList;@Schema(description = "配套列表")private List<FacilityInfo> facilityInfoList;@Schema(description = "杂费列表")private List<FeeValueVo> feeValueVoList; } -
编写Controller层逻辑
在
ApartmentController中增加如下内容@Operation(summary = "根据ID获取公寓详细信息") @GetMapping("getDetailById") public Result<ApartmentDetailVo> getDetailById(@RequestParam Long id) {ApartmentDetailVo apartmentInfo = service.getApartmentDetailById(id);return Result.ok(apartmentInfo); } -
编写Service层逻辑
-
在
ApartmentInfoService中增加如下内容ApartmentDetailVo getApartmentDetailById(Long id); -
在
ApartmentInfoServiceImpl中增加如下内容@Override public ApartmentDetailVo getApartmentDetailById(Long id) {//1.查询ApartmentInfoApartmentInfo apartmentInfo = this.getById(id);if (apartmentInfo == null) {return null;}//2.查询GraphInfoList<GraphVo> graphVoList = graphInfoMapper.selectListByItemTypeAndId(ItemType.APARTMENT, id);//3.查询LabelInfoList<LabelInfo> labelInfoList = labelInfoMapper.selectListByApartmentId(id);//4.查询FacilityInfoList<FacilityInfo> facilityInfoList = facilityInfoMapper.selectListByApartmentId(id);//5.查询FeeValueList<FeeValueVo> feeValueVoList = feeValueMapper.selectListByApartmentId(id);ApartmentDetailVo adminApartmentDetailVo = new ApartmentDetailVo();BeanUtils.copyProperties(apartmentInfo, adminApartmentDetailVo);adminApartmentDetailVo.setGraphVoList(graphVoList);adminApartmentDetailVo.setLabelInfoList(labelInfoList);adminApartmentDetailVo.setFacilityInfoList(facilityInfoList);adminApartmentDetailVo.setFeeValueVoList(feeValueVoList);return adminApartmentDetailVo; }
-
-
编写Mapper层逻辑
-
编写公寓图片查询逻辑
-
在
GraphInfoMapper中增加如下内容List<GraphVo> selectListByItemTypeAndId(ItemType itemType, Long itemId); -
在
GraphInfoMapper.xml中增加如下内容<select id="selectListByItemTypeAndId" resultType="com.atguigu.lease.web.admin.vo.graph.GraphVo">selectname,urlfrom graph_infowhere is_deleted=0and item_type=#{itemType}and item_id=#{itemId} </select>
-
-
编写公寓标签查询逻辑
-
在
LabelInfoMapper中增加如下内容List<LabelInfo> selectListByApartmentId(Long id); -
在
LabelInfoMapper.xml中增加如下内容<select id="selectListByApartmentId" resultType="com.atguigu.lease.model.entity.LabelInfo">select id,type,namefrom label_infowhere is_deleted = 0and id in(select label_idfrom apartment_labelwhere is_deleted = 0and apartment_id = #{id}) </select>
-
-
编写公寓配套查询逻辑
-
在
FacilityInfoMapper中增加如下内容List<FacilityInfo> selectListByApartmentId(Long id); -
在
FacilityInfoMapper.xml中增加如下内容<select id="selectListByApartmentId" resultType="com.atguigu.lease.model.entity.FacilityInfo">select id,type,name,iconfrom facility_infowhere is_deleted = 0and id in(select facility_idfrom apartment_facilitywhere is_deleted = 0and apartment_id = #{id}) </select>
-
-
编写公寓杂费查询逻辑
-
在
FeeValueMapper中增加如下内容List<FeeValueVo> selectListByApartmentId(Long id); -
在
FeeValueMapper.xml中增加如下内容<select id="selectListByApartmentId" resultType="com.atguigu.lease.web.admin.vo.fee.FeeValueVo">SELECT fv.id,fv.name,fv.unit,fv.fee_key_id,fk.name AS fee_key_nameFROM fee_value fvJOIN fee_key fk ON fv.fee_key_id = fk.idWHERE fv.is_deleted = 0AND fk.is_deleted = 0and fv.id in (select fee_value_idfrom apartment_fee_valuewhere is_deleted = 0and apartment_id = #{id}) </select>
-
-
4. 根据ID删除公寓信息
-
编写Controller层逻辑
在
ApartmentController中增加如下内容@Operation(summary = "根据id删除公寓信息") @DeleteMapping("removeById") public Result removeById(@RequestParam Long id) {service.removeApartmentById(id);return Result.ok(); } -
编写Service层逻辑
-
在
ApartmentInfoService中增加如下内容void removeApartmentById(Long id); -
在
ApartmentInfoServiceImpl中增加如下内容@Override public void removeApartmentById(Long id) {super.removeById(id);//1.删除GraphInfoLambdaQueryWrapper<GraphInfo> graphQueryWrapper = new LambdaQueryWrapper<>();graphQueryWrapper.eq(GraphInfo::getItemType, ItemType.APARTMENT);graphQueryWrapper.eq(GraphInfo::getItemId, id);graphInfoService.remove(graphQueryWrapper);//2.删除ApartmentLabelLambdaQueryWrapper<ApartmentLabel> labelQueryWrapper = new LambdaQueryWrapper<>();labelQueryWrapper.eq(ApartmentLabel::getApartmentId, id);apartmentLabelService.remove(labelQueryWrapper);//3.删除ApartmentFacilityLambdaQueryWrapper<ApartmentFacility> facilityQueryWrapper = new LambdaQueryWrapper<>();facilityQueryWrapper.eq(ApartmentFacility::getApartmentId, id);apartmentFacilityService.remove(facilityQueryWrapper);//4.删除ApartmentFeeValueLambdaQueryWrapper<ApartmentFeeValue> feeQueryWrapper = new LambdaQueryWrapper<>();feeQueryWrapper.eq(ApartmentFeeValue::getApartmentId, id);apartmentFeeValueService.remove(feeQueryWrapper);}知识点:
由于公寓下会包含房间信息,因此在删除公寓时最好先判断一下该公寓下是否存在房间信息,若存在,则提醒用户先删除房间信息后再删除公寓信息,判断逻辑如下
LambdaQueryWrapper<RoomInfo> roomQueryWrapper = new LambdaQueryWrapper<>();
roomQueryWrapper.eq(RoomInfo::getApartmentId, id);
Long count = roomInfoMapper.selectCount(roomQueryWrapper);
if (count > 0) {//直接为前端返回如下响应:先删除房间信息再删除公寓信息
}
想要直接为前端返回响应,可利用前边配置的全局异常处理功能(此处直接抛出异常,全局异常处理器捕获到异常后,便会直接为前端返回响应结果)。
为灵活设置响应信息,可自定义异常类,如下
在common模块创建
com.atguigu.lease.common.exception.LeaseException类,内容如下:@Data public class LeaseException extends RuntimeException {//异常状态码private Integer code;/*** 通过状态码和错误消息创建异常对象* @param message* @param code*/public LeaseException(String message, Integer code) {super(message);this.code = code;}/*** 根据响应结果枚举对象创建异常对象* @param resultCodeEnum*/public LeaseException(ResultCodeEnum resultCodeEnum) {super(resultCodeEnum.getMessage());this.code = resultCodeEnum.getCode();}@Overridepublic String toString() {return "LeaseException{" +"code=" + code +", message=" + this.getMessage() +'}';} }在common模块的
com.atguigu.lease.common.exception.GlobalExceptionHandler类中,增加自定义异常类的处理逻辑@ExceptionHandler(LeaseException.class) @ResponseBody public Result error(LeaseException e){e.printStackTrace();return Result.fail(e.getCode(), e.getMessage()); }为Result新增一个构造方法,如下
public static <T> Result<T> fail(Integer code, String message) {Result<T> result = build(null);result.setCode(code);result.setMessage(message);return result; }removeApartmentById方法的最终实现如下@Override public void removeApartmentById(Long id) {LambdaQueryWrapper<RoomInfo> roomQueryWrapper = new LambdaQueryWrapper<>();roomQueryWrapper.eq(RoomInfo::getApartmentId, id);Long count = roomInfoMapper.selectCount(roomQueryWrapper);if (count > 0) {throw new LeaseException(ResultCodeEnum.ADMIN_APARTMENT_DELETE_ERROR);}//1.删除GraphInfoLambdaQueryWrapper<GraphInfo> graphQueryWrapper = new LambdaQueryWrapper<>();graphQueryWrapper.eq(GraphInfo::getItemType, ItemType.APARTMENT);graphQueryWrapper.eq(GraphInfo::getItemId, id);graphInfoService.remove(graphQueryWrapper);//2.删除ApartmentLabelLambdaQueryWrapper<ApartmentLabel> labelQueryWrapper = new LambdaQueryWrapper<>();labelQueryWrapper.eq(ApartmentLabel::getApartmentId, id);apartmentLabelService.remove(labelQueryWrapper);//3.删除ApartmentFacilityLambdaQueryWrapper<ApartmentFacility> facilityQueryWrapper = new LambdaQueryWrapper<>();facilityQueryWrapper.eq(ApartmentFacility::getApartmentId, id);apartmentFacilityService.remove(facilityQueryWrapper);//4.删除ApartmentFeeValueLambdaQueryWrapper<ApartmentFeeValue> feeQueryWrapper = new LambdaQueryWrapper<>();feeQueryWrapper.eq(ApartmentFeeValue::getApartmentId, id);apartmentFeeValueService.remove(feeQueryWrapper);//5.删除ApartmentInfosuper.removeById(id); }
-
5. 根据ID修改公寓发布状态
在ApartmentController中增加如下内容:
@Operation(summary = "根据id修改公寓发布状态")
@PostMapping("updateReleaseStatusById")
public Result updateReleaseStatusById(@RequestParam Long id, @RequestParam ReleaseStatus status) {LambdaUpdateWrapper<ApartmentInfo> updateWrapper = new LambdaUpdateWrapper<>();updateWrapper.eq(ApartmentInfo::getId, id);updateWrapper.set(ApartmentInfo::getIsRelease, status);service.update(updateWrapper);return Result.ok();
}
6. 根据区县ID查询公寓信息列表
在ApartmentController中增加如下内容:
@Operation(summary = "根据区县id查询公寓信息列表")
@GetMapping("listInfoByDistrictId")
public Result<List<ApartmentInfo>> listInfoByDistrictId(@RequestParam Long id) {LambdaQueryWrapper<ApartmentInfo> queryWrapper = new LambdaQueryWrapper<>();queryWrapper.eq(ApartmentInfo::getDistrictId, id);List<ApartmentInfo> list = service.list(queryWrapper);return Result.ok(list);
}
7.2.2.10 房间管理
房间管理共有六个接口,下面逐一实现
首先在RoomController中注入RoomInfoService,如下
@Tag(name = "房间信息管理")
@RestController
@RequestMapping("/admin/room")
public class RoomController {@Autowiredprivate RoomInfoService service;
}
1. 保存或更新房间信息
-
查看请求的数据结构
查看web-admin模块中的
com.atguigu.lease.web.admin.vo.room.RoomSubmitVo,内容如下@Data @Schema(description = "房间信息") public class RoomSubmitVo extends RoomInfo {@Schema(description = "图片列表")private List<GraphVo> graphVoList;@Schema(description = "属性信息列表")private List<Long> attrValueIds;@Schema(description = "配套信息列表")private List<Long> facilityInfoIds;@Schema(description = "标签信息列表")private List<Long> labelInfoIds;@Schema(description = "支付方式列表")private List<Long> paymentTypeIds;@Schema(description = "可选租期列表")private List<Long> leaseTermIds; } -
编写Controller层逻辑
在
RoomController中增加如下内容@Operation(summary = "保存或更新房间信息") @PostMapping("saveOrUpdate") public Result saveOrUpdate(@RequestBody RoomSubmitVo roomSubmitVo) {service.saveOrUpdateRoom(roomSubmitVo);return Result.ok(); } -
编写Service 层逻辑
在
RoomInfoService中增加如下内容void saveOrUpdateRoom(RoomSubmitVo roomSubmitVo);在
RoomInfoServiceImpl中增加如下内容@Override public void saveOrUpdateRoom(RoomSubmitVo roomSubmitVo) {boolean isUpdate = roomSubmitVo.getId() != null;super.saveOrUpdate(roomSubmitVo);//若为更新操作,则先删除与Room相关的各项信息列表if (isUpdate) {//1.删除原有graphInfoListLambdaQueryWrapper<GraphInfo> graphQueryWrapper = new LambdaQueryWrapper<>();graphQueryWrapper.eq(GraphInfo::getItemType, ItemType.ROOM);graphQueryWrapper.eq(GraphInfo::getItemId, roomSubmitVo.getId());graphInfoService.remove(graphQueryWrapper);//2.删除原有roomAttrValueListLambdaQueryWrapper<RoomAttrValue> attrQueryMapper = new LambdaQueryWrapper<>();attrQueryMapper.eq(RoomAttrValue::getRoomId, roomSubmitVo.getId());roomAttrValueService.remove(attrQueryMapper);//3.删除原有roomFacilityListLambdaQueryWrapper<RoomFacility> facilityQueryWrapper = new LambdaQueryWrapper<>();facilityQueryWrapper.eq(RoomFacility::getRoomId, roomSubmitVo.getId());roomFacilityService.remove(facilityQueryWrapper);//4.删除原有roomLabelListLambdaQueryWrapper<RoomLabel> labelQueryWrapper = new LambdaQueryWrapper<>();labelQueryWrapper.eq(RoomLabel::getRoomId, roomSubmitVo.getId());roomLabelService.remove(labelQueryWrapper);//5.删除原有paymentTypeListLambdaQueryWrapper<RoomPaymentType> paymentQueryWrapper = new LambdaQueryWrapper<>();paymentQueryWrapper.eq(RoomPaymentType::getRoomId, roomSubmitVo.getId());roomPaymentTypeService.remove(paymentQueryWrapper);//6.删除原有leaseTermListLambdaQueryWrapper<RoomLeaseTerm> termQueryWrapper = new LambdaQueryWrapper<>();termQueryWrapper.eq(RoomLeaseTerm::getRoomId, roomSubmitVo.getId());roomLeaseTermService.remove(termQueryWrapper);}//1.保存新的graphInfoListList<GraphVo> graphVoList = roomSubmitVo.getGraphVoList();if (!CollectionUtils.isEmpty(graphVoList)) {ArrayList<GraphInfo> graphInfoList = new ArrayList<>();for (GraphVo graphVo : graphVoList) {GraphInfo graphInfo = new GraphInfo();graphInfo.setItemType(ItemType.ROOM);graphInfo.setItemId(roomSubmitVo.getId());graphInfo.setName(graphVo.getName());graphInfo.setUrl(graphVo.getUrl());graphInfoList.add(graphInfo);}graphInfoService.saveBatch(graphInfoList);}//2.保存新的roomAttrValueListList<Long> attrValueIds = roomSubmitVo.getAttrValueIds();if (!CollectionUtils.isEmpty(attrValueIds)) {List<RoomAttrValue> roomAttrValueList = new ArrayList<>();for (Long attrValueId : attrValueIds) {RoomAttrValue roomAttrValue = RoomAttrValue.builder().roomId(roomSubmitVo.getId()).attrValueId(attrValueId).build();roomAttrValueList.add(roomAttrValue);}roomAttrValueService.saveBatch(roomAttrValueList);}//3.保存新的facilityInfoListList<Long> facilityInfoIds = roomSubmitVo.getFacilityInfoIds();if (!CollectionUtils.isEmpty(facilityInfoIds)) {List<RoomFacility> roomFacilityList = new ArrayList<>();for (Long facilityInfoId : facilityInfoIds) {RoomFacility roomFacility = RoomFacility.builder().roomId(roomSubmitVo.getId()).facilityId(facilityInfoId).build();roomFacilityList.add(roomFacility);}roomFacilityService.saveBatch(roomFacilityList);}//4.保存新的labelInfoListList<Long> labelInfoIds = roomSubmitVo.getLabelInfoIds();if (!CollectionUtils.isEmpty(labelInfoIds)) {ArrayList<RoomLabel> roomLabelList = new ArrayList<>();for (Long labelInfoId : labelInfoIds) {RoomLabel roomLabel = RoomLabel.builder().roomId(roomSubmitVo.getId()).labelId(labelInfoId).build();roomLabelList.add(roomLabel);}roomLabelService.saveBatch(roomLabelList);}//5.保存新的paymentTypeListList<Long> paymentTypeIds = roomSubmitVo.getPaymentTypeIds();if (!CollectionUtils.isEmpty(paymentTypeIds)) {ArrayList<RoomPaymentType> roomPaymentTypeList = new ArrayList<>();for (Long paymentTypeId : paymentTypeIds) {RoomPaymentType roomPaymentType = RoomPaymentType.builder().roomId(roomSubmitVo.getId()).paymentTypeId(paymentTypeId).build();roomPaymentTypeList.add(roomPaymentType);}roomPaymentTypeService.saveBatch(roomPaymentTypeList);}//6.保存新的leaseTermListList<Long> leaseTermIds = roomSubmitVo.getLeaseTermIds();if (!CollectionUtils.isEmpty(leaseTermIds)) {ArrayList<RoomLeaseTerm> roomLeaseTerms = new ArrayList<>();for (Long leaseTermId : leaseTermIds) {RoomLeaseTerm roomLeaseTerm = RoomLeaseTerm.builder().roomId(roomSubmitVo.getId()).leaseTermId(leaseTermId).build();roomLeaseTerms.add(roomLeaseTerm);}roomLeaseTermService.saveBatch(roomLeaseTerms);} }
2. 根据条件分页查询房间列表
-
查看请求和响应的数据结构
-
请求数据结构
-
current和size为分页相关参数,分别表示当前所处页面和每个页面的记录数。 -
RoomQueryVo为房间的查询条件,详细结构如下:@Schema(description = "房间查询实体") @Data public class RoomQueryVo {@Schema(description = "省份Id")private Long provinceId;@Schema(description = "城市Id")private Long cityId;@Schema(description = "区域Id")private Long districtId;@Schema(description = "公寓Id")private Long apartmentId; }
-
-
响应数据结构
单个房间信息记录可查看
com.atguigu.lease.web.admin.vo.room.RoomItemVo,内容如下:@Data @Schema(description = "房间信息") public class RoomItemVo extends RoomInfo {@Schema(description = "租约结束日期")private Date leaseEndDate;@Schema(description = "当前入住状态")private Boolean isCheckIn;@Schema(description = "所属公寓信息")private ApartmentInfo apartmentInfo; }
-
-
编写Controller层逻辑
在
RoomController中增加如下内容@Operation(summary = "根据条件分页查询房间列表") @GetMapping("pageItem") public Result<IPage<RoomItemVo>> pageItem(@RequestParam long current, @RequestParam long size, RoomQueryVo queryVo) {IPage<RoomItemVo> page = new Page<>(current, size);IPage<RoomItemVo> result = service.pageRoomItemByQuery(page, queryVo);return Result.ok(result); } -
编写Service 层逻辑
-
在
RoomInfoService中增加如下内容IPage<RoomItemVo> pageRoomItemByQuery(IPage<RoomItemVo> page, RoomQueryVo queryVo); -
在
RoomInfoServiceImpl中增加如下内容@Override public IPage<RoomItemVo> pageRoomItemByQuery(IPage<RoomItemVo> page, RoomQueryVo queryVo) {return roomInfoMapper.pageRoomItemByQuery(page, queryVo); }
-
-
编写Mapper层逻辑
-
在
RoomInfoMapper中增加如下内容IPage<RoomItemVo> pageRoomItemByQuery(IPage<RoomItemVo> page, RoomQueryVo queryVo); -
在
RoomInfoMapper.xml中增加如下内容<resultMap id="RoomItemVoMap" type="com.atguigu.lease.web.admin.vo.room.RoomItemVo" autoMapping="true"><id property="id" column="id"/><association property="apartmentInfo" javaType="com.atguigu.lease.model.entity.ApartmentInfo" autoMapping="true"><id property="id" column="apart_id"/><result property="isRelease" column="apart_is_release"/></association> </resultMap><select id="pageRoomItemByQuery" resultMap="RoomItemVoMap">select ri.id,ri.room_number,ri.rent,ri.apartment_id,ri.is_release,la.room_id is not null is_check_in,la.lease_end_date,ai.id apart_id,ai.name,ai.introduction,ai.district_id,ai.district_name,ai.city_id,ai.city_name,ai.province_id,ai.province_name,ai.address_detail,ai.latitude,ai.longitude,ai.phone,ai.is_release apart_is_releasefrom room_info rileft join lease_agreement laon ri.id = la.room_idand la.is_deleted = 0and la.status in (2,5)left join apartment_info aion ri.apartment_id = ai.idand ai.is_deleted = 0<where>ri.is_deleted = 0<if test="queryVo.provinceId != null">apart.province_id = #{queryVo.provinceId}</if><if test="queryVo.cityId != null">and apart.city_id = #{queryVo.cityId}</if><if test="queryVo.districtId != null">and apart.district_id = #{queryVo.districtId}</if><if test="queryVo.apartmentId != null">and apartment_id = #{queryVo.apartmentId}</if></where> </select>
-
3. 根据ID获取房间详细信息
-
查看响应数据结构
查看web-admin下的
com.atguigu.lease.web.admin.vo.room.RoomDetailVo,内容如下@Schema(description = "房间信息") @Data public class RoomDetailVo extends RoomInfo {@Schema(description = "所属公寓信息")private ApartmentInfo apartmentInfo;@Schema(description = "图片列表")private List<GraphVo> graphVoList;@Schema(description = "属性信息列表")private List<AttrValueVo> attrValueVoList;@Schema(description = "配套信息列表")private List<FacilityInfo> facilityInfoList;@Schema(description = "标签信息列表")private List<LabelInfo> labelInfoList;@Schema(description = "支付方式列表")private List<PaymentType> paymentTypeList;@Schema(description = "可选租期列表")private List<LeaseTerm> leaseTermList; } -
编写Controller层逻辑
在
RoomController中增加如下内容@Operation(summary = "根据id获取房间详细信息") @GetMapping("getDetailById") public Result<RoomDetailVo> getDetailById(@RequestParam Long id) {RoomDetailVo roomInfo = service.getRoomDetailById(id);return Result.ok(roomInfo); } -
编写Service 层逻辑
-
在
RoomInfoService中增加如下内容RoomDetailVo getRoomDetailById(Long id); -
在
RoomInfoServiceImpl中增加如下内容@Override public RoomDetailVo getRoomDetailById(Long id) {//1.查询RoomInfoRoomInfo roomInfo = roomInfoMapper.selectById(id);//2.查询所属公寓信息ApartmentInfo apartmentInfo = apartmentInfoMapper.selectById(roomInfo.getApartmentId());//3.查询graphInfoListList<GraphVo> graphVoList = graphInfoMapper.selectListByItemTypeAndId(ItemType.ROOM, id);//4.查询attrValueListList<AttrValueVo> attrvalueVoList = attrValueMapper.selectListByRoomId(id);//5.查询facilityInfoListList<FacilityInfo> facilityInfoList = facilityInfoMapper.selectListByRoomId(id);//6.查询labelInfoListList<LabelInfo> labelInfoList = labelInfoMapper.selectListByRoomId(id);//7.查询paymentTypeListList<PaymentType> paymentTypeList = paymentTypeMapper.selectListByRoomId(id);//8.查询leaseTermListList<LeaseTerm> leaseTermList = leaseTermMapper.selectListByRoomId(id);RoomDetailVo adminRoomDetailVo = new RoomDetailVo();BeanUtils.copyProperties(roomInfo, adminRoomDetailVo);adminRoomDetailVo.setApartmentInfo(apartmentInfo);adminRoomDetailVo.setGraphVoList(graphVoList);adminRoomDetailVo.setAttrValueVoList(attrvalueVoList);adminRoomDetailVo.setFacilityInfoList(facilityInfoList);adminRoomDetailVo.setLabelInfoList(labelInfoList);adminRoomDetailVo.setPaymentTypeList(paymentTypeList);adminRoomDetailVo.setLeaseTermList(leaseTermList);return adminRoomDetailVo; }
-
-
编写Mapper层逻辑
-
编写房间属性查询逻辑
-
在
AttrValueMapper中增加如下内容List<AttrValueVo> selectListByRoomId(Long id); -
在
AttrValueMapper.xml中增加如下内容<select id="selectListByRoomId" resultType="com.atguigu.lease.web.admin.vo.attr.AttrValueVo">select v.id,v.name,v.attr_key_id,k.name attr_key_namefrom attr_value vjoin attr_key k on v.attr_key_id = k.idwhere v.is_deleted = 0and k.is_deleted = 0and v.id in (select attr_value_idfrom room_attr_valuewhere is_deleted = 0and room_id = #{id}) </select>
-
-
编写房间配套查询逻辑
-
在
FacilityInfoMapper中增加如下内容List<FacilityInfo> selectListByRoomId(Long id); -
在
FacilityInfoMapper.xml中增加如下内容<select id="selectListByRoomId" resultType="com.atguigu.lease.model.entity.FacilityInfo">select id,type,name,iconfrom facility_infowhere is_deleted = 0and id in(select facility_idfrom room_facilitywhere is_deleted = 0and room_id = #{id}) </select>
-
-
编写房间标签查询逻辑
-
在
LabelInfoMapper中增加如下内容List<LabelInfo> selectListByRoomId(Long id); -
在
LabelInfoMapper.xml中增加如下内容<select id="selectListByRoomId" resultType="com.atguigu.lease.model.entity.LabelInfo">select id,type,namefrom label_infowhere is_deleted = 0and id in(select label_idfrom room_labelwhere is_deleted = 0and room_id = #{id}) </select>
-
-
编写房间可选支付方式查询逻辑
-
在
PaymentTypeMapper中增加如下内容List<PaymentType> selectListByRoomId(Long id); -
在
PaymentTypeMapper.xml中增加如下内容<select id="selectListByRoomId" resultType="com.atguigu.lease.model.entity.PaymentType">select id,name,pay_month_count,additional_infofrom payment_typewhere is_deleted = 0and id in(select payment_type_idfrom room_payment_typewhere is_deleted = 0and room_id = #{id}) </select>
-
-
编写房间可选租期查询逻辑
-
在
Mapper中增加如下内容List<LeaseTerm> selectListByRoomId(Long id); -
在
Mapper.xml中增加如下内容<select id="selectListByRoomId" resultType="com.atguigu.lease.model.entity.LeaseTerm">select id,month_count,unitfrom lease_termwhere is_deleted = 0and id in (select lease_term_idfrom room_lease_termwhere is_deleted = 0and room_id = #{id}) </select>
-
-
4. 根据ID删除房间信息
-
编写Controller层逻辑
在
RoomController中增加如下内容@Operation(summary = "根据id删除房间信息") @DeleteMapping("removeById") public Result removeById(@RequestParam Long id) {service.removeRoomById(id);return Result.ok(); } -
编写Service 层逻辑
-
在
RoomInfoService中增加如下内容void removeRoomById(Long id); -
在
RoomInfoServiceImpl中增加如下内容@Override public void removeRoomById(Long id) {//1.删除RoomInfosuper.removeById(id);//2.删除graphInfoListLambdaQueryWrapper<GraphInfo> graphQueryWrapper = new LambdaQueryWrapper<>();graphQueryWrapper.eq(GraphInfo::getItemType, ItemType.ROOM);graphQueryWrapper.eq(GraphInfo::getItemId, id);graphInfoService.remove(graphQueryWrapper);//3.删除attrValueListLambdaQueryWrapper<RoomAttrValue> attrQueryWrapper = new LambdaQueryWrapper<>();attrQueryWrapper.eq(RoomAttrValue::getRoomId, id);roomAttrValueService.remove(attrQueryWrapper);//4.删除facilityInfoListLambdaQueryWrapper<RoomFacility> facilityQueryWrapper = new LambdaQueryWrapper<>();facilityQueryWrapper.eq(RoomFacility::getRoomId, id);roomFacilityService.remove(facilityQueryWrapper);//5.删除labelInfoListLambdaQueryWrapper<RoomLabel> labelQueryWrapper = new LambdaQueryWrapper<>();labelQueryWrapper.eq(RoomLabel::getRoomId, id);roomLabelService.remove(labelQueryWrapper);//6.删除paymentTypeListLambdaQueryWrapper<RoomPaymentType> paymentQueryWrapper = new LambdaQueryWrapper<>();paymentQueryWrapper.eq(RoomPaymentType::getRoomId, id);roomPaymentTypeService.remove(paymentQueryWrapper);//7.删除leaseTermListLambdaQueryWrapper<RoomLeaseTerm> termQueryWrapper = new LambdaQueryWrapper<>();termQueryWrapper.eq(RoomLeaseTerm::getRoomId, id);roomLeaseTermService.remove(termQueryWrapper); }
-
5. 根据id修改房间发布状态
在RoomController中增加如下内容
@Operation(summary = "根据id修改房间发布状态")
@PostMapping("updateReleaseStatusById")
public Result updateReleaseStatusById(Long id, ReleaseStatus status) {LambdaUpdateWrapper<RoomInfo> updateWrapper = new LambdaUpdateWrapper<>();updateWrapper.eq(RoomInfo::getId, id);updateWrapper.set(RoomInfo::getIsRelease, status);service.update(updateWrapper);return Result.ok();
}
6. 根据公寓ID查询房间列表
在RoomController中增加如下内容
@GetMapping("listBasicByApartmentId")
@Operation(summary = "根据公寓id查询房间列表")
public Result<List<RoomInfo>> listBasicByApartmentId(Long id) {LambdaQueryWrapper<RoomInfo> queryWrapper = new LambdaQueryWrapper<>();queryWrapper.eq(RoomInfo::getApartmentId, id);queryWrapper.eq(RoomInfo::getIsRelease, ReleaseStatus.RELEASED);List<RoomInfo> roomInfoList = service.list(queryWrapper);return Result.ok(roomInfoList);
}
7.2.3 租赁管理
7.2.3.1 看房预约管理
看房预约管理共有两个接口,分别是根据条件分页查询预约信息、根据ID更新预约状态,下面逐一实现
首先在ViewAppointmentController中注入ViewAppointmentService,如下
@Tag(name = "预约看房管理")
@RequestMapping("/admin/appointment")
@RestController
public class ViewAppointmentController {@Autowiredprivate ViewAppointmentService service;
}
1. 根据条件分页查询预约信息
-
查看请求和响应的数据结构
-
请求数据结构
-
current和size为分页相关参数,分别表示当前所处页面和每个页面的记录数。 -
AppointmentQueryVo为看房预约的查询条件,详细结构如下:@Data @Schema(description = "预约看房查询实体") public class AppointmentQueryVo {@Schema(description="预约公寓所在省份")private Long provinceId;@Schema(description="预约公寓所在城市")private Long cityId;@Schema(description="预约公寓所在区")private Long districtId;@Schema(description="预约公寓所在公寓")private Long apartmentId;@Schema(description="预约用户姓名")private String name;@Schema(description="预约用户手机号码")private String phone; }
-
-
响应数据结构
单个看房预约信息的结构可查看web-admin模块下的
com.atguigu.lease.web.admin.vo.appointment.AppointmentVo,内容如下:@Data @Schema(description = "预约看房信息") public class AppointmentVo extends ViewAppointment {@Schema(description = "预约公寓信息")private ApartmentInfo apartmentInfo; }
-
-
编写Controller层逻辑
在
ViewAppointmentController中增加如下内容@Operation(summary = "分页查询预约信息") @GetMapping("page") public Result<IPage<AppointmentVo>> page(@RequestParam long current, @RequestParam long size, AppointmentQueryVo queryVo) {IPage<AppointmentVo> page = new Page<>(current, size);IPage<AppointmentVo> list = service.pageAppointmentByQuery(page, queryVo);return Result.ok(list); } -
编写Service层逻辑
-
在
ViewAppointmentService中增加如下内容IPage<AppointmentVo> pageAppointmentByQuery(IPage<AppointmentVo> page, AppointmentQueryVo queryVo); -
在
ViewAppointmentServiceImpl中增加如下内容@Override public IPage<AppointmentVo> pageAppointmentByQuery(IPage<AppointmentVo> page, AppointmentQueryVo queryVo) {return viewAppointmentMapper.pageAppointmentByQuery(page, queryVo); }
-
-
编写Mapper层逻辑
-
在
ViewAppointmentMapper中增加如下内容IPage<AppointmentVo> pageAppointmentByQuery(IPage<AppointmentVo> page, AppointmentQueryVo queryVo); -
在
ViewAppointmentMapper.xml中增加如下内容<resultMap id="AppointmentVoMap" type="com.atguigu.lease.web.admin.vo.appointment.AppointmentVo" autoMapping="true"><id property="id" column="id"/><association property="apartmentInfo" javaType="com.atguigu.lease.model.entity.ApartmentInfo" autoMapping="true"><id property="id" column="apartment_id"/><result property="name" column="apartment_name"/></association> </resultMap><select id="pageAppointmentByQuery" resultMap="AppointmentVoMap">select va.id,va.user_id,va.name,va.phone,va.appointment_time,va.additional_info,va.appointment_status,ai.id apartment_id,ai.name apartment_name,ai.district_id,ai.district_name,ai.city_id,ai.city_name,ai.province_id,ai.province_namefrom view_appointment valeft joinapartment_info aion va.apartment_id = ai.id and ai.is_deleted=0<where>va.is_deleted = 0<if test="queryVo.provinceId != null">and ai.province_id = #{queryVo.provinceId}</if><if test="queryVo.cityId != null">and ai.city_id = #{queryVo.cityId}</if><if test="queryVo.districtId != null">and ai.district_id = #{queryVo.districtId}</if><if test="queryVo.apartmentId != null">and va.apartment_id = #{queryVo.apartmentId}</if><if test="queryVo.name != null and queryVo.name != ''">and va.name like concat('%',#{queryVo.name},'%')</if><if test="queryVo.phone != null and queryVo.phone != ''">and va.phone like concat('%',#{queryVo.phone},'%')</if></where> </select>
知识点:
ViewAppointment实体类中的appointmentTime字段为Date类型,Date类型的字段在序列化成JSON字符串时,需要考虑两个点,分别是格式和时区。本项目使用JSON序列化框架为Jackson,具体配置如下-
格式
格式可按照字段单独配置,也可全局配置,下面分别介绍
-
单独配置
在指定字段增加
@JsonFormat注解,如下@JsonFormat(pattern = "yyyy-MM-dd HH:mm:ss") private Date appointmentTime; -
全局配置
在
application.yml中增加如下内容spring:jackson:date-format: yyyy-MM-dd HH:mm:ss
-
-
时区
时区同样可按照字段单独配置,也可全局配置,下面分别介绍
-
单独配置
在指定字段增加
@JsonFormat注解,如下@JsonFormat(timezone = "GMT+8") private Date appointmentTime; -
全局配置
spring:jackson:time-zone: GMT+8
-
推荐格式按照字段单独配置,时区全局配置。
-
2. 根据ID更新预约状态
在ViewAppointmentController中增加如下内容
@Operation(summary = "根据id更新预约状态")
@PostMapping("updateStatusById")
public Result updateStatusById(@RequestParam Long id, @RequestParam AppointmentStatus status) {LambdaUpdateWrapper<ViewAppointment> updateWrapper = new LambdaUpdateWrapper<>();updateWrapper.eq(ViewAppointment::getId, id);updateWrapper.set(ViewAppointment::getAppointmentStatus, status);service.update(updateWrapper);return Result.ok();
}
7.2.3.2 租约管理
租约管理共有五个接口需要实现,除此之外,还需实现一个定时任务,用于检查租约是否到期以及修改到期状态。下面逐一实现
首先在LeaseAgreementController中注入LeaseAgreementService,如下
@Tag(name = "租约管理")
@RestController
@RequestMapping("/admin/agreement")
public class LeaseAgreementController {@Autowiredprivate LeaseAgreementService service;
}
1. 保存获更新租约信息
在LeaseAgreementController中增加如下内容
@Operation(summary = "保存或修改租约信息")
@PostMapping("saveOrUpdate")
public Result saveOrUpdate(@RequestBody LeaseAgreement leaseAgreement) {service.saveOrUpdate(leaseAgreement);return Result.ok();
}
2. 根据条件分页查询租约列表
-
查看请求和响应的数据结构
-
请求数据结构
-
current和size为分页相关参数,分别表示当前所处页面和每个页面的记录数。 -
AgreementQueryVo为公寓的查询条件,详细结构如下:@Data @Schema(description = "租约查询实体") public class AgreementQueryVo {@Schema(description = "公寓所处省份id")private Long provinceId;@Schema(description = "公寓所处城市id")private Long cityId;@Schema(description = "公寓所处区域id")private Long districtId;@Schema(description = "公寓id")private Long apartmentId;@Schema(description = "房间号")private String roomNumber;@Schema(description = "用户姓名")private String name;@Schema(description = "用户手机号码")private String phone; }
-
-
响应数据结构
单个租约信息的结构可查看
com.atguigu.lease.web.admin.vo.agreement.AgreementVo,内容如下:@Data @Schema(description = "租约信息") public class AgreementVo extends LeaseAgreement {@Schema(description = "签约公寓信息")private ApartmentInfo apartmentInfo;@Schema(description = "签约房间信息")private RoomInfo roomInfo;@Schema(description = "支付方式")private PaymentType paymentType;@Schema(description = "租期")private LeaseTerm leaseTerm; }
-
-
编写Controller层逻辑
在
LeaseAgreementController中增加如下内容@Operation(summary = "根据条件分页查询租约列表") @GetMapping("page") public Result<IPage<AgreementVo>> page(@RequestParam long current, @RequestParam long size, AgreementQueryVo queryVo) {IPage<AgreementVo> page = new Page<>(current, size);IPage<AgreementVo> list = service.pageAgreementByQuery(page, queryVo);return Result.ok(list); } -
编写Service层逻辑
-
在
LeaseAgreementService中增加如下内容IPage<AgreementVo> pageAgreementByQuery(IPage<AgreementVo> page, AgreementQueryVo queryVo); -
在
LeaseAgreementServiceImpl中增加如下内容@Override public IPage<AgreementVo> pageAgreementByQuery(IPage<AgreementVo> page, AgreementQueryVo queryVo) {return leaseAgreementMapper.pageAgreementByQuery(page, queryVo); }
-
-
编写Mapper层逻辑
-
在
LeaseAgreementMapper中增加如下内容IPage<AgreementVo> pageAgreementByQuery(IPage<AgreementVo> page, AgreementQueryVo queryVo); -
在
LeaseAgreementMapper.xml中增加如下内容<resultMap id="agreementVoMap" type="com.atguigu.lease.web.admin.vo.agreement.AgreementVo" autoMapping="true"><id property="id" column="id"/><association property="apartmentInfo" javaType="com.atguigu.lease.model.entity.ApartmentInfo" autoMapping="true"><id property="id" column="apartment_id"/><result property="name" column="apartment_name"/></association><association property="roomInfo" javaType="com.atguigu.lease.model.entity.RoomInfo" autoMapping="true"><id property="id" column="room_id"/></association><association property="paymentType" javaType="com.atguigu.lease.model.entity.PaymentType" autoMapping="true"><id property="id" column="payment_type_id"/><result property="name" column="payment_type_name"/></association><association property="leaseTerm" javaType="com.atguigu.lease.model.entity.LeaseTerm" autoMapping="true"><id property="id" column="lease_term_id"/></association> </resultMap><select id="pageAgreementByQuery" resultMap="agreementVoMap">select la.id,la.phone,la.name,la.identification_number,la.lease_start_date,la.lease_end_date,la.rent,la.deposit,la.status,la.source_type,la.additional_info,ai.id apartment_id,ai.name apartment_name,ai.district_id,ai.district_name,ai.city_id,ai.city_name,ai.province_id,ai.province_name,ri.id room_id,ri.room_number,pt.id payment_type_id,pt.name payment_type_name,pt.pay_month_count,lt.id lease_term_id,lt.month_count,lt.unitfrom lease_agreement laleft joinapartment_info aion la.apartment_id = ai.id and ai.is_deleted=0left joinroom_info rion la.room_id = ri.id and ri.is_deleted=0left joinpayment_type pton la.payment_type_id = pt.id and pt.is_deleted=0left joinlease_term lton la.lease_term_id = lt.id and lt.is_deleted=0<where>la.is_deleted = 0<if test="queryVo.provinceId != null">and ai.province_id = #{queryVo.provinceId}</if><if test="queryVo.cityId != null">and ai.city_id = #{queryVo.cityId}</if><if test="queryVo.districtId != null">and ai.district_id = #{queryVo.districtId}</if><if test="queryVo.apartmentId != null">and la.apartment_id = #{queryVo.apartmentId}</if><if test="queryVo.roomNumber != null and queryVo.roomNumber != ''">and ri.room_number like concat('%',#{queryVo.roomNumber},'%')</if><if test="queryVo.name != null and queryVo.name != ''">and la.name like concat('%',#{queryVo.name},'%')</if><if test="queryVo.phone != null and queryVo.phone != ''">and la.phone like concat('%',#{queryVo.phone},'%')</if></where> </select>
-
3. 根据ID查询租约信息
-
编写Controller层逻辑
在
LeaseAgreementController中增加如下内容@Operation(summary = "根据id查询租约信息") @GetMapping(name = "getById") public Result<AgreementVo> getById(@RequestParam Long id) {AgreementVo apartment = service.getAgreementById(id);return Result.ok(apartment); } -
编写Service层逻辑
-
在
LeaseAgreementService中增加如下内容AgreementVo getAgreementById(Long id); -
在
LeaseAgreementServiceImpl中增加如下内容@Override public AgreementVo getAgreementById(Long id) {//1.查询租约信息LeaseAgreement leaseAgreement = leaseAgreementMapper.selectById(id);//2.查询公寓信息ApartmentInfo apartmentInfo = apartmentInfoMapper.selectById(leaseAgreement.getApartmentId());//3.查询房间信息RoomInfo roomInfo = roomInfoMapper.selectById(leaseAgreement.getRoomId());//4.查询支付方式PaymentType paymentType = paymentTypeMapper.selectById(leaseAgreement.getPaymentTypeId());//5.查询租期LeaseTerm leaseTerm = leaseTermMapper.selectById(leaseAgreement.getLeaseTermId());AgreementVo adminAgreementVo = new AgreementVo();BeanUtils.copyProperties(leaseAgreement, adminAgreementVo);adminAgreementVo.setApartmentInfo(apartmentInfo);adminAgreementVo.setRoomInfo(roomInfo);adminAgreementVo.setPaymentType(paymentType);adminAgreementVo.setLeaseTerm(leaseTerm);return adminAgreementVo; }
-
4. 根据ID删除租约信息
在LeaseAgreementController中增加如下内容
@Operation(summary = "根据id删除租约信息")
@DeleteMapping("removeById")
public Result removeById(@RequestParam Long id) {service.removeById(id);return Result.ok();
}
5. 根据ID更新租约状态
后台管理系统需要多个修改租约状态的接口,例如修改租约状态为已取消、修改租约状态为已退租等等。为省去重复编码,此处将多个接口合并为一个如下,注意,在生产中应避免这样的写法。
在LeaseAgreementController中增加如下内容
@Operation(summary = "根据id更新租约状态")
@PostMapping("updateStatusById")
public Result updateStatusById(@RequestParam Long id, @RequestParam LeaseStatus status) {LambdaUpdateWrapper<LeaseAgreement> updateWrapper = new LambdaUpdateWrapper<>();updateWrapper.eq(LeaseAgreement::getId, id);updateWrapper.set(LeaseAgreement::getStatus, status);service.update(updateWrapper);return Result.ok();
}
6. 定时检查租约状态
本节内容是通过定时任务定时检查租约是否到期。SpringBoot内置了定时任务,具体实现如下。
-
启用Spring Boot定时任务
在SpringBoot启动类上增加
@EnableScheduling注解,如下@SpringBootApplication @EnableScheduling public class AdminWebApplication {public static void main(String[] args) {SpringApplication.run(AdminWebApplication.class, args);} } -
编写定时逻辑
在web-admin模块下创建
com.atguigu.lease.web.admin.schedule.ScheduledTasks类,内容如下@Component public class ScheduledTasks {@Autowiredprivate LeaseAgreementService leaseAgreementService;@Scheduled(cron = "0 0 0 * * *")public void checkLeaseStatus() {LambdaUpdateWrapper<LeaseAgreement> updateWrapper = new LambdaUpdateWrapper<>();Date now = new Date();updateWrapper.le(LeaseAgreement::getLeaseEndDate, now);updateWrapper.eq(LeaseAgreement::getStatus, LeaseStatus.SIGNED);updateWrapper.in(LeaseAgreement::getStatus, LeaseStatus.SIGNED, LeaseStatus.WITHDRAWING);leaseAgreementService.update(updateWrapper);} }知识点:
SpringBoot中的cron表达式语法如下
┌───────────── second (0-59)│ ┌───────────── minute (0 - 59)│ │ ┌───────────── hour (0 - 23)│ │ │ ┌───────────── day of the month (1 - 31)│ │ │ │ ┌───────────── month (1 - 12) (or JAN-DEC)│ │ │ │ │ ┌───────────── day of the week (0 - 7)│ │ │ │ │ │ (0 or 7 is Sunday, or MON-SUN)│ │ │ │ │ │* * * * * *
7.2.4 用户管理
用户管理共包含两个接口,分别是根据条件分页查询用户列表和根据ID更新用户状态,下面逐一实现
首先在UserInfoController中注入UserInfoService,如下
@Tag(name = "用户信息管理")
@RestController
@RequestMapping("/admin/user")
public class UserInfoController {@Autowiredprivate UserInfoService service;
}
1. 根据条件分页查询用户列表
-
查看请求的数据结构
-
current和size为分页相关参数,分别表示当前所处页面和每个页面的记录数。 -
UserInfoQueryVo为用户的查询条件,详细结构如下:@Schema(description = "用户信息查询实体") @Data public class UserInfoQueryVo {@Schema(description = "用户手机号码")private String phone;@Schema(description = "用户账号状态")private BaseStatus status; }
-
-
编写Controller层逻辑
在
UserInfoController中增加如下内容@Operation(summary = "分页查询用户信息") @GetMapping("page") public Result<IPage<UserInfo>> pageUserInfo(@RequestParam long current, @RequestParam long size, UserInfoQueryVo queryVo) {IPage<UserInfo> page = new Page<>(current, size);LambdaQueryWrapper<UserInfo> queryWrapper = new LambdaQueryWrapper<>();queryWrapper.like(queryVo.getPhone() != null, UserInfo::getPhone, queryVo.getPhone());queryWrapper.eq(queryVo.getStatus() != null, UserInfo::getStatus, queryVo.getStatus());IPage<UserInfo> list = service.page(page, queryWrapper);return Result.ok(list); }知识点:
password字段属于敏感信息,因此在查询时应过滤掉,可在UserInfo实体的password字段的@TableField注解中增加一个参数select=false来实现。
2. 根据ID更新用户状态
在UserInfoController中增加如下内容
@Operation(summary = "根据用户id更新账号状态")
@PostMapping("updateStatusById")
public Result updateStatusById(@RequestParam Long id, @RequestParam BaseStatus status) {LambdaUpdateWrapper<UserInfo> updateWrapper = new LambdaUpdateWrapper<>();updateWrapper.eq(UserInfo::getId, id);updateWrapper.set(UserInfo::getStatus, status);service.update(updateWrapper);return Result.ok();
}
7.2.5 系统管理
7.2.5.1 后台用户岗位管理
后台用户岗位管理共有六个接口,下面逐一实现
首先在SystemPostController中注入SystemPostService,如下
@RestController
@Tag(name = "后台用户岗位管理")
@RequestMapping("/admin/system/post")
public class SystemPostController {@Autowiredprivate SystemPostService service;
}
1. 分页查询岗位信息
在SystemPostController中增加如下内容
@Operation(summary = "分页获取岗位信息")
@GetMapping("page")
private Result<IPage<SystemPost>> page(@RequestParam long current, @RequestParam long size) {IPage<SystemPost> page = new Page<>(current, size);IPage<SystemPost> systemPostPage = service.page(page);return Result.ok(systemPostPage);
}
2. 保存或更新岗位信息
在SystemPostController中增加如下内容
@Operation(summary = "保存或更新岗位信息")
@PostMapping("saveOrUpdate")
public Result saveOrUpdate(@RequestBody SystemPost systemPost) {service.saveOrUpdate(systemPost);return Result.ok();
}
3. 根据ID删除岗位信息
在SystemPostController中增加如下内容
@DeleteMapping("deleteById")
@Operation(summary = "根据id删除岗位")
public Result removeById(@RequestParam Long id) {service.removeById(id);return Result.ok();
}
4. 获取全部岗位列表
在SystemPostController增加入下内容
@Operation(summary = "获取全部岗位列表")
@GetMapping("list")
public Result<List<SystemPost>> list() {List<SystemPost> list = service.list();return Result.ok(list);
}
5. 根据ID获取岗位信息
在SystemPostController中增加如下内容
@GetMapping("getById")
@Operation(summary = "根据id获取岗位信息")
public Result<SystemPost> getById(@RequestParam Long id) {SystemPost systemPost = service.getById(id);return Result.ok(systemPost);
}
6. 根据ID修改岗位状态
在SystemPostController中增加如下内容
@Operation(summary = "根据岗位id修改状态")
@PostMapping("updateStatusByPostId")
public Result updateStatusByPostId(@RequestParam Long id, @RequestParam BaseStatus status) {LambdaUpdateWrapper<SystemPost> updateWrapper = new LambdaUpdateWrapper<>();updateWrapper.eq(SystemPost::getId, id);updateWrapper.set(SystemPost::getStatus, status);service.update(updateWrapper);return Result.ok();
}
7.2.5.2 后台用户信息管理
后台用户信息管理共有六个接口,下面逐一实现
首先在SystemUserController中注入SystemUserService,如下
@Tag(name = "后台用户信息管理")
@RestController
@RequestMapping("/admin/system/user")
public class SystemUserController {@AutowiredSystemUserService service;
}
1. 根据条件分页查询后台用户列表
-
查看请求和响应的数据结构
-
请求的数据结构
-
current和size为分页相关参数,分别表示当前所处页面和每个页面的记录数。 -
SystemUserQueryVo为房间的查询条件,详细结构如下:@Data @Schema(description = "员工查询实体") public class SystemUserQueryVo {@Schema(description= "员工姓名")private String name;@Schema(description= "手机号码")private String phone; }
-
-
响应的数据结构
单个系统用户信息的结构可查看web-admin模块下的
com.atguigu.lease.web.admin.vo.system.user.SystemUserItemVo,具体内容如下:@Data @Schema(description = "后台管理系统用户基本信息实体") public class SystemUserItemVo extends SystemUser {@Schema(description = "岗位名称")@TableField(value = "post_name")private String postName; }
-
-
编写Controller层逻辑
在
SystemUserController中增加如下内容@Operation(summary = "根据条件分页查询后台用户列表") @GetMapping("page") public Result<IPage<SystemUserItemVo>> page(@RequestParam long current, @RequestParam long size, SystemUserQueryVo queryVo) {IPage<SystemUser> page = new Page<>(current, size);IPage<SystemUserItemVo> systemUserPage = service.pageSystemUserByQuery(page, queryVo);return Result.ok(systemUserPage); } -
编写Service层逻辑
-
在
SystemUserService中增加如下内容IPage<SystemUserItemVo> pageSystemUserByQuery(IPage<SystemUser> page, SystemUserQueryVo queryVo); -
在
SystemUserServiceImpl中增加如下内容@Override public IPage<SystemUserItemVo> pageSystemUserByQuery(IPage<SystemUser> page, SystemUserQueryVo queryVo) {return systemUserMapper.pageSystemUserByQuery(page, queryVo); }
-
-
编写Mapper层逻辑
-
在
SystemUserMapper中增加如下内容IPage<SystemUserItemVo> pageSystemUserByQuery(IPage<SystemUser> page, SystemUserQueryVo queryVo); -
在
SystemUserMapper.xml中增加如下内容<select id="pageSystemUserByQuery"resultType="com.atguigu.lease.web.admin.vo.system.user.SystemUserItemVo">select su.id,username,su.name,type,phone,avatar_url,additional_info,post_id,su.status,sp.name post_namefrom system_user suleft join system_post sp on su.post_id = sp.id and sp.is_deleted = 0<where>su.is_deleted = 0<if test="queryVo.name != null and queryVo.name != ''">and su.name like concat('%',#{queryVo.name},'%')</if><if test="queryVo.phone !=null and queryVo.phone != ''">and su.phone like concat('%',#{queryVo.phone},'%')</if></where> </select>知识点
password字段不要查询。
-
2. 根据ID查询后台用户信息
-
编写Controller层逻辑
在
SystemUserController中增加如下内容@Operation(summary = "根据ID查询后台用户信息") @GetMapping("getById") public Result<SystemUserItemVo> getById(@RequestParam Long id) {SystemUserItemVo systemUser = service.getSystemUserById(id);return Result.ok(systemUser); } -
编写Service层逻辑
-
在
SystemUserServcie中增加如下内容SystemUserItemVo getSystemUserById(Long id); -
在
SystemUserServcieImpl中增加如下内容@Override public SystemUserItemVo getSystemUserById(Long id) {SystemUser systemUser = systemUserMapper.selectById(id);SystemPost systemPost = systemPostMapper.selectById(systemUser.getPostId());SystemUserItemVo systemUserItemVo = new SystemUserItemVo();BeanUtils.copyProperties(systemPost, systemUserItemVo);systemUserItemVo.setPostName(systemUserItemVo.getPostName());return systemUserItemVo; }知识点
system_user表中的password字段不应查询,需要在SystemUser的password字段的@TableField注解中增加select=false参数。
-
3. 保存或更新后台用户信息
-
编写Controller层逻辑
在
SystemUserController中增加如下内容@Operation(summary = "保存或更新后台用户信息") @PostMapping("saveOrUpdate") public Result saveOrUpdate(@RequestBody SystemUser systemUser) {if(systemUser.getPassword() != null){systemUser.setPassword(DigestUtils.md5Hex(systemUser.getPassword()));}service.saveOrUpdate(systemUser);return Result.ok(); }知识点:
-
密码处理
用户的密码通常不会直接以明文的形式保存到数据库中,而是会先经过处理,然后将处理之后得到的"密文"保存到数据库,这样能够降低数据库泄漏导致的用户账号安全问题。
密码通常会使用一些单向函数进行处理,如下图所示

常用于处理密码的单向函数(算法)有MD5、SHA-256等,Apache Commons提供了一个工具类
DigestUtils,其中就包含上述算法的实现。Apache Commons是Apache软件基金会下的一个项目,其致力于提供可重用的开源软件,其中包含了很多易于使用的现成工具。
使用该工具类需引入
commons-codec依赖,在common模块的pom.xml中增加如下内容<dependency><groupId>commons-codec</groupId><artifactId>commons-codec</artifactId> </dependency> -
Mybatis-Plus update strategy
使用Mybatis-Plus提供的更新方法时,若实体中的字段为
null,默认情况下,最终生成的update语句中,不会包含该字段。若想改变默认行为,可做以下配置。-
全局配置
在
application.yml中配置如下参数mybatis-plus:global-config:db-config:update-strategy: <strategy>注:上述
<strategy>可选值有:ignore、not_null、not_empty、never,默认值为not_null-
ignore:忽略空值判断,不管字段是否为空,都会进行更新 -
not_null:进行非空判断,字段非空才会进行判断 -
not_empty:进行非空判断,并进行非空串(“”)判断,主要针对字符串类型 -
never:从不进行更新,不管该字段为何值,都不更新
-
-
局部配置
在实体类中的具体字段通过
@TableField注解进行配置,如下:@Schema(description = "密码") @TableField(value = "password", updateStrategy = FieldStrategy.NOT_EMPTY) private String password;
-
-
4. 判断后台用户名是否可用
在SystemUserController中增加如下内容
@Operation(summary = "判断后台用户名是否可用")
@GetMapping("isUserNameAvailable")
public Result<Boolean> isUsernameExists(@RequestParam String username) {LambdaQueryWrapper<SystemUser> queryWrapper = new LambdaQueryWrapper<>();queryWrapper.eq(SystemUser::getUsername, username);long count = service.count(queryWrapper);return Result.ok(count == 0);
}
5. 根据ID删除后台用户信息
在SystemUserController中增加如下内容
@DeleteMapping("deleteById")
@Operation(summary = "根据ID删除后台用户信息")
public Result removeById(@RequestParam Long id) {service.removeById(id);return Result.ok();
}
6. 根据ID修改后台用户状态
在SystemUserController中增加如下内容
@Operation(summary = "根据ID修改后台用户状态")
@PostMapping("updateStatusByUserId")
public Result updateStatusByUserId(@RequestParam Long id, @RequestParam BaseStatus status) {LambdaUpdateWrapper<SystemUser> updateWrapper = new LambdaUpdateWrapper<>();updateWrapper.eq(SystemUser::getId, id);updateWrapper.set(SystemUser::getStatus, status);service.update(updateWrapper);return Result.ok();
}
7.2.6 登录管理
7.2.6.1 背景知识
1. 认证方案概述
有两种常见的认证方案,分别是基于Session的认证和基于Token的认证,下面逐一进行介绍
-
基于Session
基于Session的认证流程如下图所示
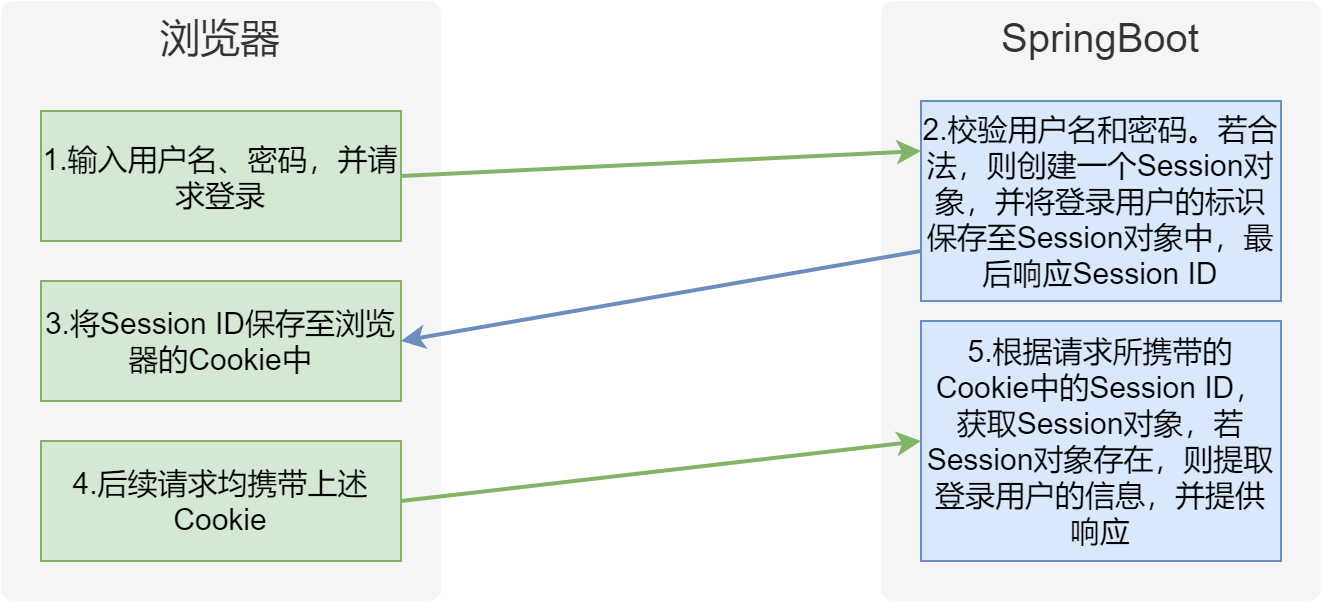
该方案的特点
- 登录用户信息保存在服务端内存中,若访问量增加,单台节点压力会较大
- 随用户规模增大,若后台升级为集群,则需要解决集群中各服务器登录状态共享的问题。
-
基于Token
基于Token的认证流程如下图所示
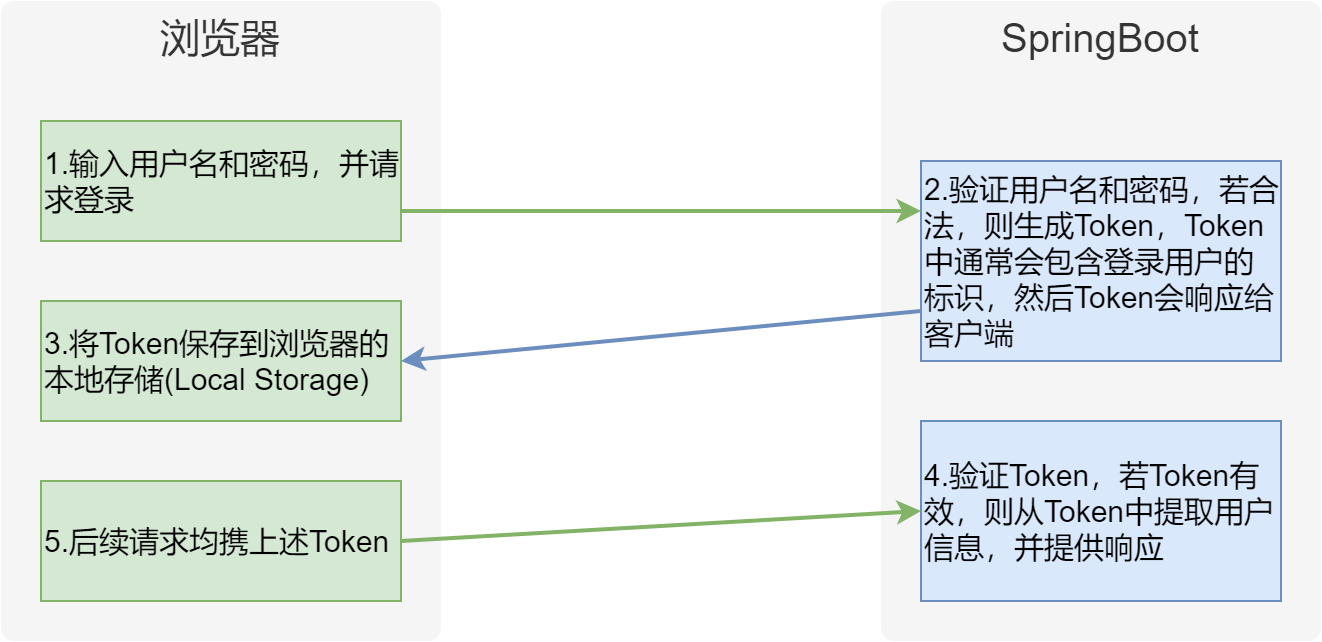
该方案的特点
- 登录状态保存在客户端,服务器没有存储开销
- 客户端发起的每个请求自身均携带登录状态,所以即使后台为集群,也不会面临登录状态共享的问题。
2. Token详解
本项目采用基于Token的登录方案,下面详细介绍Token这一概念。
我们所说的Token,通常指JWT(JSON Web TOKEN)。JWT是一种轻量级的安全传输方式,用于在两个实体之间传递信息,通常用于身份验证和信息传递。
JWT是一个字符串,如下图所示,该字符串由三部分组成,三部分由.分隔。三个部分分别被称为
header(头部)payload(负载)signature(签名)
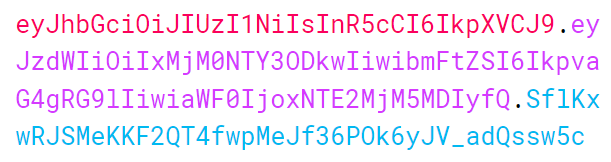
各部分的作用如下
-
Header(头部)
Header部分是由一个JSON对象经过
base64url编码得到的,这个JSON对象用于保存JWT 的类型(typ)、签名算法(alg)等元信息,例如{"alg": "HS256","typ": "JWT" } -
Payload(负载)
也称为 Claims(声明),也是由一个JSON对象经过
base64url编码得到的,用于保存要传递的具体信息。JWT规范定义了7个官方字段,如下:- iss (issuer):签发人
- exp (expiration time):过期时间
- sub (subject):主题
- aud (audience):受众
- nbf (Not Before):生效时间
- iat (Issued At):签发时间
- jti (JWT ID):编号
除此之外,我们还可以自定义任何字段,例如
{"sub": "1234567890","name": "John Doe","iat": 1516239022 } -
Signature(签名)
由头部、负载和秘钥一起经过(header中指定的签名算法)计算得到的一个字符串,用于防止消息被篡改。
7.2.6.2 登录流程
后台管理系统的登录流程如下图所示
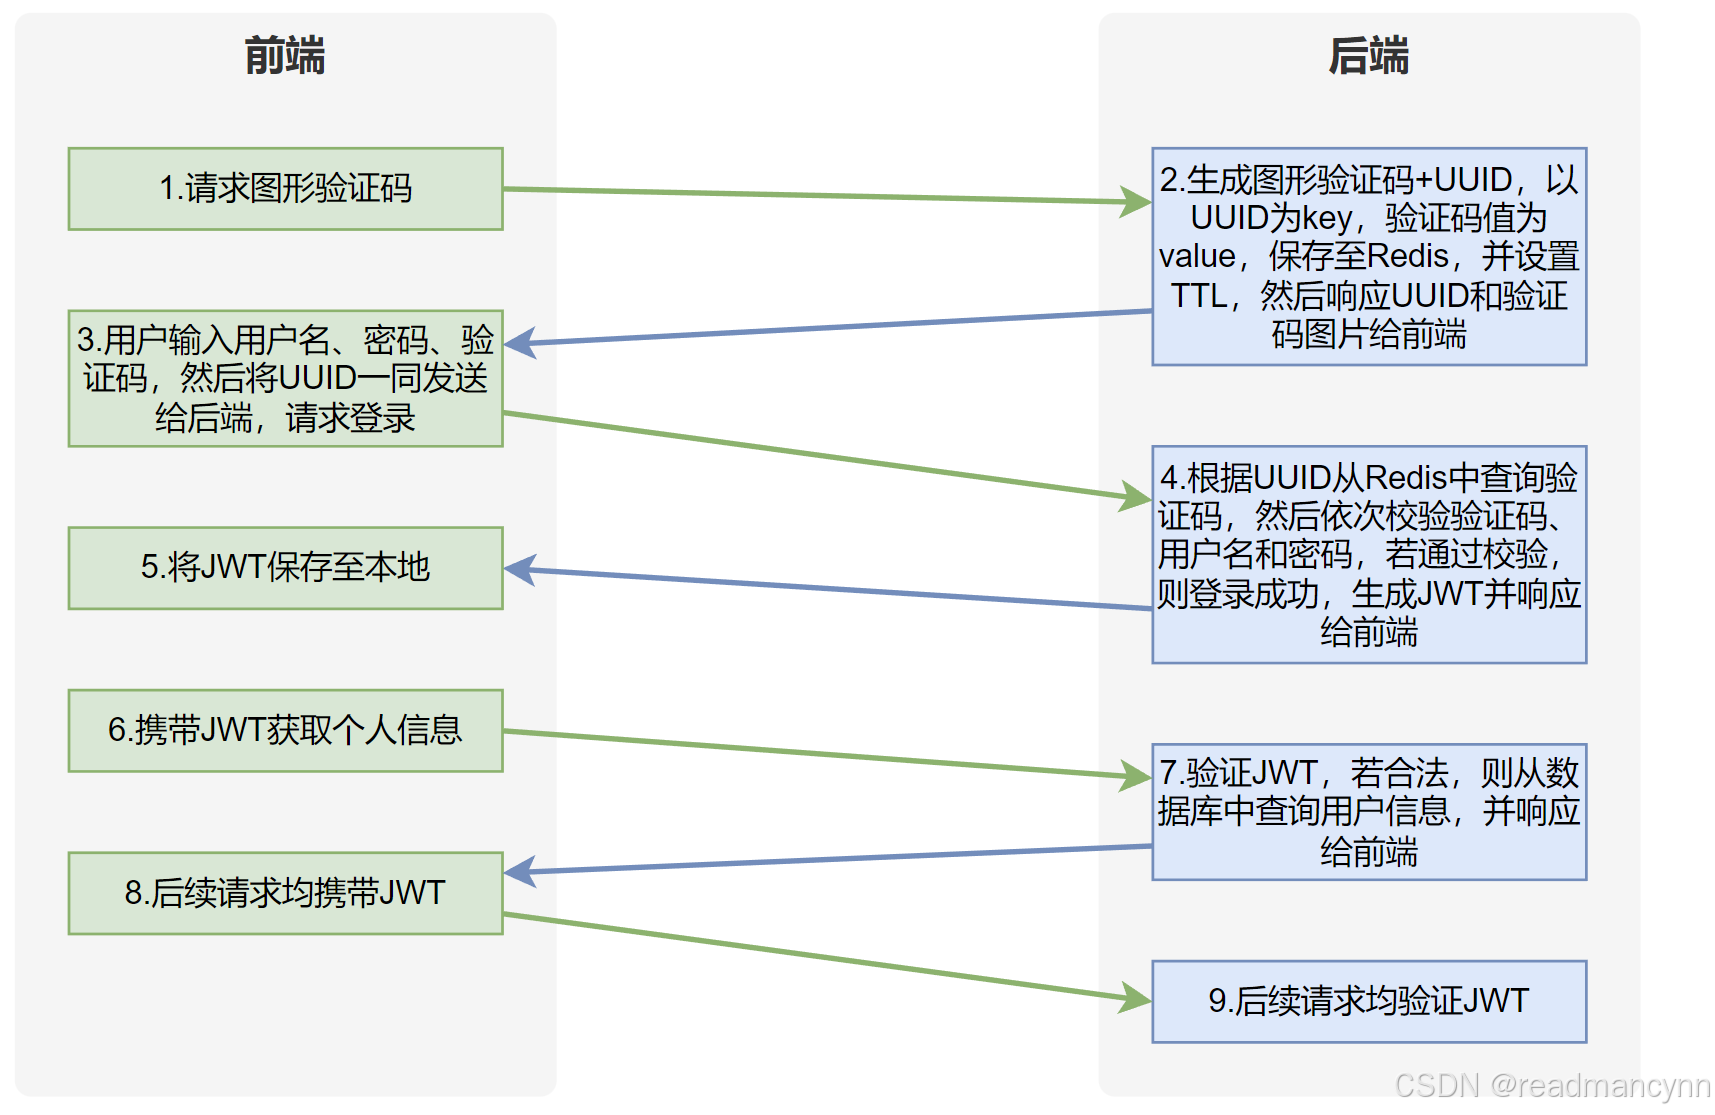
根据上述登录流程,可分析出,登录管理共需三个接口,分别是获取图形验证码、登录、获取登录用户个人信息,除此之外,我们还需为所有受保护的接口增加验证JWT合法性的逻辑,这一功能可通过HandlerInterceptor来实现。
7.2.6.3 接口开发
首先在LoginController中注入LoginService,如下
@Tag(name = "后台管理系统登录管理")
@RestController
@RequestMapping("/admin")
public class LoginController {@Autowiredprivate LoginService service;
}
1. 获取图形验证码
-
查看响应的数据结构
查看web-admin模块下的
com.atguigu.lease.web.admin.vo.login.CaptchaVo,内容如下@Data @Schema(description = "图像验证码") @AllArgsConstructor public class CaptchaVo {@Schema(description="验证码图片信息")private String image;@Schema(description="验证码key")private String key; } -
配置所需依赖
-
验证码生成工具
本项目使用开源的验证码生成工具EasyCaptcha,其支持多种类型的验证码,例如gif、中文、算术等,并且简单易用,具体内容可参考其官方文档。
在common模块的pom.xml文件中增加如下内容
<dependency><groupId>com.github.whvcse</groupId><artifactId>easy-captcha</artifactId> </dependency> -
Redis
在common模块的pom.xml中增加如下内容
<dependency><groupId>org.springframework.boot</groupId><artifactId>spring-boot-starter-data-redis</artifactId>
</dependency>
在
application.yml中增加如下配置spring:data:redis:host: <hostname>port: <port>database: 0注意:上述
hostname和port需根据实际情况进行修改
-
-
编写Controller层逻辑
在
LoginController中增加如下内容@Operation(summary = "获取图形验证码") @GetMapping("login/captcha") public Result<CaptchaVo> getCaptcha() {CaptchaVo captcha = service.getCaptcha();return Result.ok(captcha); } -
编写Service层逻辑
-
在
LoginService中增加如下内容CaptchaVo getCaptcha(); -
在
LoginServiceImpl中增加如下内容@Autowired private StringRedisTemplate redisTemplate;@Override public CaptchaVo getCaptcha() {SpecCaptcha specCaptcha = new SpecCaptcha(130, 48, 4);specCaptcha.setCharType(Captcha.TYPE_DEFAULT);String code = specCaptcha.text().toLowerCase();String key = RedisConstant.ADMIN_LOGIN_PREFIX + UUID.randomUUID();String image = specCaptcha.toBase64();redisTemplate.opsForValue().set(key, code, RedisConstant.ADMIN_LOGIN_CAPTCHA_TTL_SEC, TimeUnit.SECONDS);return new CaptchaVo(image, key); }知识点:
-
本项目Reids中的key需遵循以下命名规范:项目名:功能模块名:其他,例如
admin:login:123456 -
spring-boot-starter-data-redis已经完成了StringRedisTemplate的自动配置,我们直接注入即可。 -
为方便管理,可以将Reids相关的一些值定义为常量,例如key的前缀、TTL时长,内容如下。大家可将这些常量统一定义在common模块下的
com.atguigu.lease.common.constant.RedisConstant类中public class RedisConstant {public static final String ADMIN_LOGIN_PREFIX = "admin:login:";public static final Integer ADMIN_LOGIN_CAPTCHA_TTL_SEC = 60;public static final String APP_LOGIN_PREFIX = "app:login:";public static final Integer APP_LOGIN_CODE_RESEND_TIME_SEC = 60;public static final Integer APP_LOGIN_CODE_TTL_SEC = 60 * 10;public static final String APP_ROOM_PREFIX = "app:room:"; }
-
-
2. 登录接口
-
登录校验逻辑
用户登录的校验逻辑分为三个主要步骤,分别是校验验证码,校验用户状态和校验密码,具体逻辑如下
- 前端发送
username、password、captchaKey、captchaCode请求登录。 - 判断
captchaCode是否为空,若为空,则直接响应验证码为空;若不为空进行下一步判断。 - 根据
captchaKey从Redis中查询之前保存的code,若查询出来的code为空,则直接响应验证码已过期;若不为空进行下一步判断。 - 比较
captchaCode和code,若不相同,则直接响应验证码不正确;若相同则进行下一步判断。 - 根据
username查询数据库,若查询结果为空,则直接响应账号不存在;若不为空则进行下一步判断。 - 查看用户状态,判断是否被禁用,若禁用,则直接响应
账号被禁;若未被禁用,则进行下一步判断。 - 比对
password和数据库中查询的密码,若不一致,则直接响应账号或密码错误,若一致则进行入最后一步。 - 创建JWT,并响应给浏览器。
- 前端发送
-
接口逻辑实现
-
查看请求数据结构
查看web-admin模块下的
com.atguigu.lease.web.admin.vo.login.LoginVo,具体内容如下@Data @Schema(description = "后台管理系统登录信息") public class LoginVo {@Schema(description="用户名")private String username;@Schema(description="密码")private String password;@Schema(description="验证码key")private String captchaKey;@Schema(description="验证码code")private String captchaCode; } -
配置所需依赖
登录接口需要为登录成功的用户创建并返回JWT,本项目使用开源的JWT工具Java-JWT,配置如下,具体内容可参考官方文档。
-
引入Maven依赖
在common模块的pom.xml文件中增加如下内容
<dependency><groupId>io.jsonwebtoken</groupId><artifactId>jjwt-api</artifactId> </dependency><dependency><groupId>io.jsonwebtoken</groupId><artifactId>jjwt-impl</artifactId><scope>runtime</scope> </dependency><dependency><groupId>io.jsonwebtoken</groupId><artifactId>jjwt-jackson</artifactId><scope>runtime</scope> </dependency> -
创建JWT工具类
在common模块下创建
com.atguigu.lease.common.utils.JwtUtil工具类,内容如下public class JwtUtil {private static long tokenExpiration = 60 * 60 * 1000L;private static SecretKey tokenSignKey = Keys.hmacShaKeyFor("M0PKKI6pYGVWWfDZw90a0lTpGYX1d4AQ".getBytes());public static String createToken(Long userId, String username) {String token = Jwts.builder().setSubject("USER_INFO").setExpiration(new Date(System.currentTimeMillis() + tokenExpiration)).claim("userId", userId).claim("username", username).signWith(tokenSignKey).compact();return token;} }
-
-
编写Controller层逻辑
在
LoginController中增加如下内容@Operation(summary = "登录") @PostMapping("login") public Result<String> login(@RequestBody LoginVo loginVo) {String token = service.login(loginVo);return Result.ok(token); } -
编写Service层逻辑
-
在
LoginService中增加如下内容String login(LoginVo loginVo); -
在
LoginServiceImpl中增加如下内容@Override public String login(LoginVo loginVo) {//1.判断是否输入了验证码if (!StringUtils.hasText(loginVo.getCaptchaCode())) {throw new LeaseException(ResultCodeEnum.ADMIN_CAPTCHA_CODE_NOT_FOUND);}//2.校验验证码String code = redisTemplate.opsForValue().get(loginVo.getCaptchaKey());if (code == null) {throw new LeaseException(ResultCodeEnum.ADMIN_CAPTCHA_CODE_EXPIRED);}if (!code.equals(loginVo.getCaptchaCode().toLowerCase())) {throw new LeaseException(ResultCodeEnum.ADMIN_CAPTCHA_CODE_ERROR);}//3.校验用户是否存在SystemUser systemUser = systemUserMapper.selectOneByUsername(loginVo.getUsername());if (systemUser == null) {throw new LeaseException(ResultCodeEnum.ADMIN_ACCOUNT_NOT_EXIST_ERROR);}//4.校验用户是否被禁if (systemUser.getStatus() == BaseStatus.DISABLE) {throw new LeaseException(ResultCodeEnum.ADMIN_ACCOUNT_DISABLED_ERROR);}//5.校验用户密码if (!systemUser.getPassword().equals(DigestUtils.md5Hex(loginVo.getPassword()))) {throw new LeaseException(ResultCodeEnum.ADMIN_ACCOUNT_ERROR);}//6.创建并返回TOKENreturn JwtUtil.createToken(systemUser.getId(), systemUser.getUsername()); }
-
-
编写Mapper层逻辑
-
在
LoginMapper中增加如下内容SystemUser selectOneByUsername(String username); -
在
LoginMapper.xml中增加如下内容<select id="selectOneByUsername" resultType="com.atguigu.lease.model.entity.SystemUser">select id,username,password,name,type,phone,avatar_url,additional_info,post_id,statusfrom system_userwhere is_deleted = 0and username = #{username} </select>
-
-
编写HandlerInterceptor
我们需要为所有受保护的接口增加校验JWT合法性的逻辑。具体实现如下
-
在
JwtUtil中增加parseToken方法,内容如下public static Claims parseToken(String token){if (token==null){throw new LeaseException(ResultCodeEnum.ADMIN_LOGIN_AUTH);}try{JwtParser jwtParser = Jwts.parserBuilder().setSigningKey(secretKey).build();return jwtParser.parseClaimsJws(token).getBody();}catch (ExpiredJwtException e){throw new LeaseException(ResultCodeEnum.TOKEN_EXPIRED);}catch (JwtException e){throw new LeaseException(ResultCodeEnum.TOKEN_INVALID);} } -
编写HandlerInterceptor
在web-admin模块中创建
com.atguigu.lease.web.admin.custom.interceptor.AuthenticationInterceptor类,内容如下,有关HanderInterceptor的相关内容,可参考官方文档。@Component public class AuthenticationInterceptor implements HandlerInterceptor {@Overridepublic boolean preHandle(HttpServletRequest request, HttpServletResponse response, Object handler) throws Exception {String token = request.getHeader("access-token");JwtUtil.parseToken(token);return true;} }注意:
我们约定,前端登录后,后续请求都将JWT,放置于HTTP请求的Header中,其Header的key为
access-token。 -
注册HandlerInterceptor
在web-admin模块的
com.atguigu.lease.web.admin.custom.config.WebMvcConfiguration中增加如下内容@Autowired private AuthenticationInterceptor authenticationInterceptor;@Override public void addInterceptors(InterceptorRegistry registry) {registry.addInterceptor(this.authenticationInterceptor).addPathPatterns("/admin/**").excludePathPatterns("/admin/login/**"); }
-
-
Knife4j配置
在增加上述拦截器后,为方便继续调试其他接口,可以获取一个长期有效的Token,将其配置到Knife4j的全局参数中,如下图所示。
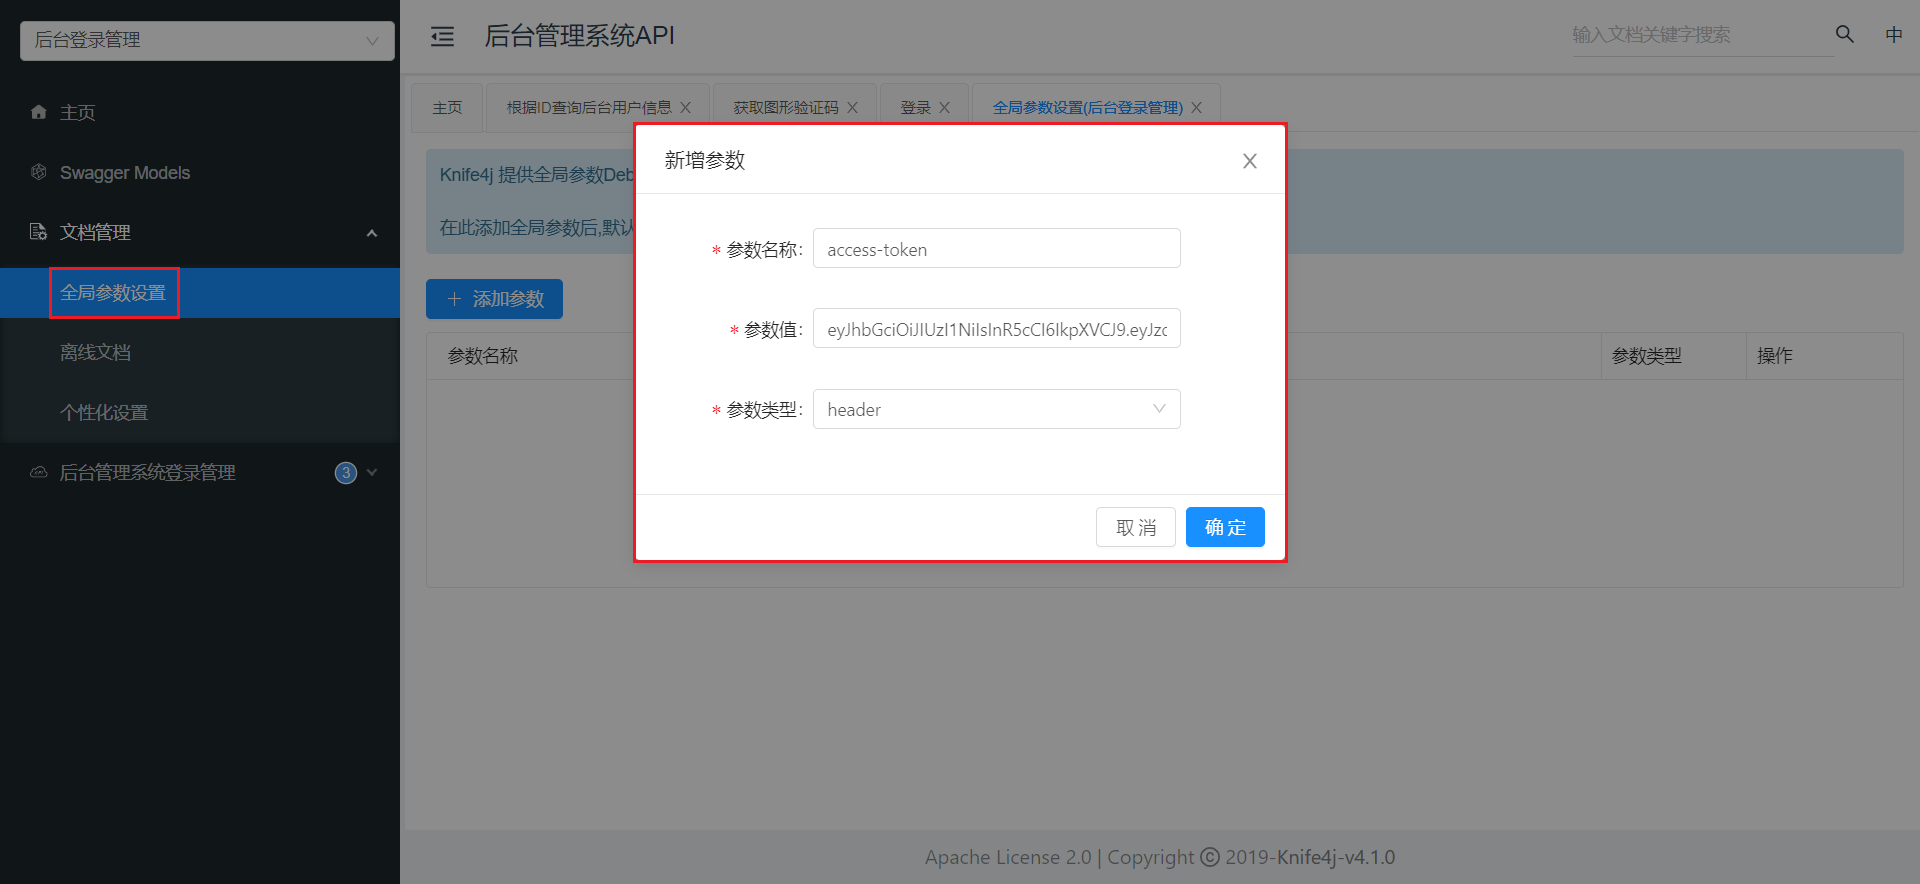
**注意:**每个接口分组需要单独配置
刷新页面,任选一个接口进行调试,会发现发送请求时会自动携带该header,如下图所示
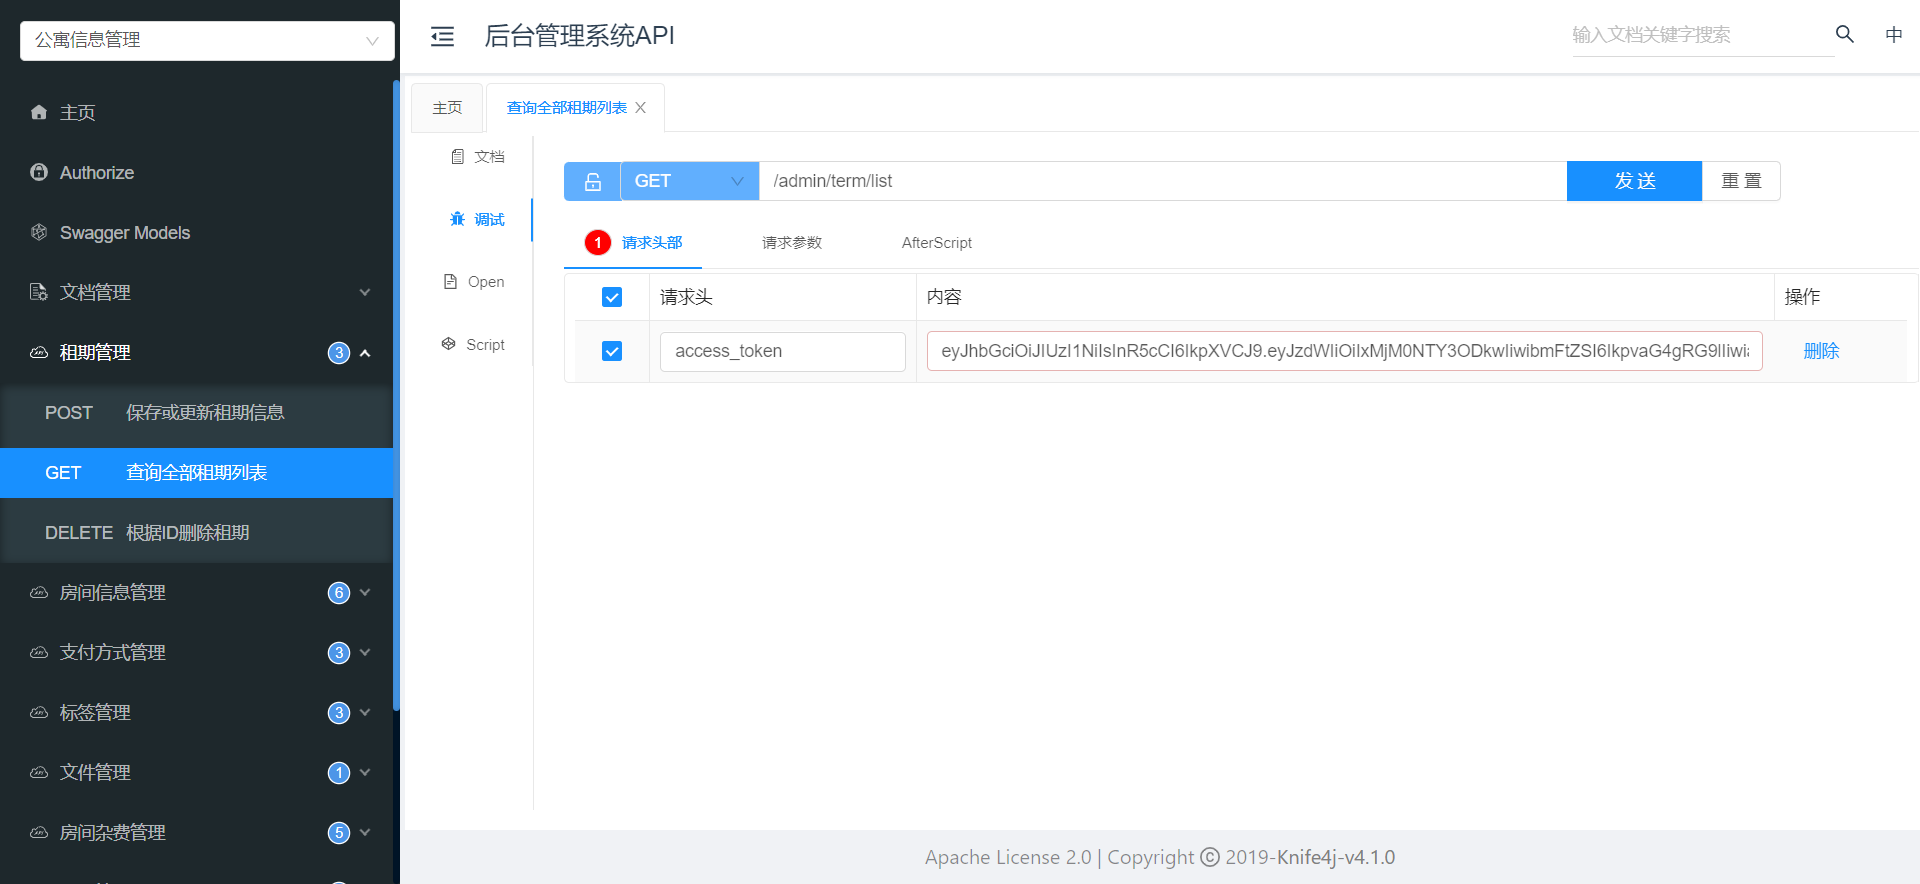
-
3. 获取登录用户个人信息
-
查看请求和响应的数据结构
-
响应的数据结构
查看web-admin模块下的
com.atguigu.lease.web.admin.vo.system.user.SystemUserInfoVo,内容如下@Schema(description = "员工基本信息") @Data public class SystemUserInfoVo {@Schema(description = "用户姓名")private String name;@Schema(description = "用户头像")private String avatarUrl; } -
请求的数据结构
按理说,前端若想获取当前登录用户的个人信息,需要传递当前用户的
id到后端进行查询。但是由于请求中携带的JWT中就包含了当前登录用户的id,故请求个人信息时,就无需再传递id。
-
-
修改
JwtUtil中的parseToken方法由于需要从Jwt中获取用户
id,因此需要为parseToken方法增加返回值,如下public static Claims parseToken(String token){if (token==null){throw new LeaseException(ResultCodeEnum.ADMIN_LOGIN_AUTH);}try{JwtParser jwtParser = Jwts.parserBuilder().setSigningKey(secretKey).build();return jwtParser.parseClaimsJws(token).getBody();}catch (ExpiredJwtException e){throw new LeaseException(ResultCodeEnum.TOKEN_EXPIRED);}catch (JwtException e){throw new LeaseException(ResultCodeEnum.TOKEN_INVALID);} } -
编写ThreadLocal工具类
理论上我们可以在Controller方法中,使用
@RequestHeader获取JWT,然后在进行解析,如下@Operation(summary = "获取登陆用户个人信息") @GetMapping("info") public Result<SystemUserInfoVo> info(@RequestHeader("access-token") String token) {Claims claims = JwtUtil.parseToken(token);Long userId = claims.get("userId", Long.class);SystemUserInfoVo userInfo = service.getLoginUserInfo(userId);return Result.ok(userInfo); }上述代码的逻辑没有任何问题,但是这样做,JWT会被重复解析两次(一次在拦截器中,一次在该方法中)。为避免重复解析,通常会在拦截器将Token解析完毕后,将结果保存至ThreadLocal中,这样一来,我们便可以在整个请求的处理流程中进行访问了。
ThreadLocal概述
ThreadLocal的主要作用是为每个使用它的线程提供一个独立的变量副本,使每个线程都可以操作自己的变量,而不会互相干扰,其用法如下图所示。
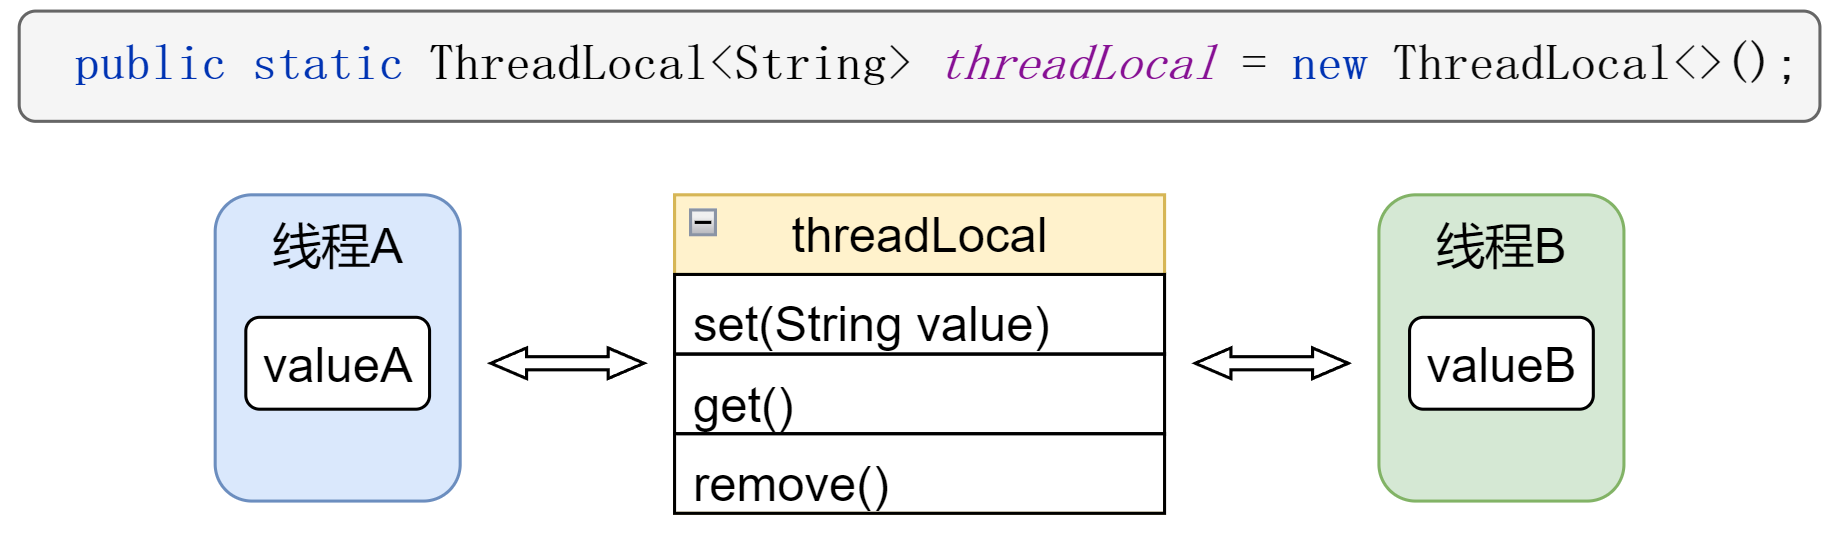
在common模块中创建
com.atguigu.lease.common.login.LoginUserHolder工具类public class LoginUserHolder {public static ThreadLocal<LoginUser> threadLocal = new ThreadLocal<>();public static void setLoginUser(LoginUser loginUser) {threadLocal.set(loginUser);}public static LoginUser getLoginUser() {return threadLocal.get();}public static void clear() {threadLocal.remove();} }同时在common模块中创建
com.atguigu.lease.common.login.LoginUser类@Data @AllArgsConstructor public class LoginUser {private Long userId;private String username; } -
修改
AuthenticationInterceptor拦截器@Component public class AuthenticationInterceptor implements HandlerInterceptor {@Overridepublic boolean preHandle(HttpServletRequest request, HttpServletResponse response, Object handler) throws Exception {String token = request.getHeader("access-token");Claims claims = JwtUtil.parseToken(token);Long userId = claims.get("userId", Long.class);String username = claims.get("username", String.class);LoginUserHolder.setLoginUser(new LoginUser(userId, username));return true;}@Overridepublic void afterCompletion(HttpServletRequest request, HttpServletResponse response, Object handler, Exception ex) throws Exception {LoginUserHolder.clear();} } -
编写Controller层逻辑
在
LoginController中增加如下内容@Operation(summary = "获取登陆用户个人信息") @GetMapping("info") public Result<SystemUserInfoVo> info() {SystemUserInfoVo userInfo = service.getLoginUserInfo(LoginUserHolder.getLoginUser().getUserId());return Result.ok(userInfo); } -
编写Service层逻辑
在
LoginService中增加如下内容@Override public SystemUserInfoVo getLoginUserInfo(Long userId) {SystemUser systemUser = systemUserMapper.selectById(userId);SystemUserInfoVo systemUserInfoVo = new SystemUserInfoVo();systemUserInfoVo.setName(systemUser.getName());systemUserInfoVo.setAvatarUrl(systemUser.getAvatarUrl());return systemUserInfoVo; }
7.3 后台管理系统前后端联调
7.3.1 启动后端项目
启动后端项目,供前端调用接口。
7.3.2 启动前端项目
7.3.2.1 安装Node和npm
-
部署Node和npm
Node和npm的部署比较简单,拿到安装包后按照安装向导操作即可。
-
配置npm国内镜像
为加速npm下载依赖,可以为npm配置国内镜像,在终端执行以下命令为npm配置阿里云镜像。
npm config set registry https://registry.npmmirror.com若想取消上述配置,可在终端执行以下命令删除镜像,删除后将恢复默认配置。
npm config delete registry
7.3.2.2 启动前端项目
-
导入前端项目
将后台管理系统的前端项目(rentHouseAdmin)导入
vscode或者WebStorm,打开终端,在项目根目录执行以下命令,安装所需依赖npm install -
配置后端接口地址
修改项目根目录下的
.env.development文件中的VITE_APP_BASE_URL变量的值为后端接口的地址,此处改为http://localhost:8080即可,如下VITE_APP_BASE_URL='http://localhost:8080'注意:
上述主机名和端口号需要根据实际情况进行修改。
-
启动前端项目
上述配置完成之后,便可执行以下命令启动前端项目了
npm run dev -
访问前端项目
在浏览器中访问前端项目,并逐个测试每个页面的相关功能。


 "正点原子imx6ull-mini-Linux驱动之Linux LCD 驱动实验(19)")