
MQ入门
同步处理业务:

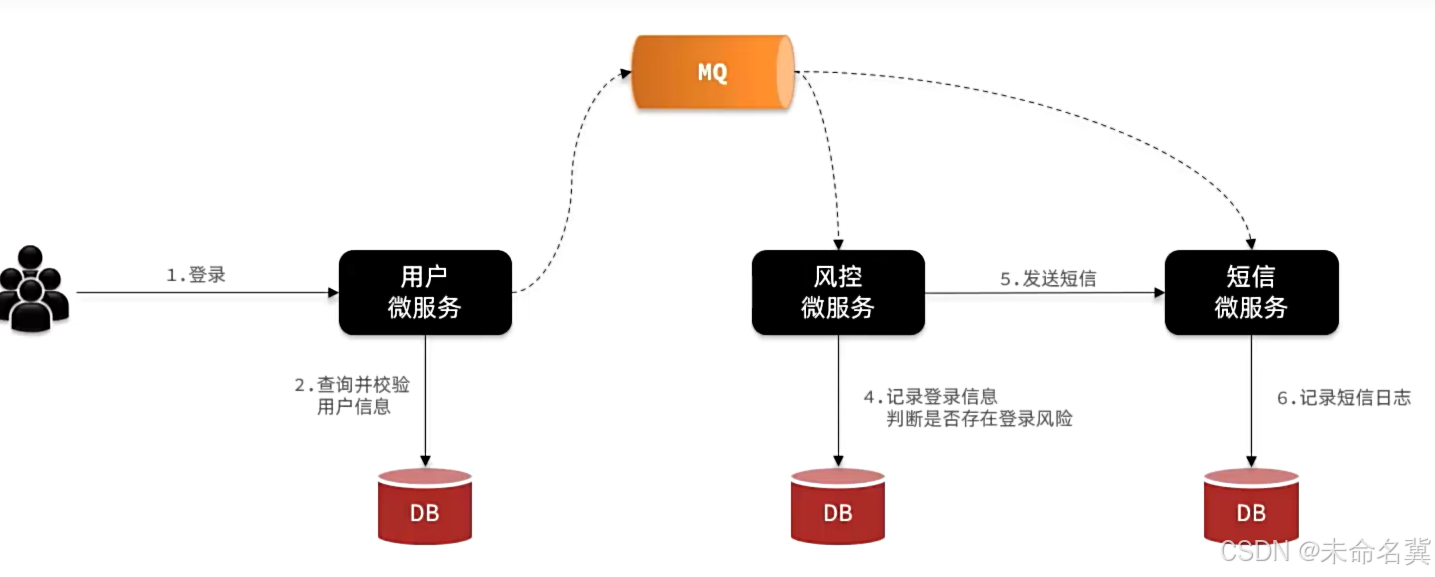
异步处理:
将任务处理后交给MQ来进行分发处理。
MQ的相关知识

同步调用

同步调用的小结

异步调用


MQ技术选型

RabbitMQ
安装部署

其中包含几个概念:
-
publisher:生产者,也就是发送消息的一方 -
consumer:消费者,也就是消费消息的一方 -
queue:队列,存储消息。生产者投递的消息会暂存在消息队列中,等待消费者处理 -
exchange:交换机,负责消息路由。生产者发送的消息由交换机决定投递到哪个队列。 -
virtual host:虚拟主机,起到数据隔离的作用。每个虚拟主机相互独立,有各自的exchange、queue
上述这些东西都可以在RabbitMQ的管理控制台来管理,下一节我们就一起来学习控制台的使用。
查看详情:点这里![]() https://b11et3un53m.feishu.cn/wiki/OQH4weMbcimUSLkIzD6cCpN0nvc
https://b11et3un53m.feishu.cn/wiki/OQH4weMbcimUSLkIzD6cCpN0nvc
数据隔离

创建新用户:

创建新的host:


Java客户端
快速入门


在控制台创建消息队列:

导入实例项目后,在发送者和接受者的pom文件中引入依赖:
<!--AMQP依赖,包含RabbitMQ--><dependency><groupId>org.springframework.boot</groupId><artifactId>spring-boot-starter-amqp</artifactId></dependency>修改两个模块的配置文件:
spring:rabbitmq:host: 192.168.21.101 # 你的虚拟机IPport: 5672 # 端口virtual-host: /hmall # 虚拟主机username: hmall # 用户名password: 123 # 密码在发送者的启动类创建一个测试类:
package com.itheima.publisher;import org.junit.jupiter.api.Test;
import org.springframework.amqp.rabbit.core.RabbitTemplate;
import org.springframework.beans.factory.annotation.Autowired;
import org.springframework.boot.test.context.SpringBootTest;import static org.junit.jupiter.api.Assertions.*;@SpringBootTest
class mqTest {//引入Rabbit提供的操作类@Autowiredprivate RabbitTemplate rabbitTemplate;@Testpublic void test(){//设置要发送的字符串String massage = "hello rabbitmq";//设置要发个那个消息队列String name = "simple.queue";//调用工具类进行发送rabbitTemplate.convertAndSend(name,massage);}}
在接收者创建一个接受的类:
package com.itheima.consumer.mq;import lombok.extern.slf4j.Slf4j;
import org.springframework.amqp.rabbit.annotation.RabbitListener;
import org.springframework.stereotype.Component;//将类交给bean容器来进行管理,进行监听
@Component
@Slf4j
public class leatinMq {// 利用RabbitListener来声明要监听的队列信息// 将来一旦监听的队列中有了消息,就会推送给当前服务,调用当前方法,处理消息。// 可以看到方法体中接收的就是消息体的内容@RabbitListener(queues = "simple.queue")public void Leasion(String msg){log.info("接收到消息:{}",msg);}
}
输出结果:
11-10 20:42:27:552  INFO 22620 --- [ntContainer#0-1] com.itheima.consumer.mq.leatinMq         : 接收到消息:hello rabbitmq
11-10 20:42:42:000  INFO 22620 --- [ntContainer#0-1] com.itheima.consumer.mq.leatinMq         : 接收到消息:hello rabbitmq
Work Queues


创建队列:

修改发送方的测试函数,发送50条数据:
//修改为连续发送50条数据到队列中@Testpublic void test2(){for (int i = 1; i <= 50; i++) {String massage = "hello rabbitmq_"+i;String name = "work.queue";rabbitTemplate.convertAndSend(name,massage);}}建立两个监听来进行读取:
@RabbitListener(queues = "work.queue")public void Leasion1(String msg){System.out.println("队列1接收到消息:"+msg+"_"+ LocalTime.now());}@RabbitListener(queues = "work.queue")public void Leasion2(String msg){System.err.println("队列2接收到消息:"+msg+"_"+ LocalTime.now());}代码运行结果:
队列1接收到消息:hello rabbitmq_1_21:25:12.780
队列1接收到消息:hello rabbitmq_3_21:25:12.780
队列1接收到消息:hello rabbitmq_5_21:25:12.781
队列1接收到消息:hello rabbitmq_7_21:25:12.781
队列1接收到消息:hello rabbitmq_9_21:25:12.781
队列1接收到消息:hello rabbitmq_11_21:25:12.781
队列1接收到消息:hello rabbitmq_13_21:25:12.782
队列1接收到消息:hello rabbitmq_15_21:25:12.782
队列1接收到消息:hello rabbitmq_17_21:25:12.783
队列1接收到消息:hello rabbitmq_19_21:25:12.783
队列1接收到消息:hello rabbitmq_21_21:25:12.783
队列1接收到消息:hello rabbitmq_23_21:25:12.783
队列1接收到消息:hello rabbitmq_25_21:25:12.783
队列1接收到消息:hello rabbitmq_27_21:25:12.783
队列1接收到消息:hello rabbitmq_29_21:25:12.784
队列1接收到消息:hello rabbitmq_31_21:25:12.784
队列1接收到消息:hello rabbitmq_33_21:25:12.785
队列1接收到消息:hello rabbitmq_35_21:25:12.785
队列1接收到消息:hello rabbitmq_37_21:25:12.787
队列1接收到消息:hello rabbitmq_39_21:25:12.787
队列1接收到消息:hello rabbitmq_41_21:25:12.788
队列1接收到消息:hello rabbitmq_43_21:25:12.788
队列1接收到消息:hello rabbitmq_45_21:25:12.789
队列1接收到消息:hello rabbitmq_47_21:25:12.789
队列1接收到消息:hello rabbitmq_49_21:25:12.789
队列2接收到消息:hello rabbitmq_2_21:25:12.780
队列2接收到消息:hello rabbitmq_4_21:25:12.780
队列2接收到消息:hello rabbitmq_6_21:25:12.780
队列2接收到消息:hello rabbitmq_8_21:25:12.781
队列2接收到消息:hello rabbitmq_10_21:25:12.781
队列2接收到消息:hello rabbitmq_12_21:25:12.781
队列2接收到消息:hello rabbitmq_14_21:25:12.781
队列2接收到消息:hello rabbitmq_16_21:25:12.781
队列2接收到消息:hello rabbitmq_18_21:25:12.782
队列2接收到消息:hello rabbitmq_20_21:25:12.783
队列2接收到消息:hello rabbitmq_22_21:25:12.783
队列2接收到消息:hello rabbitmq_24_21:25:12.783
队列2接收到消息:hello rabbitmq_26_21:25:12.783
队列2接收到消息:hello rabbitmq_28_21:25:12.783
队列2接收到消息:hello rabbitmq_30_21:25:12.784
队列2接收到消息:hello rabbitmq_32_21:25:12.784
队列2接收到消息:hello rabbitmq_34_21:25:12.785
队列2接收到消息:hello rabbitmq_36_21:25:12.785
队列2接收到消息:hello rabbitmq_38_21:25:12.785
队列2接收到消息:hello rabbitmq_40_21:25:12.785
队列2接收到消息:hello rabbitmq_42_21:25:12.785
队列2接收到消息:hello rabbitmq_44_21:25:12.788
队列2接收到消息:hello rabbitmq_46_21:25:12.790
队列2接收到消息:hello rabbitmq_48_21:25:12.790
队列2接收到消息:hello rabbitmq_50_21:25:12.790
可以看出这两个监听者是轮流进行监听的。并且不考虑是否有运行速度的区别。
这个是将1监听设置线程休眠25毫秒即每秒中可处理40个,
这个是将1监听设置线程休眠200毫秒即每秒中可处理5个,的运行情况
队列1接收到消息:hello rabbitmq_1_21:31:42.712
队列1接收到消息:hello rabbitmq_3_21:31:42.737
队列1接收到消息:hello rabbitmq_5_21:31:42.762
队列1接收到消息:hello rabbitmq_7_21:31:42.787
队列1接收到消息:hello rabbitmq_9_21:31:42.813
队列1接收到消息:hello rabbitmq_11_21:31:42.838
队列1接收到消息:hello rabbitmq_13_21:31:42.864
队列2接收到消息:hello rabbitmq_2_21:31:42.885
队列1接收到消息:hello rabbitmq_15_21:31:42.890
队列1接收到消息:hello rabbitmq_17_21:31:42.915
队列1接收到消息:hello rabbitmq_19_21:31:42.941
队列1接收到消息:hello rabbitmq_21_21:31:42.967
队列1接收到消息:hello rabbitmq_23_21:31:42.993
队列1接收到消息:hello rabbitmq_25_21:31:43.019
队列1接收到消息:hello rabbitmq_27_21:31:43.045
队列1接收到消息:hello rabbitmq_29_21:31:43.070
队列2接收到消息:hello rabbitmq_4_21:31:43.086
队列1接收到消息:hello rabbitmq_31_21:31:43.097
队列1接收到消息:hello rabbitmq_33_21:31:43.122
队列1接收到消息:hello rabbitmq_35_21:31:43.148
队列1接收到消息:hello rabbitmq_37_21:31:43.173
队列1接收到消息:hello rabbitmq_39_21:31:43.198
队列1接收到消息:hello rabbitmq_41_21:31:43.223
队列1接收到消息:hello rabbitmq_43_21:31:43.249
队列1接收到消息:hello rabbitmq_45_21:31:43.274
队列2接收到消息:hello rabbitmq_6_21:31:43.286
队列1接收到消息:hello rabbitmq_47_21:31:43.300
队列1接收到消息:hello rabbitmq_49_21:31:43.326
队列2接收到消息:hello rabbitmq_8_21:31:43.487
队列2接收到消息:hello rabbitmq_10_21:31:43.687
队列2接收到消息:hello rabbitmq_12_21:31:43.887
队列2接收到消息:hello rabbitmq_14_21:31:44.089
队列2接收到消息:hello rabbitmq_16_21:31:44.289
队列2接收到消息:hello rabbitmq_18_21:31:44.490
队列2接收到消息:hello rabbitmq_20_21:31:44.691
队列2接收到消息:hello rabbitmq_22_21:31:44.891
队列2接收到消息:hello rabbitmq_24_21:31:45.092
队列2接收到消息:hello rabbitmq_26_21:31:45.293
队列2接收到消息:hello rabbitmq_28_21:31:45.495
队列2接收到消息:hello rabbitmq_30_21:31:45.695
队列2接收到消息:hello rabbitmq_32_21:31:45.896
队列2接收到消息:hello rabbitmq_34_21:31:46.098
队列2接收到消息:hello rabbitmq_36_21:31:46.299
队列2接收到消息:hello rabbitmq_38_21:31:46.499
队列2接收到消息:hello rabbitmq_40_21:31:46.699
队列2接收到消息:hello rabbitmq_42_21:31:46.900
队列2接收到消息:hello rabbitmq_44_21:31:47.101
队列2接收到消息:hello rabbitmq_46_21:31:47.303
队列2接收到消息:hello rabbitmq_48_21:31:47.504
队列2接收到消息:hello rabbitmq_50_21:31:47.704
下面将设置条件,能者多劳。

修改后的情况:
队列1接收到消息:hello rabbitmq_1_21:34:50.426
队列1接收到消息:hello rabbitmq_3_21:34:50.454
队列1接收到消息:hello rabbitmq_4_21:34:50.482
队列1接收到消息:hello rabbitmq_5_21:34:50.508
队列1接收到消息:hello rabbitmq_6_21:34:50.534
队列1接收到消息:hello rabbitmq_7_21:34:50.565
队列1接收到消息:hello rabbitmq_8_21:34:50.592
队列2接收到消息:hello rabbitmq_2_21:34:50.599
队列1接收到消息:hello rabbitmq_9_21:34:50.618
队列1接收到消息:hello rabbitmq_11_21:34:50.645
队列1接收到消息:hello rabbitmq_12_21:34:50.672
队列1接收到消息:hello rabbitmq_13_21:34:50.698
队列1接收到消息:hello rabbitmq_14_21:34:50.726
队列1接收到消息:hello rabbitmq_15_21:34:50.752
队列1接收到消息:hello rabbitmq_16_21:34:50.780
队列2接收到消息:hello rabbitmq_10_21:34:50.800
队列1接收到消息:hello rabbitmq_17_21:34:50.807
队列1接收到消息:hello rabbitmq_19_21:34:50.835
队列1接收到消息:hello rabbitmq_20_21:34:50.863
队列1接收到消息:hello rabbitmq_21_21:34:50.890
队列1接收到消息:hello rabbitmq_22_21:34:50.918
队列1接收到消息:hello rabbitmq_23_21:34:50.944
队列1接收到消息:hello rabbitmq_24_21:34:50.972
队列1接收到消息:hello rabbitmq_25_21:34:50.999
队列2接收到消息:hello rabbitmq_18_21:34:51.003
队列1接收到消息:hello rabbitmq_26_21:34:51.028
队列1接收到消息:hello rabbitmq_28_21:34:51.055
队列1接收到消息:hello rabbitmq_29_21:34:51.081
队列1接收到消息:hello rabbitmq_30_21:34:51.108
队列1接收到消息:hello rabbitmq_31_21:34:51.135
队列1接收到消息:hello rabbitmq_32_21:34:51.162
队列1接收到消息:hello rabbitmq_33_21:34:51.188
队列2接收到消息:hello rabbitmq_27_21:34:51.205
队列1接收到消息:hello rabbitmq_34_21:34:51.215
队列1接收到消息:hello rabbitmq_36_21:34:51.242
队列1接收到消息:hello rabbitmq_37_21:34:51.269
队列1接收到消息:hello rabbitmq_38_21:34:51.295
队列1接收到消息:hello rabbitmq_39_21:34:51.322
队列1接收到消息:hello rabbitmq_40_21:34:51.349
队列1接收到消息:hello rabbitmq_41_21:34:51.376
队列1接收到消息:hello rabbitmq_42_21:34:51.403
队列2接收到消息:hello rabbitmq_35_21:34:51.406
队列1接收到消息:hello rabbitmq_43_21:34:51.430
队列1接收到消息:hello rabbitmq_45_21:34:51.456
队列1接收到消息:hello rabbitmq_46_21:34:51.483
队列1接收到消息:hello rabbitmq_47_21:34:51.509
队列1接收到消息:hello rabbitmq_48_21:34:51.536
队列1接收到消息:hello rabbitmq_49_21:34:51.562
队列1接收到消息:hello rabbitmq_50_21:34:51.589
队列2接收到消息:hello rabbitmq_44_21:34:51.608
Fanout交换机

案例:

声明两个消息队列:

创建一个fanout模式的交换机:

将交换机和消息队列关联:

修改消费者的方法:
@RabbitListener(queues = "fanout.queue1")public void Fanoutlisten1(String msg) throws InterruptedException {System.err.println("消费者1接收到队列fanout.queue1的消息:"+msg+"_"+ LocalTime.now());}@RabbitListener(queues = "fanout.queue2")public void Fanoutlisten2(String msg) throws InterruptedException {System.err.println("消费者2接收到队列fanout.queue2的消息:"+msg+"_"+ LocalTime.now());}修改发送者的代码,使其发送到 hm.fanout 交换机:
@Testpublic void testFanout(){String massage = "hello rabbitmq";//修改交换机的名字为hm.fanoutString name = "hm.fanout";//由于是广播,所以发送到交换机,不需要指定路由键,将消息队列名称设置为nullrabbitTemplate.convertAndSend(name,null,massage);}结果:
消费者2接收到队列fanout.queue2的消息:hello rabbitmq_22:15:58.655
消费者1接收到队列fanout.queue1的消息:hello rabbitmq_22:15:58.655
交换机小结:

Direct队列
 案例
案例

创建队列:

创建交换机:

将交换机和队列联系起来:

修改接收者(消费者):
@RabbitListener(queues = "direct.queue1")public void Directlisten1(String msg) throws InterruptedException {System.err.println("消费者1接收到队列direct.queue1的消息:"+msg+"_"+ LocalTime.now());}@RabbitListener(queues = "direct.queue2")public void Directlisten2(String msg) throws InterruptedException {System.err.println("消费者2接收到队列direct.queue2的消息:"+msg+"_"+ LocalTime.now());}发送者:
@Testpublic void testDirect1(){String massage = "红色:震惊男生宿舍后面发现女尸";//修改交换机的名字为hm.fanoutString name = "hm.direct";//修改路由键为redrabbitTemplate.convertAndSend(name,"red",massage);}@Testpublic void testDirect2(){String massage = "蓝色:该女尸竟是硅胶制品";//修改交换机的名字为hm.fanoutString name = "hm.direct";//修改路由键为bluerabbitTemplate.convertAndSend(name,"blue",massage);}结果:
消费者1接收到队列direct.queue1的消息:红色:震惊男生宿舍后面发现女尸_22:40:27.927
消费者2接收到队列direct.queue2的消息:红色:震惊男生宿舍后面发现女尸_22:40:27.927
消费者1接收到队列direct.queue1的消息:蓝色:该女尸竟是硅胶制品_22:40:37.891
Topic交换机

案例

创建两个消息队列:

创建topic交换机:

关联交换机和消息队列:

修改发送者:
@Testpublic void testTopic1(){String massage = "今天天气不错啊";//修改交换机的名字为hm.topicString name = "hm.topic";//修改路由键为redrabbitTemplate.convertAndSend(name,"china.news",massage);}@Testpublic void testTopic2(){String massage = "这是一个大新闻啊";//修改交换机的名字为hm.topicString name = "hm.topic";//修改路由键为bluerabbitTemplate.convertAndSend(name,"china.goods",massage);}修改接收值:
@RabbitListener(queues = "topic.queue1")public void Topiclisten1(String msg) throws InterruptedException {System.err.println("消费者1接收到队列topic.queue1的消息:"+msg+"_"+ LocalTime.now());}@RabbitListener(queues = "topic.queue2")public void Topiclisten2(String msg) throws InterruptedException {System.err.println("消费者2接收到队列topic.queue2的消息:"+msg+"_"+ LocalTime.now());}运行结果:
消费者2接收到队列topic.queue2的消息:今天天气不错啊_09:08:04.351
消费者1接收到队列topic.queue1的消息:今天天气不错啊_09:08:04.351
消费者1接收到队列topic.queue1的消息:这是一个大新闻啊_09:08:12.309
Topic小结

声明队列交换机


注意: 由于消息发送端通常只负责消息的发送,所以在通常情况下都是将消息队列和交换机的创建放在消息的接受端。
在接受端创建fanout交换机和队列:
1、删除已有的fanout交换机和队列。
2、编写代码:
在消息接受者编写代码,创建一个配置类:

package com.itheima.consumer.config;import org.springframework.amqp.core.*;
import org.springframework.context.annotation.Bean;
import org.springframework.context.annotation.Configuration;@Configuration
public class FanoutConfigrasion {//交给Bean注解来进行处理//创建交换机@Beanpublic FanoutExchange fanoutExchange(){//参数:交换机名称,是否持久化,是否自动删除,持久化默认为开启(持久化就是是否保存到磁盘)
//        return new FanoutExchange("hm.fanout");//使用build来创建交换机,durable(true)即是否持久化return ExchangeBuilder.fanoutExchange("hm.fanout").durable(true).build();}//创建消息队列@Beanpublic Queue fanoutQueue1(){
//        return new Queue("fanout.queue1");//使用build来创建消息队列return QueueBuilder.durable("fanout.queue1").build();}@Beanpublic Queue fanoutQueue2(){
//        return new Queue("fanout.queue1");//使用build来创建消息队列return QueueBuilder.durable("fanout.queue2").build();}// 绑定队列和交换机@Beanpublic Binding bindingfanoutQueue1(Queue fanoutQueue1, FanoutExchange fanoutExchange){return BindingBuilder.bind(fanoutQueue1).to(fanoutExchange);}@Beanpublic Binding bindingfanoutQueue2(Queue fanoutQueue2, FanoutExchange fanoutExchange){return BindingBuilder.bind(fanoutQueue2).to(fanoutExchange);}}
运行该模块就可以创建交换机和消息队列:

由于基于Bean注解的方式,需要每个key都要写一遍比较麻烦。
还提供基于@RabbitListener的声明方式。

使用配置类注解的方式:
package com.itheima.consumer.config;import org.springframework.amqp.core.*;
import org.springframework.context.annotation.Bean;
import org.springframework.context.annotation.Configuration;@Configuration
public class dircetConfigrasion {//交给Bean注解来进行处理//创建交换机@Beanpublic DirectExchange directExchange(){//参数:交换机名称,是否持久化,是否自动删除,持久化默认为开启(持久化就是是否保存到磁盘)
//        return new FanoutExchange("hm.fanout");//使用build来创建交换机,durable(true)即是否持久化return ExchangeBuilder.directExchange("hm.direct").durable(true).build();}//创建消息队列@Beanpublic Queue DirectQueue1(){
//        return new Queue("fanout.queue1");//使用build来创建消息队列return QueueBuilder.durable("direct.queue1").build();}@Beanpublic Queue DirectQueue2(){
//        return new Queue("fanout.queue1");//使用build来创建消息队列return QueueBuilder.durable("direct.queue2").build();}// 绑定队列和交换机@Beanpublic Binding bindingfanoutQueue1red(Queue directQueue1, DirectExchange directExchange){return BindingBuilder.bind(directQueue1).to(directExchange).with("red");}@Beanpublic Binding bindingfanoutQueue1blue(Queue directQueue1, DirectExchange directExchange){return BindingBuilder.bind(directQueue1).to(directExchange).with("blue");}@Beanpublic Binding bindingfanoutQueue2red(Queue directQueue2, DirectExchange directExchange){return BindingBuilder.bind(directQueue2).to(directExchange).with("red");}@Beanpublic Binding bindingfanoutQueue2yellow(Queue directQueue2, DirectExchange directExchange){return BindingBuilder.bind(directQueue2).to(directExchange).with("yellow");}}
使用注解来创建:
1、注释掉Config注解使上面的配置类失效
2、代码:
@RabbitListener(bindings = @QueueBinding(value = @Queue(name = "direct.queue1"),exchange = @Exchange(name = "hm.direct",type = ExchangeTypes.DIRECT),key = {"red","blue"}))public void Directlisten1redblue(String msg) throws InterruptedException {System.err.println("消费者1接收到队列direct.queue1的消息:"+msg+"_"+ LocalTime.now());}@RabbitListener(bindings = @QueueBinding(value = @Queue(name = "direct.queue2"),exchange = @Exchange(name = "hm.direct",type = ExchangeTypes.DIRECT),key = {"red","yellow"}))public void Directlisten2redyellow(String msg) throws InterruptedException {System.err.println("消费者2接收到队列direct.queue2的消息:"+msg+"_"+ LocalTime.now());}3、结果,运行项目创建成功。

消息转换器
案例:

@Testpublic void testObgect(){//准备Map数据Map map = new HashMap();map.put("name","jack");map.put("age",21);rabbitTemplate.convertAndSend("obgect.queue",map);}


使用JSON序列化器:
引入依赖:
<dependency><groupId>com.fasterxml.jackson.dataformat</groupId><artifactId>jackson-dataformat-xml</artifactId><version>2.9.10</version>
</dependency>
在两个模块都添加配置项:
@Bean
public MessageConverter messageConverter(){// 1.定义消息转换器Jackson2JsonMessageConverter jackson2JsonMessageConverter = new Jackson2JsonMessageConverter();// 2.配置自动创建消息id,用于识别不同消息,也可以在业务中基于ID判断是否是重复消息jackson2JsonMessageConverter.setCreateMessageIds(true);return jackson2JsonMessageConverter;
}
发送者的配置项添加到启动类中:
package com.itheima.publisher;import org.springframework.amqp.support.converter.Jackson2JsonMessageConverter;
import org.springframework.amqp.support.converter.MessageConverter;
import org.springframework.boot.SpringApplication;
import org.springframework.boot.autoconfigure.SpringBootApplication;
import org.springframework.context.annotation.Bean;@SpringBootApplication
public class PublisherApplication {public static void main(String[] args) {SpringApplication.run(PublisherApplication.class);}@Beanpublic MessageConverter messageConverter(){// 1.定义消息转换器Jackson2JsonMessageConverter jackson2JsonMessageConverter = new Jackson2JsonMessageConverter();// 2.配置自动创建消息id,用于识别不同消息,也可以在业务中基于ID判断是否是重复消息jackson2JsonMessageConverter.setCreateMessageIds(true);return jackson2JsonMessageConverter;}
}
接受者代码:
配置类:
package com.itheima.consumer.config;import org.springframework.amqp.support.converter.Jackson2JsonMessageConverter;
import org.springframework.amqp.support.converter.MessageConverter;
import org.springframework.context.annotation.Bean;
import org.springframework.context.annotation.Configuration;@Configuration
public class JackionConfig {@Beanpublic MessageConverter messageConverter(){// 1.定义消息转换器Jackson2JsonMessageConverter jackson2JsonMessageConverter = new Jackson2JsonMessageConverter();// 2.配置自动创建消息id,用于识别不同消息,也可以在业务中基于ID判断是否是重复消息jackson2JsonMessageConverter.setCreateMessageIds(true);return jackson2JsonMessageConverter;}
}
接收监听:
@RabbitListener(queues = "obgect.queue")public void Obgectlisten(Map msg) throws InterruptedException {System.err.println("消费者1接收到队列fanout.queue1的消息:"+msg);}结果:
消费者1接收到队列fanout.queue1的消息:{name=jack, age=21}业务改造:
给两个模块都引入依赖引入依赖:
        <!--消息发送--><dependency><groupId>org.springframework.boot</groupId><artifactId>spring-boot-starter-amqp</artifactId></dependency>
<!--        序列化器--><dependency><groupId>com.fasterxml.jackson.dataformat</groupId><artifactId>jackson-dataformat-xml</artifactId><version>2.9.10</version></dependency>
两个模块都设置配置文件
spring:rabbitmq:host: 192.168.21.101 # 你的虚拟机IPport: 5672 # 端口virtual-host: /hmall # 虚拟主机username: hmall # 用户名password: 123 # 密码为两个模块设置序列化器:
package com.hmall.trade.config;import org.springframework.amqp.support.converter.Jackson2JsonMessageConverter;
import org.springframework.amqp.support.converter.MessageConverter;
import org.springframework.context.annotation.Bean;
import org.springframework.context.annotation.Configuration;@Configuration
public class JackionConfigration {@Beanpublic MessageConverter messageConverter(){// 1.定义消息转换器Jackson2JsonMessageConverter jackson2JsonMessageConverter = new Jackson2JsonMessageConverter();// 2.配置自动创建消息id,用于识别不同消息,也可以在业务中基于ID判断是否是重复消息jackson2JsonMessageConverter.setCreateMessageIds(true);return jackson2JsonMessageConverter;}
}
在接受端设置接受代码:

package com.hmall.trade.listener;import com.hmall.trade.service.IOrderService;
import lombok.RequiredArgsConstructor;
import org.springframework.amqp.rabbit.annotation.Exchange;
import org.springframework.amqp.rabbit.annotation.Queue;
import org.springframework.amqp.rabbit.annotation.QueueBinding;
import org.springframework.amqp.rabbit.annotation.RabbitListener;
import org.springframework.context.annotation.Bean;
import org.springframework.stereotype.Component;@Component
@RequiredArgsConstructor
public class Orderlisten {private final IOrderService orderService;@RabbitListener(bindings = @QueueBinding(value = @Queue(name = "trade.pay.success.queue", durable = "true"),exchange = @Exchange(name = "pay.topic"),key = "pay.success"))public void listenPaySuccess(Long orderId){orderService.markOrderPaySuccess(orderId);}
}
改造发送端的代码:
//TODO 5.修改订单状态try {rabbitTemplate.convertAndSend("pay.direct", "pay.success", po.getBizOrderNo());} catch (Exception e) {log.error("支付成功的消息发送失败,支付单id:{}, 交易单id:{}", po.getId(), po.getBizOrderNo(), e);}package com.hmall.pay.service.impl;import com.baomidou.mybatisplus.core.toolkit.IdWorker;
import com.baomidou.mybatisplus.core.toolkit.StringUtils;
import com.baomidou.mybatisplus.extension.service.impl.ServiceImpl;import com.hmall.api.client.UserClient;
import com.hmall.api.client.tradeClient;
import com.hmall.common.exception.BizIllegalException;
import com.hmall.common.utils.BeanUtils;
import com.hmall.common.utils.UserContext;
import com.hmall.pay.domain.dto.PayApplyDTO;
import com.hmall.pay.domain.dto.PayOrderFormDTO;
import com.hmall.pay.domain.po.PayOrder;
import com.hmall.pay.enums.PayStatus;
import com.hmall.pay.mapper.PayOrderMapper;
import com.hmall.pay.service.IPayOrderService;
import lombok.RequiredArgsConstructor;
import lombok.extern.slf4j.Slf4j;
import org.springframework.amqp.rabbit.core.RabbitTemplate;
import org.springframework.stereotype.Service;
import org.springframework.transaction.annotation.Transactional;import java.time.LocalDateTime;/*** <p>* 支付订单 服务实现类* </p>**/
@Service
@Slf4j
@RequiredArgsConstructor
public class PayOrderServiceImpl extends ServiceImpl<PayOrderMapper, PayOrder> implements IPayOrderService {private final UserClient userClient;private final RabbitTemplate rabbitTemplate;// private final tradeClient tradeClient;@Overridepublic String applyPayOrder(PayApplyDTO applyDTO) {// 1.幂等性校验PayOrder payOrder = checkIdempotent(applyDTO);// 2.返回结果return payOrder.getId().toString();}@Override@Transactionalpublic void tryPayOrderByBalance(PayOrderFormDTO payOrderDTO) {// 1.查询支付单PayOrder po = getById(payOrderDTO.getId());// 2.判断状态if(!PayStatus.WAIT_BUYER_PAY.equalsValue(po.getStatus())){// 订单不是未支付,状态异常throw new BizIllegalException("交易已支付或关闭!");}// 3.尝试扣减余额userClient.deductMoney(payOrderDTO.getPw(), po.getAmount());// 4.修改支付单状态boolean success = markPayOrderSuccess(payOrderDTO.getId(), LocalDateTime.now());if (!success) {throw new BizIllegalException("交易已支付或关闭!");}//TODO 5.修改订单状态try {rabbitTemplate.convertAndSend("pay.direct", "pay.success", po.getBizOrderNo());} catch (Exception e) {log.error("支付成功的消息发送失败,支付单id:{}, 交易单id:{}", po.getId(), po.getBizOrderNo(), e);}
// tradeClient.markOrderPaySuccess(po.getBizOrderNo());}public boolean markPayOrderSuccess(Long id, LocalDateTime successTime) {return lambdaUpdate().set(PayOrder::getStatus, PayStatus.TRADE_SUCCESS.getValue()).set(PayOrder::getPaySuccessTime, successTime).eq(PayOrder::getId, id)// 支付状态的乐观锁判断.in(PayOrder::getStatus, PayStatus.NOT_COMMIT.getValue(), PayStatus.WAIT_BUYER_PAY.getValue()).update();}private PayOrder checkIdempotent(PayApplyDTO applyDTO) {// 1.首先查询支付单PayOrder oldOrder = queryByBizOrderNo(applyDTO.getBizOrderNo());// 2.判断是否存在if (oldOrder == null) {// 不存在支付单,说明是第一次,写入新的支付单并返回PayOrder payOrder = buildPayOrder(applyDTO);payOrder.setPayOrderNo(IdWorker.getId());save(payOrder);return payOrder;}// 3.旧单已经存在,判断是否支付成功if (PayStatus.TRADE_SUCCESS.equalsValue(oldOrder.getStatus())) {// 已经支付成功,抛出异常throw new BizIllegalException("订单已经支付!");}// 4.旧单已经存在,判断是否已经关闭if (PayStatus.TRADE_CLOSED.equalsValue(oldOrder.getStatus())) {// 已经关闭,抛出异常throw new BizIllegalException("订单已关闭");}// 5.旧单已经存在,判断支付渠道是否一致if (!StringUtils.equals(oldOrder.getPayChannelCode(), applyDTO.getPayChannelCode())) {// 支付渠道不一致,需要重置数据,然后重新申请支付单PayOrder payOrder = buildPayOrder(applyDTO);payOrder.setId(oldOrder.getId());payOrder.setQrCodeUrl("");updateById(payOrder);payOrder.setPayOrderNo(oldOrder.getPayOrderNo());return payOrder;}// 6.旧单已经存在,且可能是未支付或未提交,且支付渠道一致,直接返回旧数据return oldOrder;}private PayOrder buildPayOrder(PayApplyDTO payApplyDTO) {// 1.数据转换PayOrder payOrder = BeanUtils.toBean(payApplyDTO, PayOrder.class);// 2.初始化数据payOrder.setPayOverTime(LocalDateTime.now().plusMinutes(120L));payOrder.setStatus(PayStatus.WAIT_BUYER_PAY.getValue());payOrder.setBizUserId(UserContext.getUser());return payOrder;}public PayOrder queryByBizOrderNo(Long bizOrderNo) {return lambdaQuery().eq(PayOrder::getBizOrderNo, bizOrderNo).one();}
}业务改造完毕。
作业:
作业1
将MQ配置抽取到Nacos中管理,微服务中直接使用共享配置。
1、为pay-service模块引入依赖,统一配置管理和读取配置文件的依赖
<!--统一配置管理--><dependency><groupId>com.alibaba.cloud</groupId><artifactId>spring-cloud-starter-alibaba-nacos-config</artifactId></dependency><!--读取bootstrap文件--><dependency><groupId>org.springframework.cloud</groupId><artifactId>spring-cloud-starter-bootstrap</artifactId></dependency>2、在nacos中创建一个共享配置文件
spring:rabbitmq:host: ${hm.mq.host:192.168.21.101}port: ${hm.mq.port:5672} # 端口virtual-host: ${hm.mq.virtual-host:/hmall} # 虚拟主机username: ${hm.mq.username:hmall} # 用户名password: ${hm.mq.password:123} # 密码
3、修改模块中的配置文件
server:port: 8086
feign:okhttp:enabled: true # 开启OKHttp连接池支持sentinel:enabled: true # 开启feign对sentinel的支持
hm:swagger:title: 支付服务接口文档package: com.hmall.pay.controllerdb:database: hm-pay
spring:cloud:sentinel:transport:dashboard: localhost:8090 #访问路径http-method-specify: true # 开启请求方式前缀nacos:server-addr: 192.168.21.101application:name: pay-service
4、添加引导配置文件
bootstrap.yml
spring:application:name: pay-service # 服务名称profiles:active: devcloud:nacos:server-addr: 192.168.21.101 # nacos地址config:file-extension: yaml # 文件后缀名shared-configs: # 共享配置- dataId: shared-jdbc.yaml # 共享mybatis配置- dataId: shared-log.yaml # 共享日志配置- dataId: shared-swagger.yaml # 共享日志配置- dataId: shared-seata.yaml- dataId: shared-mq.yaml作业二:改造下单功能
改造下单功能,将基于OpenFeign的清理购物车同步调用,改为基于RabbitMQ的异步通知:
-
定义topic类型交换机,命名为
trade.topic -
定义消息队列,命名为
cart.clear.queue -
将
cart.clear.queue与trade.topic绑定,BindingKey为order.create -
下单成功时不再调用清理购物车接口,而是发送一条消息到
trade.topic,发送消息的RoutingKey为order.create,消息内容是下单的具体商品、当前登录用户信息 -
购物车服务监听
cart.clear.queue队列,接收到消息后清理指定用户的购物车中的指定商品
1、在car-service模块添加依赖:
<!--消息发送--><dependency><groupId>org.springframework.boot</groupId><artifactId>spring-boot-starter-amqp</artifactId></dependency>2、修改配置文件:
spring:application:name: cart-service # 服务名称profiles:active: devcloud:nacos:server-addr: 192.168.21.101 # nacos地址config:file-extension: yaml # 文件后缀名shared-configs: # 共享配置- dataId: shared-jdbc.yaml # 共享mybatis配置- dataId: shared-log.yaml # 共享日志配置- dataId: shared-swagger.yaml # 共享日志配置- dataId: shared-seata.yaml # 共享日志配置- dataId: shared-mq.yaml # 共享日志配置3、添加配置类配置序列化器
@Configuration
public class JackionConfigration {@Beanpublic MessageConverter messageConverter(){// 1.定义消息转换器Jackson2JsonMessageConverter jackson2JsonMessageConverter = new Jackson2JsonMessageConverter();// 2.配置自动创建消息id,用于识别不同消息,也可以在业务中基于ID判断是否是重复消息jackson2JsonMessageConverter.setCreateMessageIds(true);return jackson2JsonMessageConverter;}
}
4、创建监听:
package com.hmall.cart.listener;import com.hmall.cart.service.impl.CartServiceImpl;
import lombok.RequiredArgsConstructor;
import org.springframework.amqp.rabbit.annotation.Exchange;
import org.springframework.amqp.rabbit.annotation.Queue;
import org.springframework.amqp.rabbit.annotation.QueueBinding;
import org.springframework.amqp.rabbit.annotation.RabbitListener;
import org.springframework.stereotype.Component;import java.util.Set;@Component
@RequiredArgsConstructor
public class Catlisten {private final CartServiceImpl cartService;@RabbitListener(bindings = @QueueBinding(value = @Queue(name = "cart.clear.queue", durable = "true"),exchange = @Exchange(name = "trade.topic"),key = "order.create"))public void listenPaySuccess(Set<Long> orderIds){cartService.removeByItemIds(orderIds);}
}
修改发送端:trade-service
        //TODO 3.清理购物车商品
//        cartService.removeByItemIds(itemIds);
//        cartClient.deleteCartItemByIds(itemIds);rabbitTemplate.convertAndSend("trade.topic","order.create",itemIds);
@Transactional@GlobalTransactionalpublic Long createOrder(OrderFormDTO orderFormDTO) {// 1.订单数据Order order = new Order();// 1.1.查询商品List<OrderDetailDTO> detailDTOS = orderFormDTO.getDetails();// 1.2.获取商品id和数量的MapMap<Long, Integer> itemNumMap = detailDTOS.stream().collect(Collectors.toMap(OrderDetailDTO::getItemId, OrderDetailDTO::getNum));Set<Long> itemIds = itemNumMap.keySet();// 1.3.查询商品
// List<ItemDTO> items = itemService.queryItemByIds(itemIds);List<ItemDTO> items = itemClient.queryItemByIds(itemIds);if (items == null || items.size() < itemIds.size()) {throw new BadRequestException("商品不存在");}// 1.4.基于商品价格、购买数量计算商品总价:totalFeeint total = 0;for (ItemDTO item : items) {total += item.getPrice() * itemNumMap.get(item.getId());}order.setTotalFee(total);// 1.5.其它属性order.setPaymentType(orderFormDTO.getPaymentType());order.setUserId(UserContext.getUser());order.setStatus(1);// 1.6.将Order写入数据库order表中save(order);// 2.保存订单详情List<OrderDetail> details = buildDetails(order.getId(), items, itemNumMap);detailService.saveBatch(details);//TODO 3.清理购物车商品
// cartService.removeByItemIds(itemIds);
// cartClient.deleteCartItemByIds(itemIds);rabbitTemplate.convertAndSend("trade.topic","order.create",itemIds);// 4.扣减库存try {itemClient.deductStock(detailDTOS);
// itemService.deductStock(detailDTOS);} catch (Exception e) {throw new RuntimeException("库存不足!");}return order.getId();}
修改完毕。


_百度推广优化方案_郑州官网网络营销外包)


