
在上一节 cloud compare二次插件化功能开发详细步骤(一)
我们已经完成了 具体开发前的准备工作,包括 各级CMakelists.txt 的设置,相关内容的修改,并已成功编译
如需整个插件项目,编译后的dll,或其他帮助,欢迎留言、私信或加群【群号:392784757】
这一节针对我们的qPCA插件,引入进阶内容,包括第三方库引入、设置用户输入参数界面以及具体逻辑的编写
最终整体的qPCA插件目录结构如下

第三方库引入
由于cc 处理的主要是点云、网格数据,较少涉及到大型矩阵的求解,而PCA分析需要去计算矩阵,在这里我们要引入第三方库Eigen 帮助完成
Eigen 是一个轻量级的 C++ 数学库,主要用于矩阵和线性代数运算。它的一个优势就是它是头文件库,不需要编译成库文件,引入难度也会低一点
在这里使用的是 Eigen 3.4 版本 官方网站 https://eigen.tuxfamily.org/index.php?title=Main_Page
下载解压后在 extern 目录下
具体路径 形式 extern\eigen3\Eigen\**
然后修改 当前qPCA 插件的 最高CMakeLists.txt
添加内容
include_directories("${CMAKE_CURRENT_LIST_DIR}/extern/eigen3") # 设置包含目录
我在这里设置后发现 并不能成功引入
同时还在 include 文件夹下的 CMakeLists.txt 添加
include_directories("${CMAKE_CURRENT_LIST_DIR}/../extern/eigen3")
成功引入
【最终版本 qPCA 插件的 最高CMakeLists.txt 如下】
# CloudCompare example for standard pluginsoption( PLUGIN_qPCA "Install PCA plugin" OFF )if ( PLUGIN_qPCA )project( QPCA_PLUGIN )AddPlugin( NAME ${PROJECT_NAME} )add_subdirectory( include )add_subdirectory( src )add_subdirectory( ui )include_directories("${CMAKE_CURRENT_LIST_DIR}/extern/eigen3")# set dependencies to necessary libraries# target_link_libraries( ${PROJECT_NAME} LIB1 )
endif()
【最终版本 include 文件夹下的 CMakeLists.txt 如下】
include_directories("${CMAKE_CURRENT_LIST_DIR}/../extern/eigen3")target_sources( ${PROJECT_NAME}PRIVATE#${CMAKE_CURRENT_LIST_DIR}/ActionA.h${CMAKE_CURRENT_LIST_DIR}/qPCA.h${CMAKE_CURRENT_LIST_DIR}/ccPCADlg.h
)target_include_directories( ${PROJECT_NAME}PRIVATE${CMAKE_CURRENT_SOURCE_DIR}
)
插件基于ExamplePlugin而来,其中的 ActionA.h,ActionA.cpp 并未删除 相关内容被注释,不会引入到我们的插件中
然后 cmake 重新构建项目,测试是否引入成功
在qPCA.h中添加
#include <Eigen/Core>
在qPCA.cpp 中添加 相关头文件,看能否找到
#include <Eigen/Core>
#include <Eigen/Eigenvalues>
#include <Eigen/Dense>
在 vs 中 ctrl 然后 点击引入的头文件,引入成功 可以看到 具体的头文件,否则就未引入成功
ui 用户参数设置接收框
针对qPCA 插件我设置的用户参数是主方向和哪个坐标轴对齐,界面展示如下
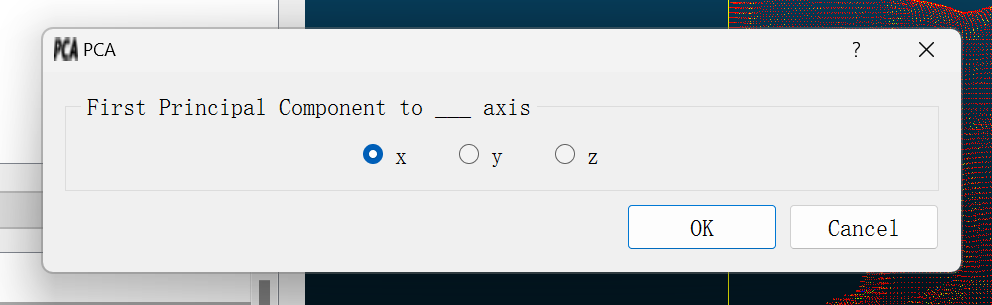
可以对齐到不同的轴上,在最开始开发时,可以不引入用户参数接收框,程序基本完成后,再引入ui,提升用户体验
按照真实的开发情况,这一小节应放在最后,但放在中间行文也可以
ui的设计
【略】
根据自己的插件设置不同的布局和对应输入组件,可基于CC已有的进行修改
结束后应由有一个ui文件,在本文是 ui/pcaDlg.ui
ui文件夹下 cmakelists.txt 最终版如下
target_sources( ${PROJECT_NAME}PRIVATE${CMAKE_CURRENT_LIST_DIR}/pcaDlg.ui
)
其实也可以由代码来写界面,不需要.ui ,也就是.ui编译后的 ui_xxx.h 头文件,这里是qt的知识了
ui 代码层面引入
新建 include/ccPCADlg.h,src/ccPCADlg.cpp
cmakelists.txt 修改
qPCA 插件的 最高CMakeLists.txt 已在上文摆出
include 文件下 cmakelists.txt 已在上文摆出
src 文件夹下 cmakelists.txt 最终版如下
target_sources( ${PROJECT_NAME}PRIVATE# ${CMAKE_CURRENT_LIST_DIR}/ActionA.cpp${CMAKE_CURRENT_LIST_DIR}/qPCA.cpp${CMAKE_CURRENT_LIST_DIR}/ccPCADlg.cpp
)
ccPCADlg.h
#ifndef CC_PCA_DLG_HEADER
#define CC_PCA_DLG_HEADER#include "ui_pcaDlg.h"class ccPCADlg : public QDialog, public Ui::PCADialog
{Q_OBJECTpublic://! Default constructorexplicit ccPCADlg(QWidget* parent = nullptr);protected://! Saves (temporarily) the dialog parameters on acceptationvoid saveSettings();};#endif
这里ccPCADlg 会继承 ui文件编译后ui_pcaDlg.h 中的 Ui::PCADialog,声明的ccPCADlg可以拿到界面上的所有组件,进而可以获取用户设置的值
ccPCADlg.cpp
#include "ccPCADlg.h"
#include <QButtonGroup>static bool axis_x_checeked  = true;
static bool axis_y_checeked = false;
static bool axis_z_checeked = false;	ccPCADlg::ccPCADlg(QWidget* parent): QDialog(parent), Ui::PCADialog()
{setupUi(this);connect(buttonBox, &QDialogButtonBox::accepted, this, &ccPCADlg::saveSettings);// 创建一个 QButtonGroup 逻辑上保证只有一个被选中QButtonGroup* buttonGroup = new QButtonGroup(this);buttonGroup->addButton(radioButton);buttonGroup->addButton(radioButton_2);buttonGroup->addButton(radioButton_3);radioButton->setChecked(true); // default x
}void ccPCADlg::saveSettings()
{axis_x_checeked = radioButton->isChecked();axis_y_checeked = radioButton_2->isChecked();axis_z_checeked = radioButton_3->isChecked();
}
主程序逻辑
qPCA.h
#pragma once#include "ccStdPluginInterface.h"
#include <Eigen/Core>class qPCA : public QObject, public ccStdPluginInterface
{Q_OBJECTQ_INTERFACES(ccPluginInterface ccStdPluginInterface)Q_PLUGIN_METADATA(IID "cccorp.cloudcompare.plugin.qPCA" FILE "../info.json")public:explicit qPCA(QObject *parent = nullptr);~qPCA() override = default;// Inherited from ccStdPluginInterfacevoid onNewSelection(const ccHObject::Container &selectedEntities) override;QList<QAction *> getActions() override;ccHObject* executePCA(ccPointCloud* ccPC,Eigen::Vector3f& eigenValuesPCA,Eigen::Matrix3f& eigenVectorsPCA,Eigen::Vector3f& pcaCentroid,bool silent);
protected:void doAction();
private:QAction *m_action;
};
其中
ccHObject* executePCA(ccPointCloud* ccPC,Eigen::Vector3f& eigenValuesPCA,Eigen::Matrix3f& eigenVectorsPCA,Eigen::Vector3f& pcaCentroid,bool silent);
是我们的核心函数
qPCA.cpp
一一实现对应的函数
声明用于插件的cc提供的程序接口,暴露出来给后面函数使用
static ccMainAppInterface* s_app = nullptr;
构造函数
qPCA::qPCA( QObject *parent ): QObject( parent ), ccStdPluginInterface( ":/CC/plugin/qPCA/info.json" ), m_action( nullptr )
{s_app = m_app; // m_app 继承自 ccStdPluginInterface 接口 也是 ccMainAppInterface*
}
onNewSelection()
void qPCA::onNewSelection( const ccHObject::Container &selectedEntities )
{if (m_action)m_action->setEnabled(selectedEntities.size() == 1 && selectedEntities[0]->isA(CC_TYPES::POINT_CLOUD));}
保证选到了一个实体,且是点云
getActions()
QList<QAction *> qPCA::getActions()
{// default action (if it has not been already created, this is the moment to do it)if ( !m_action ){// Here we use the default plugin name, description, and icon,// but each action should have its own.m_action = new QAction( getName(), this );m_action->setToolTip( getDescription() );m_action->setIcon( getIcon() );// Connect appropriate signalconnect( m_action, &QAction::triggered, this, &qPCA::doAction);}return { m_action };
}
我们只有一个 action ,保持不变;
如需添加更多子功能action啥的,需要在这里链接对应信号和槽函数
doAction()
执行核心逻辑前的检查和准备,包括 实体检查和判断,获取用户设置值,实体类型转换为点云,核心函数的准备
static bool axis_x_checked = true;
static bool axis_y_checked = false;
static bool axis_z_checked = false;
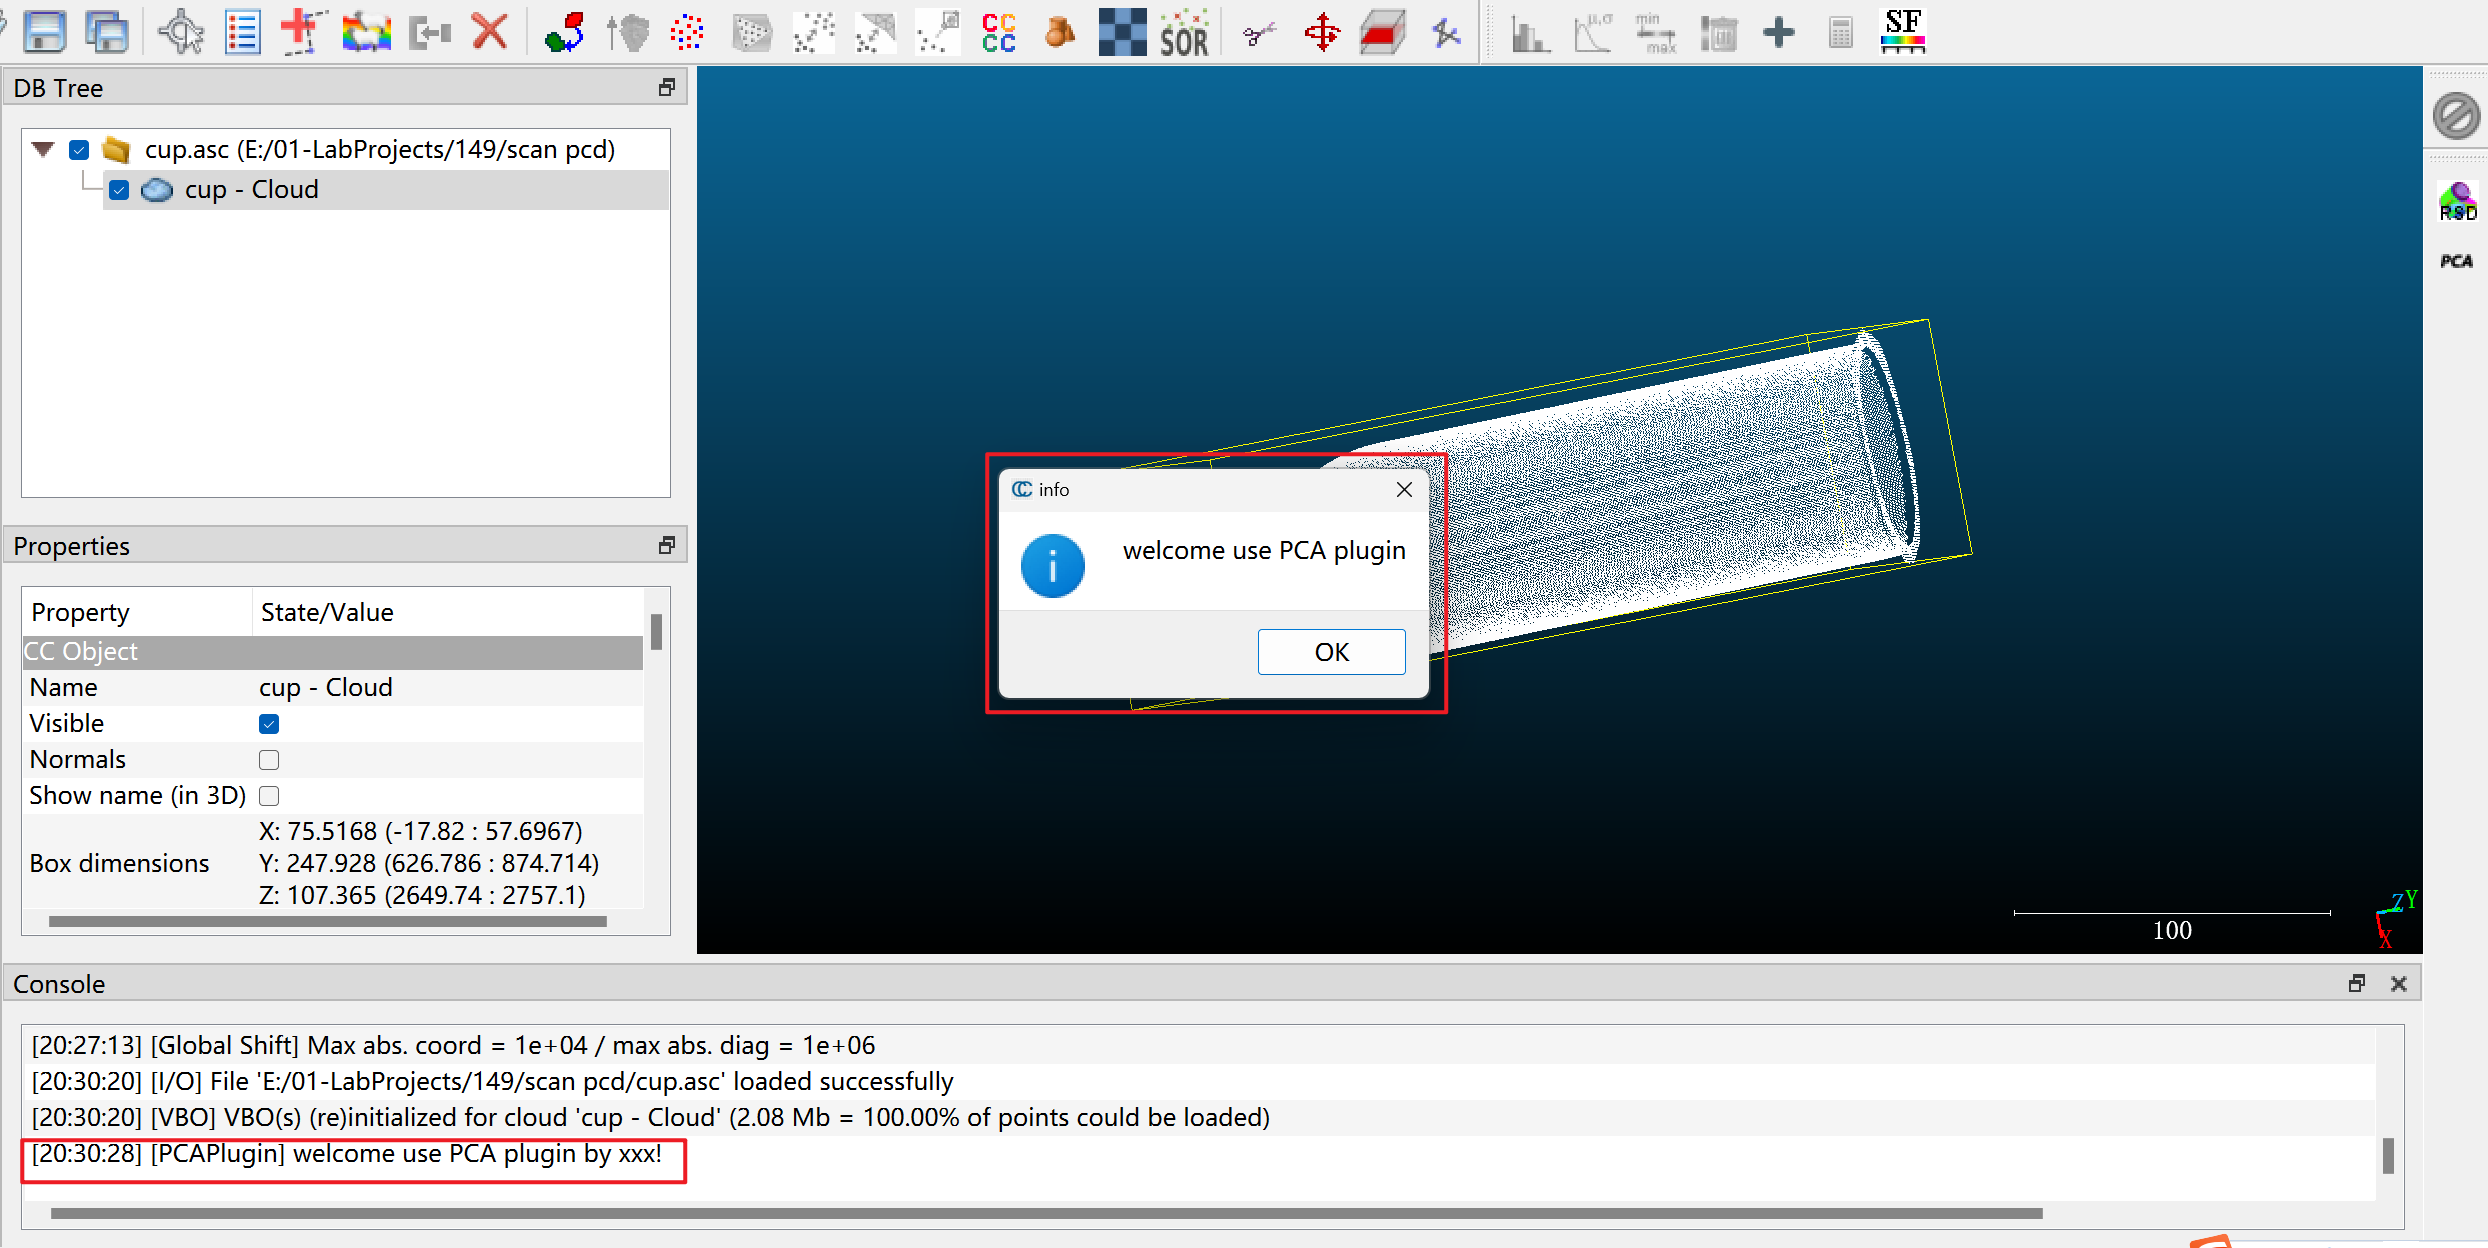
void qPCA::doAction()
{assert(m_app);if (!m_app)return;m_app->dispToConsole("[qPCA] welcome use PCA plugin by xxx!", ccMainAppInterface::STD_CONSOLE_MESSAGE);QMessageBox::information(nullptr, "info", "welcome use PCA plugin");const ccHObject::Container& selectedEntities = m_app->getSelectedEntities();size_t selNum = selectedEntities.size();if (selNum != 1){ccLog::Error("[qPCA] Select only one cloud!");return;}ccHObject* ent = selectedEntities[0];assert(ent);if (!ent || !ent->isA(CC_TYPES::POINT_CLOUD)){ccLog::Error("[qPCA] Select a real point cloud!");return;}ccPointCloud* pc = static_cast<ccPointCloud*>(ent);// input cloudCCVector3 bbMin, bbMax;pc->getBoundingBox(bbMin, bbMax);/*CCVector3 diff = bbMax - bbMin;float scale = std::max(std::max(diff[0], diff[1]), diff[2]);*/ccPCADlg pcaDlg(m_app->getMainWindow());if (!pcaDlg.exec()){return;}axis_x_checked = pcaDlg.radioButton->isChecked();axis_y_checked = pcaDlg.radioButton_2->isChecked();axis_z_checked = pcaDlg.radioButton_3->isChecked();Eigen::Vector3f eigenValuesPCA;Eigen::Matrix3f eigenVectorsPCA;Eigen::Vector3f pcaCentroid;ccHObject* group = executePCA(pc,eigenValuesPCA,eigenVectorsPCA, pcaCentroid,false);if (group){m_app->addToDB(group);m_app->refreshAll();}
}
executePCA()
主要逻辑为
计算点云中心—> 计算点云协方差矩阵 —> Eigen 求解奇异值和奇异向量 —> 构建旋转矩阵 —》 旋转变换到标准坐标系,主方向 与根据用户选择的轴 对齐,默认x轴
ccHObject* qPCA::executePCA(ccPointCloud* ccPC,Eigen::Vector3f& eigenValuesPCA,Eigen::Matrix3f& eigenVectorsPCA,Eigen::Vector3f& pcaCentroid,bool silent)
{ccHObject* group = nullptr;const CCVector3d& globalShift = ccPC->getGlobalShift();double globalScale = ccPC->getGlobalScale();auto toEigen = [](const CCVector3* vec) {return Eigen::Vector3f(vec->x, vec->y, vec->z);};pcaCentroid.setZero();for (unsigned i = 0; i < ccPC->size(); ++i){const CCVector3* point = ccPC->getPoint(i);Eigen::Vector3f eigenPoint(point->x, point->y, point->z);pcaCentroid += eigenPoint;}pcaCentroid /= static_cast<float>(ccPC->size());Eigen::Matrix3f covarianceMatrix = Eigen::Matrix3f::Zero();for (unsigned i = 0; i < ccPC->size(); ++i){Eigen::Vector3f diff = (toEigen(ccPC->getPoint(i))) - pcaCentroid;covarianceMatrix += diff * diff.transpose();}covarianceMatrix /= static_cast<float>(ccPC->size());// 进行 PCA:求解特征值和特征向量Eigen::SelfAdjointEigenSolver<Eigen::Matrix3f> solver(covarianceMatrix);eigenValuesPCA = solver.eigenvalues();   // 返回特征值eigenVectorsPCA = solver.eigenvectors(); // 返回特征向量// logEigen::IOFormat CleanFmt(4, 0, ", ", "\n", "[", "]");std::stringstream vectorStream, matrixStream;vectorStream << pcaCentroid.format(CleanFmt);m_app->dispToConsole("[qPCA] pca center", ccMainAppInterface::STD_CONSOLE_MESSAGE);m_app->dispToConsole(QString::fromStdString(vectorStream.str()), ccMainAppInterface::STD_CONSOLE_MESSAGE);vectorStream.str("");m_app->dispToConsole("[qPCA] eigen values", ccMainAppInterface::STD_CONSOLE_MESSAGE);vectorStream << eigenValuesPCA.format(CleanFmt);matrixStream << eigenVectorsPCA.format(CleanFmt);m_app->dispToConsole(QString::fromStdString(vectorStream.str()), ccMainAppInterface::STD_CONSOLE_MESSAGE);m_app->dispToConsole("[qPCA] eigen vectors sorted by eigen value in descending order", ccMainAppInterface::STD_CONSOLE_MESSAGE);m_app->dispToConsole(QString::fromStdString(matrixStream.str()), ccMainAppInterface::STD_CONSOLE_MESSAGE);//m_app->forceConsoleDisplay();// 将点云主方向转换到 x y z 轴上char axis = axis_y_checked ? 'y' : (axis_z_checked ? 'z' : 'x');m_app->dispToConsole(QString::fromStdString("[qPCA] frist component 2 axis "+std::tolower(axis)), ccMainAppInterface::STD_CONSOLE_MESSAGE);//char axis = 'x'; //通过对话框获取 默认Eigen::Matrix4f rotationMatrix = Eigen::Matrix4f::Identity();Eigen::Matrix3f tmp;switch (axis){case 'x':rotationMatrix.block<3, 3>(0, 0) = eigenVectorsPCA.transpose(); // x y zbreak;case 'y':tmp = eigenVectorsPCA;tmp.col(0).swap(tmp.col(1));rotationMatrix.block<3, 3>(0, 0) = tmp.transpose(); // y x zbreak;case 'z':tmp = eigenVectorsPCA;tmp.col(0).swap(tmp.col(2));rotationMatrix.block<3, 3>(0, 0) = tmp.transpose(); // z x ybreak;default:break;}matrixStream.str("");matrixStream << rotationMatrix.format(CleanFmt);m_app->dispToConsole(QString::fromStdString(matrixStream.str()), ccMainAppInterface::STD_CONSOLE_MESSAGE);rotationMatrix.block<3, 1>(0, 3) = -1.0f * ((axis_x_checked ? eigenVectorsPCA.transpose() : tmp.transpose()) * pcaCentroid);matrixStream.str("");matrixStream << rotationMatrix.format(CleanFmt);m_app->dispToConsole(QString::fromStdString(matrixStream.str()), ccMainAppInterface::STD_CONSOLE_MESSAGE);ccPointCloud* firstComponent = new ccPointCloud(QString("first  component - projecting to (%1) plane ").arg((axis_y_checked ? "xz" : (axis_z_checked ? "xy" : "yz"))));ccPointCloud* secondComponent = new ccPointCloud(QString("second component - projecting to (%1) plane ").arg((axis_y_checked ? "yz" : (axis_z_checked ? "zy" : "xz"))));ccPointCloud* thirdComponent = new ccPointCloud(QString("third  component - projecting to (%1) plane ").arg((axis_y_checked ? "yx" : (axis_z_checked ? "zx" : "xy")))); // 主成分ccPointCloud* stdAxisCloud = new ccPointCloud("2stdAxisCloud");if (!firstComponent->reserve(static_cast<unsigned>(ccPC->size()))){ccLog::Error("[qPCA] Not enough memory!");delete firstComponent;return nullptr;}if (!secondComponent->reserve(static_cast<unsigned>(ccPC->size()))){ccLog::Error("[qPCA] Not enough memory!");delete secondComponent;return nullptr;}if (!thirdComponent->reserve(static_cast<unsigned>(ccPC->size()))){ccLog::Error("[qPCA] Not enough memory!");delete thirdComponent;return nullptr;}if (!stdAxisCloud->reserve(static_cast<unsigned>(ccPC->size()))){ccLog::Error("[qPCA] Not enough memory!");delete stdAxisCloud;return nullptr;}// 遍历每个点并应用旋转矩阵std::stringstream pointStream;for (unsigned i = 0; i < ccPC->size(); ++i){pointStream.str("");CCVector3* point = const_cast<CCVector3*>(ccPC->getPoint(i));// 将 CCVector3 转换为 Eigen::Vector3fEigen::Vector4f eigenPoint(point->x, point->y, point->z, 1.0f);// 旋转点Eigen::Vector4f rotatedPoint = rotationMatrix * eigenPoint;// 将结果写回 CCVector3,// 还是不写回了/*point->x = rotatedPoint.x();point->y = rotatedPoint.y();point->z = rotatedPoint.z();*///pointStream << point->x << "," << point->y << "," << point->z;//m_app->dispToConsole(QString::fromStdString(pointStream.str()), ccMainAppInterface::STD_CONSOLE_MESSAGE);stdAxisCloud->addPoint({ rotatedPoint[0],rotatedPoint[1],rotatedPoint[2] });if (axis_y_checked) // align to y // y x z{firstComponent->addPoint({ rotatedPoint[0],0.0f,rotatedPoint[2] });secondComponent->addPoint({ 0.0f,rotatedPoint[1],rotatedPoint[2] });thirdComponent->addPoint({ rotatedPoint[0],rotatedPoint[1],0.0f });}else if (axis_x_checked) // align to x // x y z{firstComponent->addPoint({ 0.0f,rotatedPoint[1],rotatedPoint[2] });secondComponent->addPoint({ rotatedPoint[0],0.0f,rotatedPoint[2] });thirdComponent->addPoint({ rotatedPoint[0],rotatedPoint[1],0.0f });}else if(axis_z_checked) // align to  z // z x y{firstComponent->addPoint({ rotatedPoint[0],rotatedPoint[1],0.0f });secondComponent->addPoint({ 0.0f,rotatedPoint[1],rotatedPoint[2] });thirdComponent->addPoint({ rotatedPoint[0],0.0f,rotatedPoint[2] });}else{ccLog::Error("[qPCA] axis error");return nullptr;}}// 更新点云//ccPC->invalidateBoundingBox();//ccPC->setVisible(false);// 设置 主成分 颜色 可视化for (auto pcShape : { stdAxisCloud ,firstComponent,secondComponent,thirdComponent }){ccColor::Rgb col = ccColor::Generator::Random();pcShape->setColor(col);pcShape->showSF(false);pcShape->showColors(true);pcShape->showNormals(true);pcShape->setVisible(true);}// 计算投影 各个方向 主成分 已经变换到标准坐标系下, 直接坐标赋0//ccPointCloud firstComponent, secondComponent, thirdComponent; // 合并到上面的循环完成if (!group){group = new ccHObject(QString("PCA processed - align to %1 axis (%2)").arg((axis_y_checked?"y":(axis_z_checked?"z":"x")), ccPC->getName()));}if (group){group->addChild(stdAxisCloud);group->addChild(firstComponent);group->addChild(secondComponent);group->addChild(thirdComponent);}return group;
}
至此 所有内容都完成
cmake 重新构建、然后编译
效果展示
【csdn 图片最大只支持 5MB,压缩比较大】
感谢免费GIF压缩 - 专研免费“GIF压缩”在线工具 (gifcompress.com) 提供的免费gif压缩服务

下一篇,我们一起学习一下 cc的代码。
如需整个插件项目,编译后的dll,或其他帮助,欢迎留言、私信或加群【群号:392784757】


附代码 "cloud compare PCA插件开发详细步骤(二)附代码")


