
文章目录
- 1.创建一个maven项目,命名为xxx-spring-boot-starter
- 2.编写配置类
- 3.进行自动配置
- 4.打jar包,使用maven进行install
- 5.新建一个springboot项目,引入依赖:
1.创建一个maven项目,命名为xxx-spring-boot-starter
<parent><groupId>org.springframework.boot</groupId><artifactId>spring-boot-starter-parent</artifactId><version>2.0.4.RELEASE</version></parent>
<dependencies><dependency><groupId>org.springframework.boot</groupId><artifactId>spring-boot-starter-web</artifactId></dependency></dependencies>
2.编写配置类
@Configuration
@EnableConfigurationProperties(TestUserProperties.class)
@ConditionalOnClass({User.class})
public class TestAutoConfiguration {@Resourceprivate TestUserProperties testUserProperties;@Beanpublic User getUser(){User user = new User();user.setName(testUserProperties.getName());user.setAge(testUserProperties.getAge());user.setAddress(testUserProperties.getAddress());return user;}}
@Configuration
@ConfigurationProperties(prefix = "test.user")
public class TestUserProperties {private String name;private Integer age;private String address;// getter/setter
}
public class User {private String name;private Integer age;private String address;// getter/setter
}
3.进行自动配置
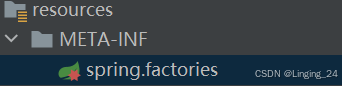
resources -> META_INF -> spring.factories # SpringBoot 2.7以前写法,2.7版本废除,3版本后终止使用
resources -> META_INF -> spring -> org.springframework.boot.autoconfigure.AutoConfiguration.imports 文件
2.7以下版本
org.springframework.boot.autoconfigure.EnableAutoConfiguration=com.linging.config.TestAutoConfiguration
3.0以上版本:

com.linging.config.TestAutoConfiguration
2.7~3.0之间,两种方式共存。
4.打jar包,使用maven进行install
5.新建一个springboot项目,引入依赖:
<dependency><groupId>com.linging</groupId><artifactId>linging-spring-boot-starter</artifactId><version>1.0-SNAPSHOT</version></dependency>
同时yaml文件进行配置:
test:user:name: 张三age: 18address: 深圳
编写controller进行注入:
@RequestMapping("/test")
@RestController
public class TestController {@Resourceprivate User user;@GetMapping("/starter")public String starter(){return JSON.toJSONString(user);}
}
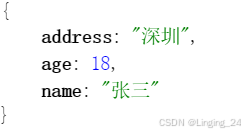
访问结果:http://localhost:8081/test/starter


 —— MySQL初始用 "【MySQL】(基础篇二) —— MySQL初始用")


